Hours of Service Learning Center
Topics:
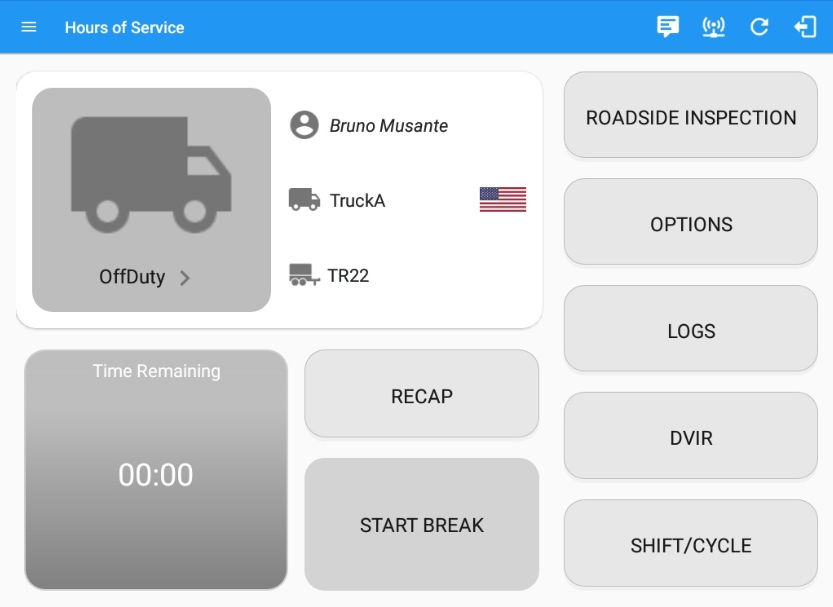
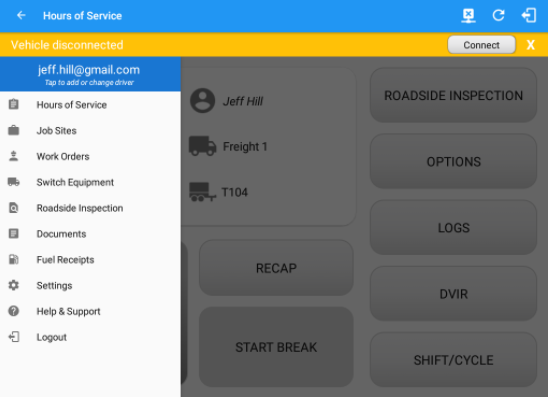
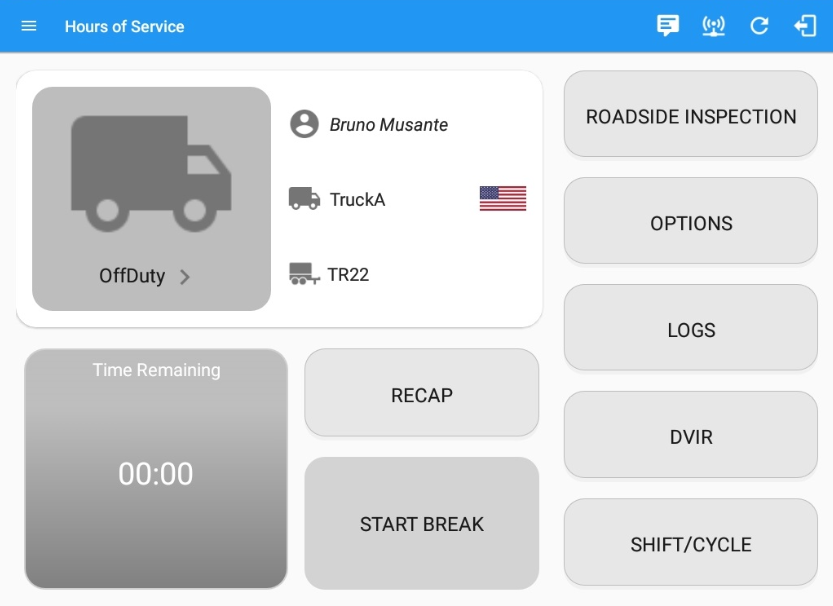
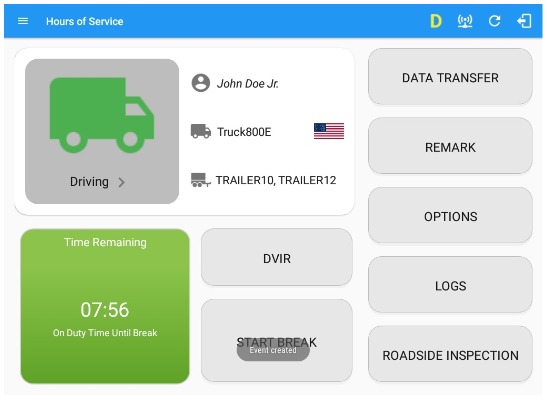
Main Dashboard
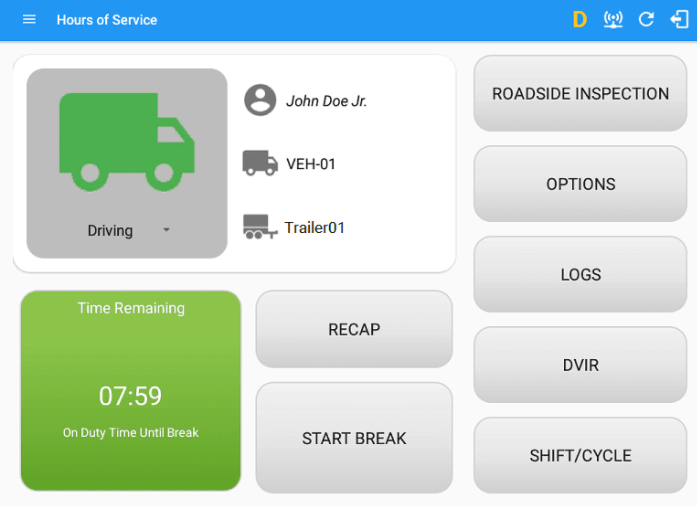
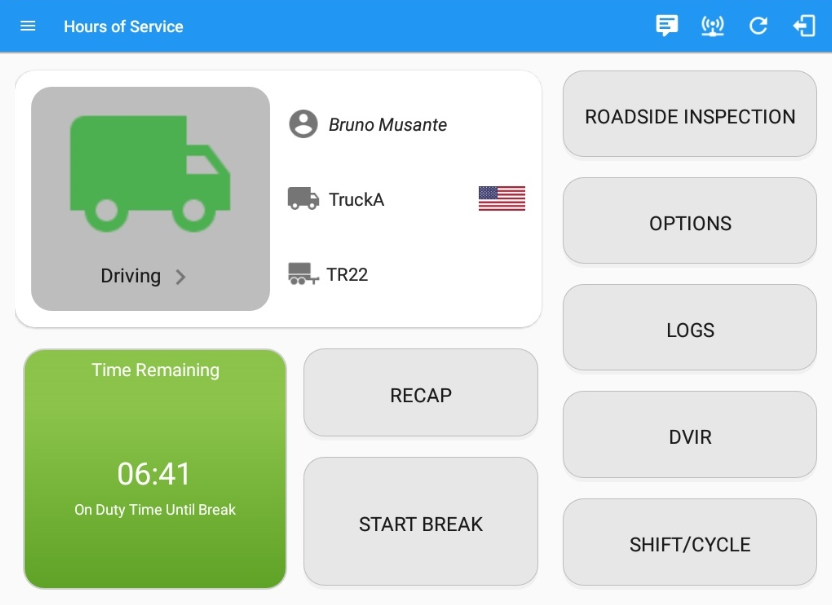
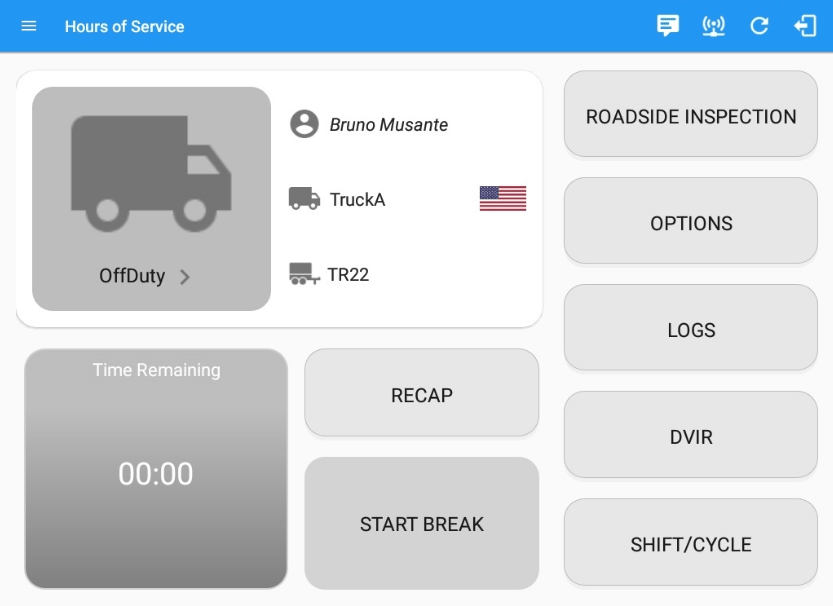
The Main Dashboard main screen is where you log your duty status events and which, in turn, determines your compliance with FMCSA Hours of Service Regulations. This screen also serves as your gateway to the rest of the app’s features.
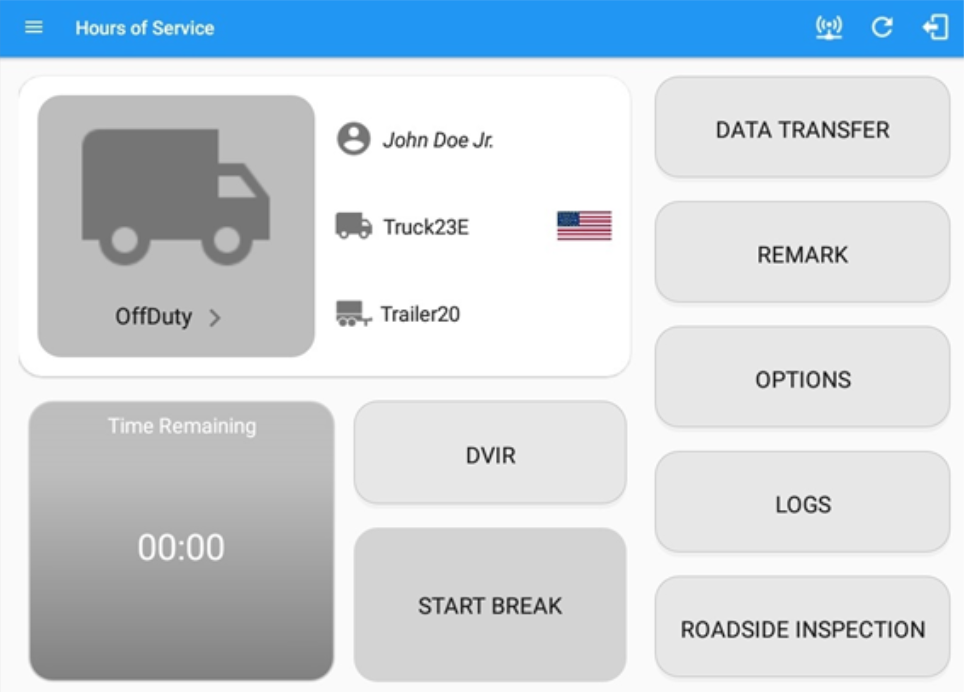
The main screen also provides essential information about the app’s user:
Driver Name: Displays the name of the driver who is logged in and whose logs are displayed.
Vehicle Name: Displays the driver’s vehicle name.
Trailer Name: Displays the driver’s trailer.
Note: The layout shown above is the default arrangement of buttons for the Main Dashboard. The button layout for the Main Dashboard and the Options screen can be configured and rearranged in the portal’s Button Editor
1. Using Hours of Service Action Bar
The Hours of Service Action Bar is the starting point for navigating to the different pages in the HOS app and is always present in the app’s topmost portion.
![]()
It features the following main navigational controls of the HOS app:
 Main Navigation Hamburger Icon: Tap to open the main navigation menu of the HOS app.
 Pending Edit Request Button: Icon only displays when there are request to edit events from Motor Carrier Personnel and Co-Driver(s). Tap the icon to display the list of pending edit request(s) which driver(s) will take action to “accept” or “reject” a specific request. Pending Edit Request(s) display includes requested edits for a day that is beyond the 8 days log for USA cycle (14 days log for Canada cycle).

Note: On instances where the vehicle has been moving for more then 3 minutes while there is no driver logged in, the ELD automatically records this activity as "Unidentified Driving Events" under the driver: "Unidentified Driver". These events can be reassigned to actual drivers upon logging in to the app, under Pending Request(s).
If the driver accepts the edit request(s) then the new status will be displayed on the events history list and will replace the old status.
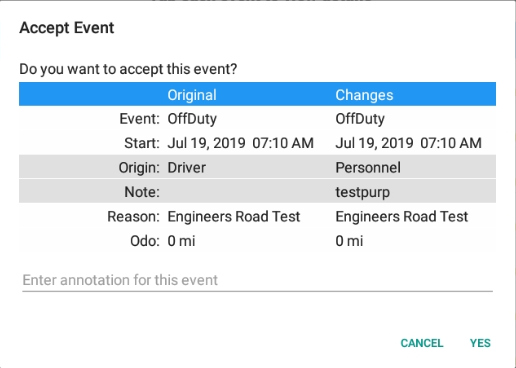
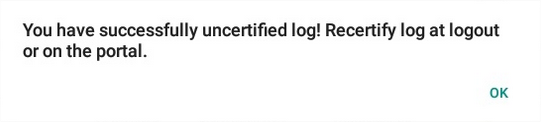
Accepting the requested edits of the day that is beyond the last 8 days log for USA cycle (14 days log for Canada cycle) will display a warning dialog informing that driver needs to recertify the log at logout on the app or driver can log into the drivers’ portal to certify the log for that day.
If the driver rejects the edit request(s) then it will not replace the original status however the status will still be recorded in the events history list with a note Inactive Change Rejected (ICJ).
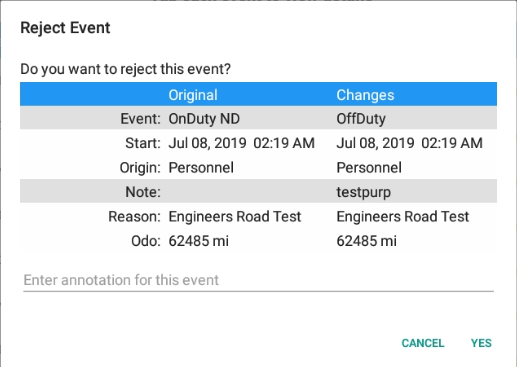
The Reject and Accept Event dialog shows the comparison of the Original status vs the changes (requested edits) made by the Motor Carrier Personnel. Once the edit requests are accepted, it will require the driver to fill in the annotation field (Required, maximum of 60 characters) to successfully save the changes.On the Main Dashboard, Tap on Logs button then edit logs. The driver can check in the events history list for the accepted and rejected event statuses.
Notes:- Odometer field is displayed for edit request(s) made by the Personnel
- Vehicle Miles field is displayed for edit request(s) made by the Unidentified Driver
- The Unidentified Driving Event pending edit request dialog has additional details like: From, To & Equipment ID compared to that of the Personnel’s pending edit request dialog
 Refresh Button: Tap to manually refresh the data in the HOS app page. Hidden under
  submenu icon once all icons are present.
 Logout Button: Tap to log out of the app, this will also set your status to Off Duty. Hidden under submenu icon once all icons are present.

Logging out of the HOS app when the status is "Driving/On Duty" will pop up a different message dialog and will also set the driver status to “Off Duty”.
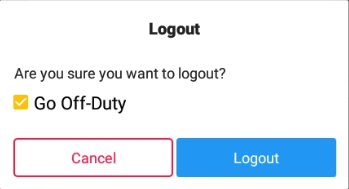
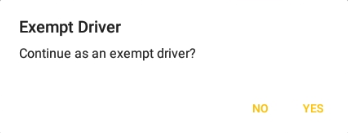
Note: Once the “go off-duty” option is checked, all the valid driver that logged into the HOS app will be logged out and the HOS app will be close completely (with no Snaptraq service or VBUS service running in the background). If the Driver is an Exempt Driver or a driver that operates under the short-haul exemption (395.1 (e)), upon logging in or out, a dialog will display confirming whether the driver chooses to continue as an exempt driver. By selecting the OK button, the “No Logs for Non-CDL-Driver Short-Haul Drivers operating within 150 air-miles” exception will be enabled.
 Malfunction Button: Tap to display the Malfunction Event(s) dialog .
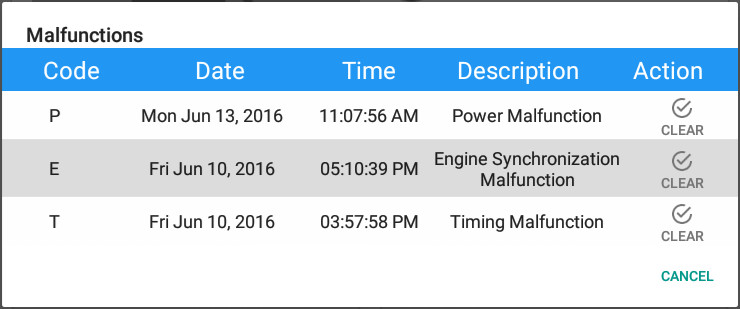
Malfunction and Data Diagnostic icon is displayed always in the toolbar. Malfunction Indicators acquired by the driver will be displayed in the application’s Header which is always visible across all screens. There will also be a notification in the Android toolbar indicating a malfunction.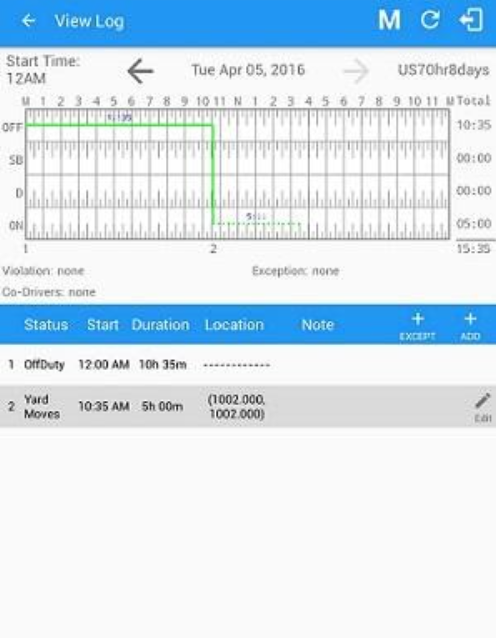
To clear the malfunction, tap on the Clear button. The Clear Malfunction dialog will then be displayed.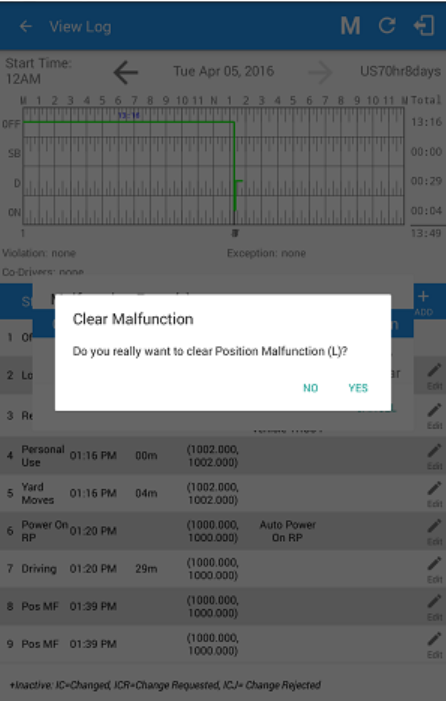
At each instance when an ELD malfunction or data diagnostic event is detected or cleared by the ELD, the ELD records the event.
Note: A Power Malfunction & Diagnostic will be triggered once the device is not connected to a power source and that the battery level is down to 10%.
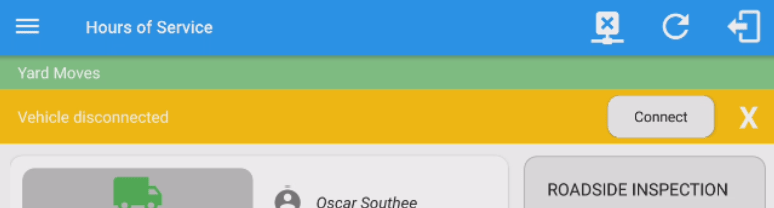
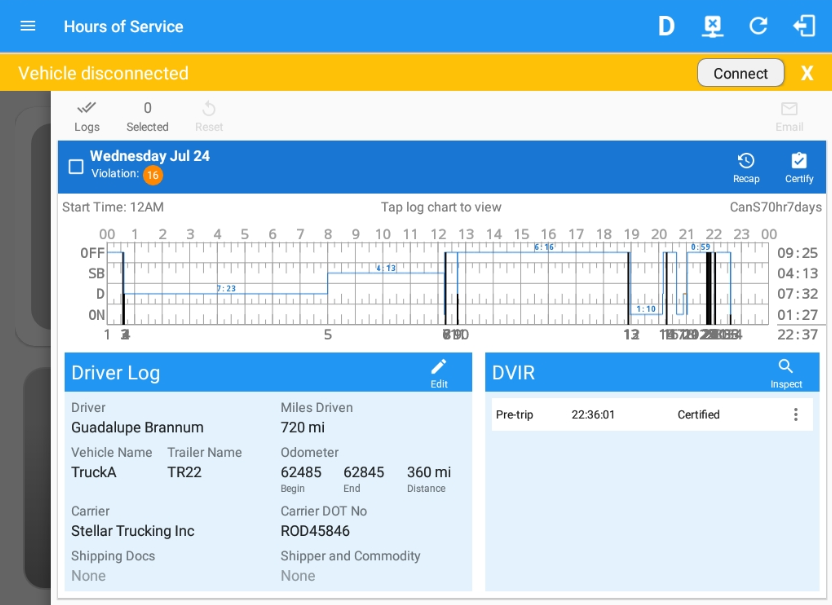
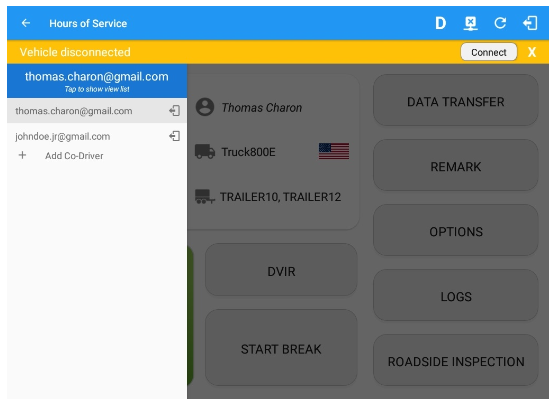
 'VBUS Connection Icon: Indicates if the device is connected to a VBUS device. and turns to
  when disconnected. Hence, connection interruptions may occur which will turn into flashing icon
  while in a reconnecting state.
The VBUS Connection indicator will be displayed in the application’s Header which is always visible across all screens.
VBUS Connection bar
The Connect button has the same capabilities as the connection icon
Connection Process
- Tap the Connect button to display the Vehicle Data Settings and enable VBUS data.
- Manual Connection
- Tap on the Manual Connection button
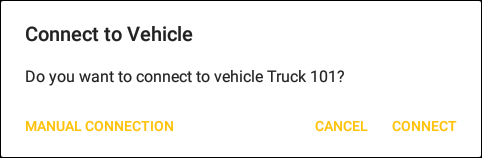
- Note: When drivers who do not have asset admin permission attempts to perform a manual connection, an error dialog will appear
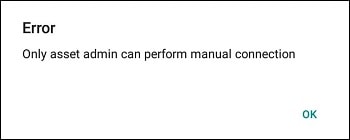
- Note: When drivers who do not have asset admin permission attempts to perform a manual connection, an error dialog will appear
- List of VBUS devices that would appear in the app will be configured in portal.
- Select a supported VBUS Device and Tap ‘Next’.

- ATBS_Interpreter, ATrack AX11 OBDII, ATrack AX7B OBDII, ATrackAU7 J1939/J1708, ATrackAX7 OBD2, ATrackAX9 J1939, ATrackAx9 OBD2, Atlas, CalAmp 4230 Bluetooth, CalAmp 4230 Hardwired, CalAmp MDT7 Tablet , CalAmp V-Series, ELM327 (BAFX,...) (J1708), ELM327 (BAFX,...) (J1939), ELM327 (BAFX,...) (OBDII), Geometris, IOSiX, MGNOBD, MGNOBDBA, Pacific Track, ROVR dT9 J1939, ROVR dT9 OBD2 and Xirgo XT6360 devices connects via bluetooth.
- Will display the Bluetooth Permission Request dialog
- After accepting the request, the list of Bluetooth devices will display depending on the selected device.
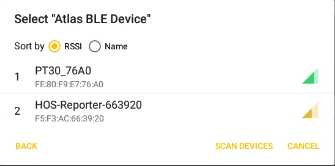
- Tap on the device name to display the Connect dialog and establish a connection to the device.
- DIGI WVA device connects via WiFi.
- The ‘Configure VBUS device’ dialog will be displayed.
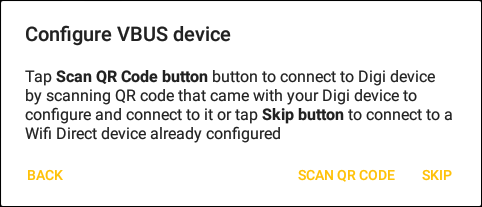
- Configure the device if it will be used for the first time.
- Tap on the device name to display the Connect dialog and establish a connection to the device.
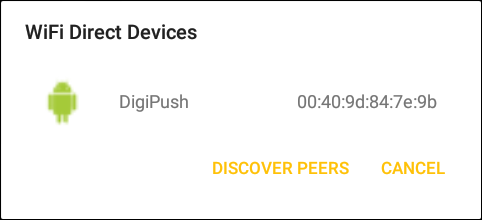
- Enter the PIN for DIGI WVA device configured for PIN Pairing mode or Hold the Digi WVA button down for 3 seconds for Digi WVA device configured for Push Button pairing.
- The ‘Configure VBUS device’ dialog will be displayed.
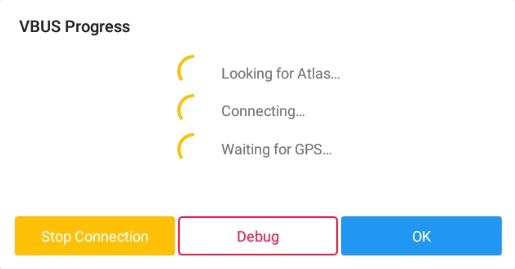
- After tapping the device name, the VBUS Progress dialog will be displayed along with a progress spinner over the connection icon to have a visible indication of the connection progress. The driver can also enabled to cancel an in-progress connection via the OK and Stop Connection button found in the VBUS Progress dialog.
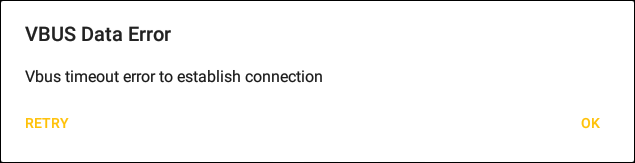
Notes:- VBUS data error dialog will appear when no VBUS data received within 60 seconds.
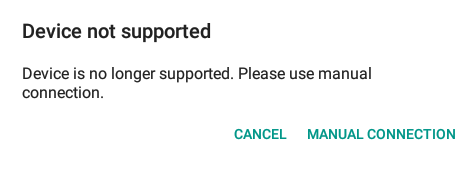
- If the app attempts to connect to an unsupported device. the app then displays a dialog which warns the user that the equipment has an invalid VBUS device type set and that the default device type is being used. The ‘Device Not Supported’ dialog will be displayed stating: “Device is no longer supported. Please use manual connection." along with a Cancel and Manual Connection buttons.
- The app also skip device selection for manual connection if device selected on the portal is only one type of VBUS device.
- VBUS data error dialog will appear when no VBUS data received within 60 seconds.
- Tap on the Manual Connection button
- Auto Connection
- Tap on the Connect button
- The VBUS Progress dialog will then display
- Upon establishing a connection to the VBUS device, You should hear a tone letting you know that device is now connected and that an event 'ELD Login' will be recorded in the events list.
- Manual Connection
- Disconnect to the device by tapping on the VBUS icon
- Tap on the Connect button
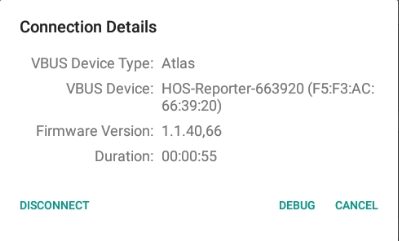
- The Connection Details dialog will then display
- Tap on the Disconnect button
- The Disconnect dialog will then display
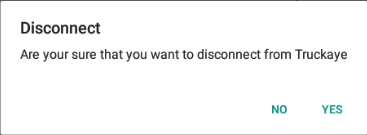
- Tap on the Yes button to confirm disconnection from the app to the VBUS device
- Upon successfully disconnecting to the VBUS device, an event 'ELD Logout' will be recorded in the events list. However, if the connection was drop due to interruptions (low signal & etc.) which will disconnect the app to the VBUS device, it will not create an 'ELD Logout' event.
- Accessing the VBUS Service Debug screen
- Tap on the Debug button
- The VBUS Service Debug screen will then display. It shows the live vbus data which helps the driver monitor the device.
- If the VBUS data is disabled then the following events should not take place:
- [locale_translate text ='Detection of any data diagnostic or malfunction events']
- The ELD Compliance Test should only run when VBUS is connected
- Also, Upon connection/disconnection to the VBUS device, it logs the connection/disconnection events in the Exceptions.txt file (found on the device storage under the app name's folder)
- Tap the Connect button to display the Vehicle Data Settings and enable VBUS data.
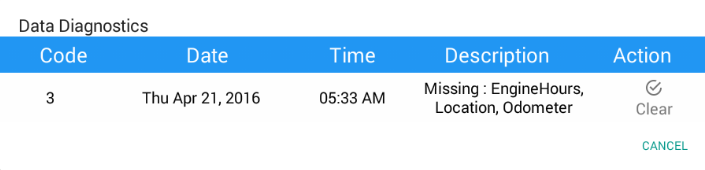
 Data Diagnostics Button: Tap to display the Data Diagnostics Event(s) dialog .
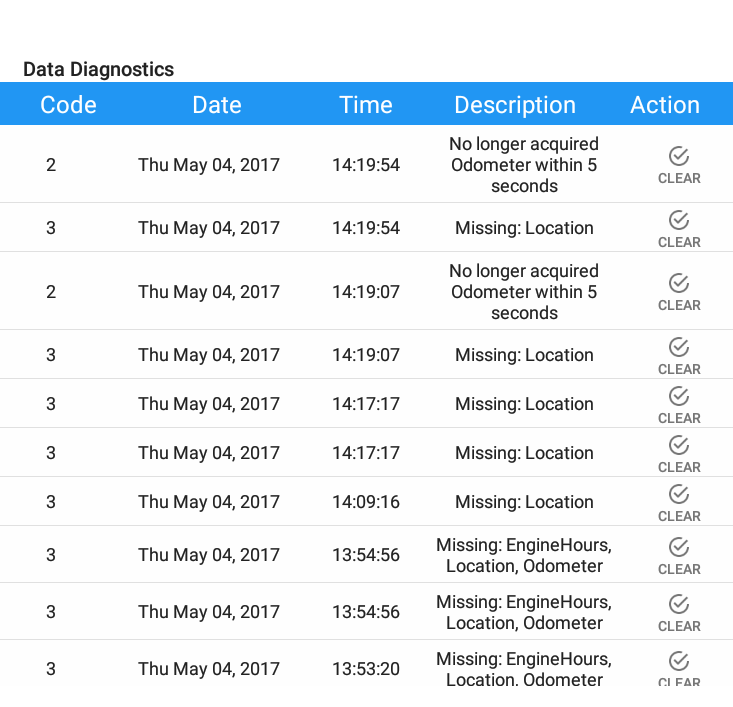
Data Diagnostics Events acquired by the driver will be displayed in the application’s Header which is always visible across all screens. There will also be a notification in the Android toolbar indicating a data diagnostic event.
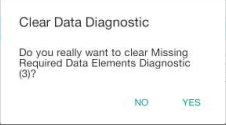
To clear the Data Diagnostics Event, tap on the Clear button. The Clear Data Diagnostics dialog will then be displayed.
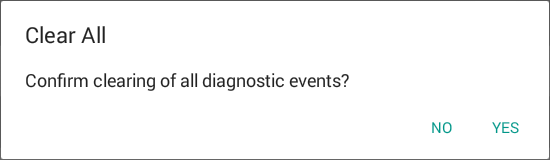
To clear all the Data Diagnostics Events on the dialog, tap on the Clear All button. The Clear All Data Diagnostics dialog will then be displayed
At each instance when an ELD malfunction or data diagnostic event is detected or cleared by the ELD, the ELD records the event.
Note:- ELD Data Diagnostic status affects only the authenticated user, therefore, the ELD only indicate the active data diagnostics event status applicable to the active driver. Data Diagnostic Event dialog will no longer pop up whenever it occurs hence, the Data Diagnostic “D” icon will be in a flashing amber color when new data diagnostic events occurred.
The “D” icon will only turn back to white once the dialog for the Data Diagnostic List is closed and will flash in amber color again once there are new active data diagnostic events.
- Tap on the “D” icon on the application header to display the Data Diagnostic dialog. On the diagnostic pop up dialog for Missing Required Data Elements it states the exact missing data elements instead of just generic missing data diagnostic error.
- ELD Data Diagnostic status affects only the authenticated user, therefore, the ELD only indicate the active data diagnostics event status applicable to the active driver. Data Diagnostic Event dialog will no longer pop up whenever it occurs hence, the Data Diagnostic “D” icon will be in a flashing amber color when new data diagnostic events occurred.
2. Customizing the Hours of Service App Preferences
The HOS apps’ settings and preferences can be customized in the Hours of Service App Preferences screen. The following are the steps to navigate to this part of the HOS app:
- Tap the Main Navigation Hamburger Icon or slide to the right to show the main navigation menu.
- Select
 Settings in the HOS app’s main navigation menu and proceed to the
  Hours of Service Preferences screen.
Note: The HOS app preferences/settings are automatically saved.
For further information, please proceed to the documentation of the Hours of Service App Preferences/Settings Menu.
2.1. Quick Guide for Setting the Vehicle Name and Trailer Name
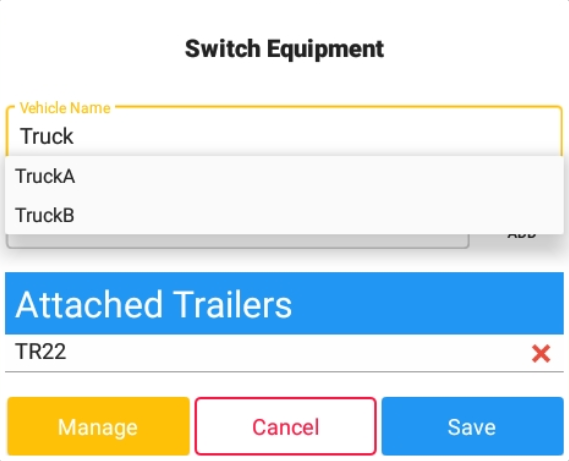
The Vehicle Name and Trailer Name can be customized in the Switch Equipment tab.
Using the Hours of Service Preferences Module At Any Time
- Update the Vehicle Name and Trailer Name: Slide to the right or tap the Main Navigation Hamburger icon to show the main navigation menu.
- Tap on
 Switch Equipment option in the HOS app's navigation menu, after which a dialog will then be displayed:
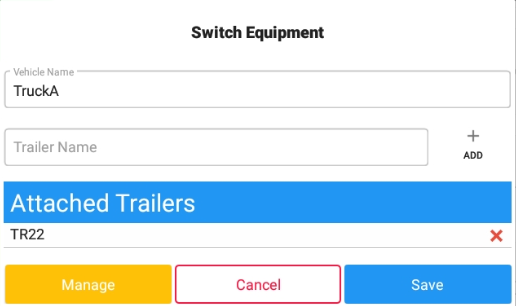
- Tap on the drop-down list of Vehicle Name to select a new Vehicle.
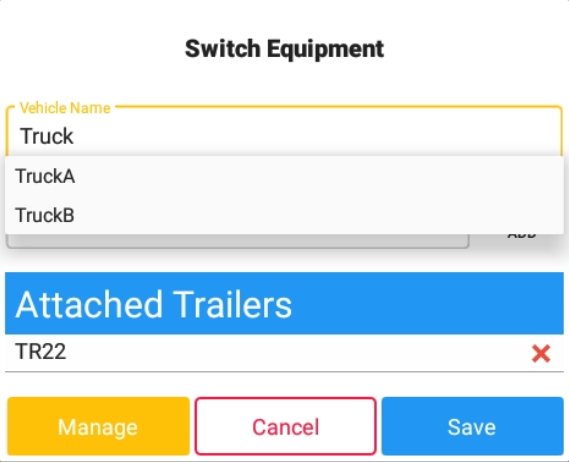
- Tap on the drop-down list of Trailer Name to select a new Trailer.
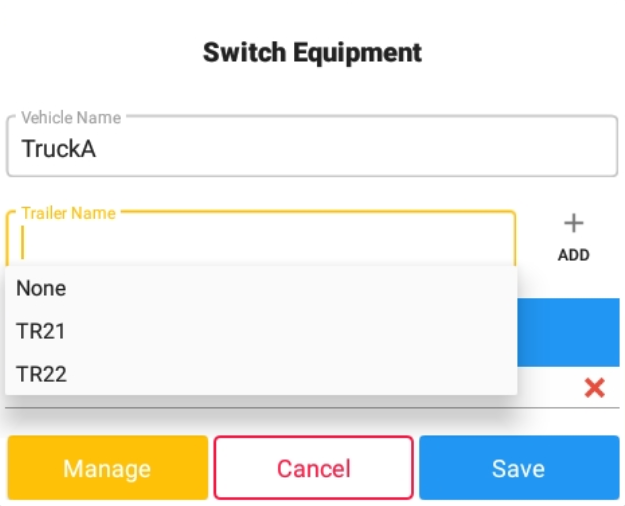
- Tap on the Add button to add the selected trailer to the list of Attached Trailers. Tap on the X button on the right side of the Trailer to remove it from the list.
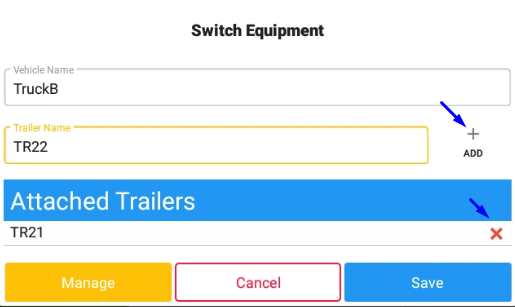
By tapping the Switch button, Vehicle Name and Trailer Name will then be successfully changed.
3. Changing the Driver’s Duty Status
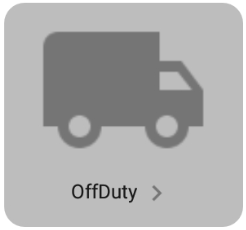
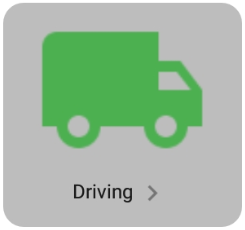
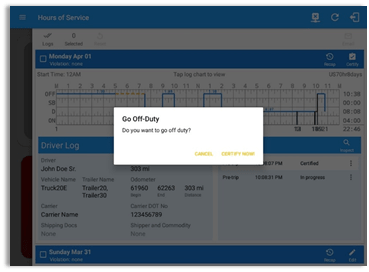
To change the duty status of the driver, tap the Duty Status button and select the appropriate driver duty status.
- Available Duty Status Options
- Off Duty
- Sleeper (Berth)

- Driving
- On Duty ND (Not Driving)
- Waiting at Site

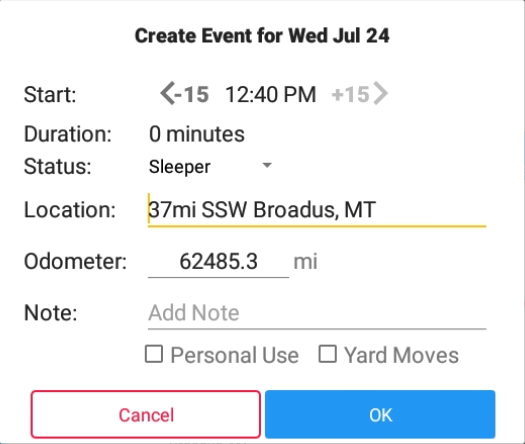
- Selecting a status will show the Create Event pop up dialog. The Start Time is disabled by default to disallow the drivers to edit their Start and End time.
- You can also change the duty status from this drop-down list.
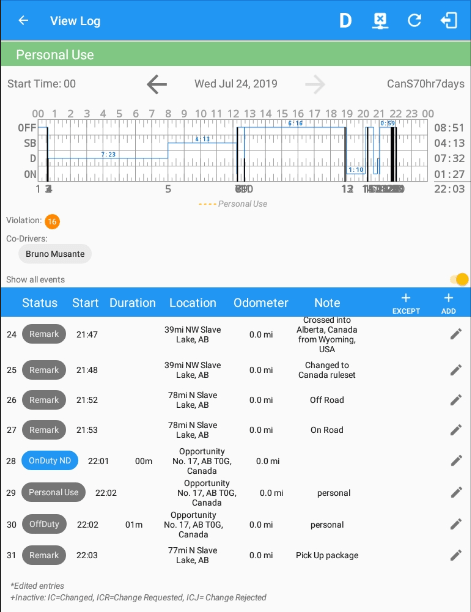
- All driving status will enable the following:
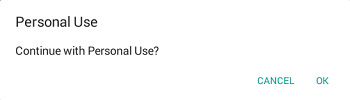
- Personal Use - If this is enabled, the status will be set to Off Duty automatically and will disable the Yard Moves checkbox. Selection of this option will be recorded within the events history list.
- Yard Moves - If this is enabled, the status will be set to On Duty automatically and will disable the Personal Use checkbox. Selection of this option will be recorded within the events history list.
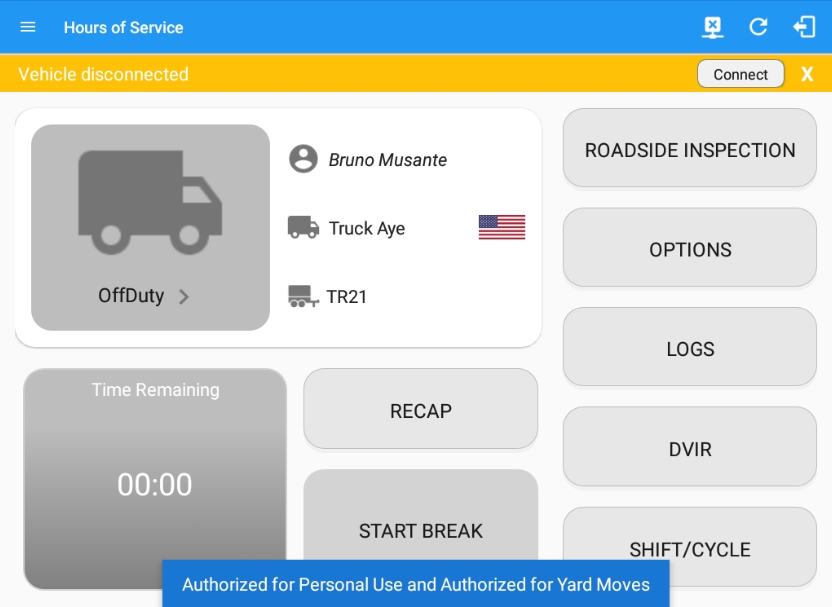
Once Personal Use is enabled and if the driver's indication is not confirmed by the driver and the vehicle is in motion (driving status), the ELD prompts a dialog if the driver wants to continue using authorized personal use. If the driver does not confirm the prompt and status is default to none.
A static notification bar is visible when driver is currently in Personal Use or Yard Moves
- When changing the driving status to "Driving" , a snackbar reminder will launch along with the INSPECT link which leads to the DVIR screen, reminding the driver to perform a Pre-trip DVIR if he forgot to do so.
- When the HOS app is able to get a GPS position fix, the Location field will be automatically filled in with the current location of the user. You can also manually fill in the Location field if you cannot get a GPS fix.
- You may fill in the Note field for your notes or remarks.
- After filling in the details of the new duty status, tap the OK button to save the new duty status event. You can also select the Cancel button to cancel adding the said duty status.
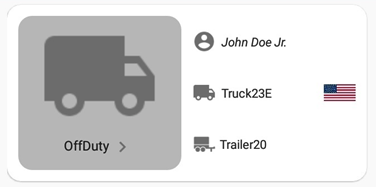
- Driving and ON Duty ND will be having On Duty Time Until Break remarks in the button
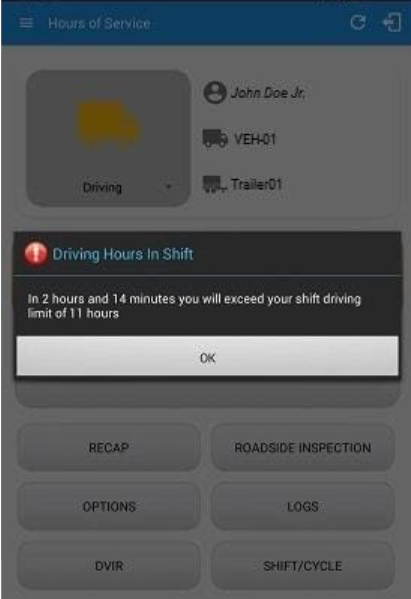
Note: When the HOS app is in the background and a violation occurs, the app launches itself along with a warning dialog for the driver.
4. Familiarizing The Hours of Service Default Dashboard Tiles
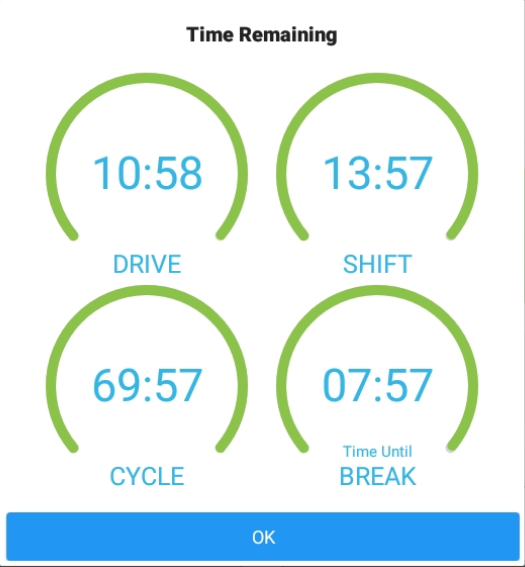
- Time Remaining Tile:
- When the Time Remaining Tile changes into a grey color it indicates that the driver is off duty, sleeper or waiting at well site; when the tile changes into a green color, it indicates that the driver’s status is driving or on duty; when the tile changes into a red color, it indicates that the driver has less than 1 hour left or has already ran out of time.


- Tap the button to view Time Remaining Clocks.
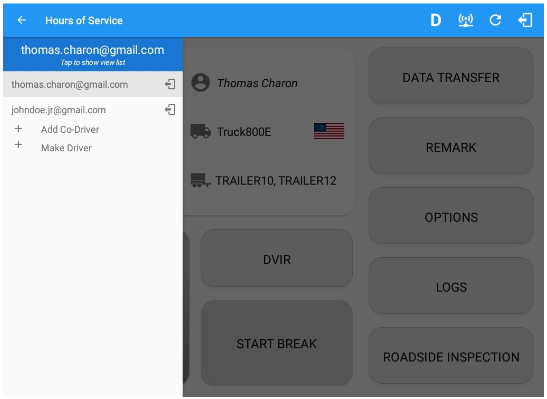
- If there is a logged in Co-Driver, it is possible for him/her to view the logs and access the application, but with very limited conditions. This can be done by tapping the
 button to display the co-driver login screen.

- When the Time Remaining Tile changes into a grey color it indicates that the driver is off duty, sleeper or waiting at well site; when the tile changes into a green color, it indicates that the driver’s status is driving or on duty; when the tile changes into a red color, it indicates that the driver has less than 1 hour left or has already ran out of time.
- Recap Tile:
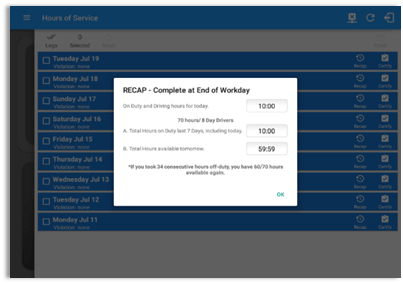
 Tap the button to bring up the recap information for the specified duty day and corresponding cycle data as of the said specified day.
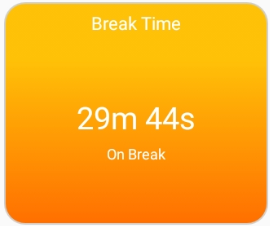
 - Start Break Tile:
 The Start Break tile will be disabled when the duty status is Off Duty, Sleeper or Waiting at Well Site.
 The Start Break tile will be enabled when the duty status is On Duty or Driving. Once you tap the Start Break tile, a dialog will then pop-up.
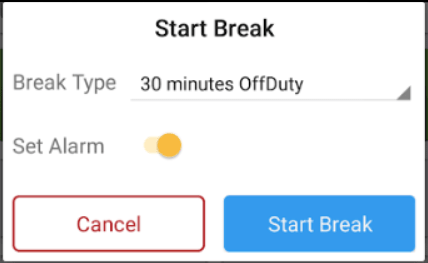
- You can select which break do you want to start
- Break Type option for USA Cycle
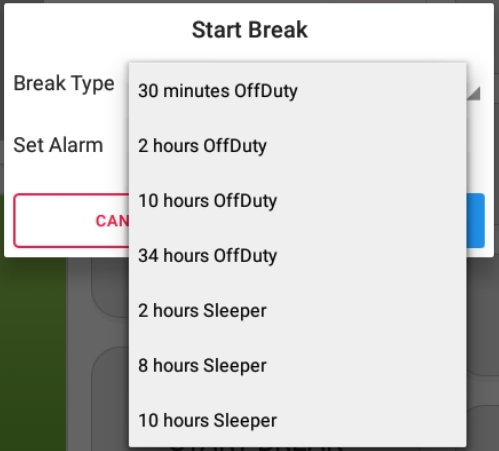
- Break Type option for Canada Cycle

- Break Type option for USA Cycle
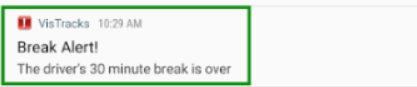
- You can optionally set an Alarm which will then play an audio alarm along with the a notification to let the driver know that the break is over
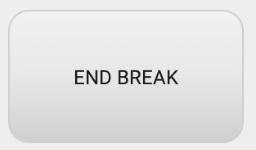
Notes:- If the ‘Start Break’ button is pressed, then:
- It sets the status to OffDuty
- The ‘Start Break’ button turns to ‘End Break’
- The Time remaining button turns to On Break and the second line shows “time remaining 00:00”
- If the ‘End Break’ button is pressed, then:
- It sets the status to ‘On Duty’ (if the vehicle is not moving) or ‘Driving’ (if the vehicle is moving)
- You can select which break do you want to start
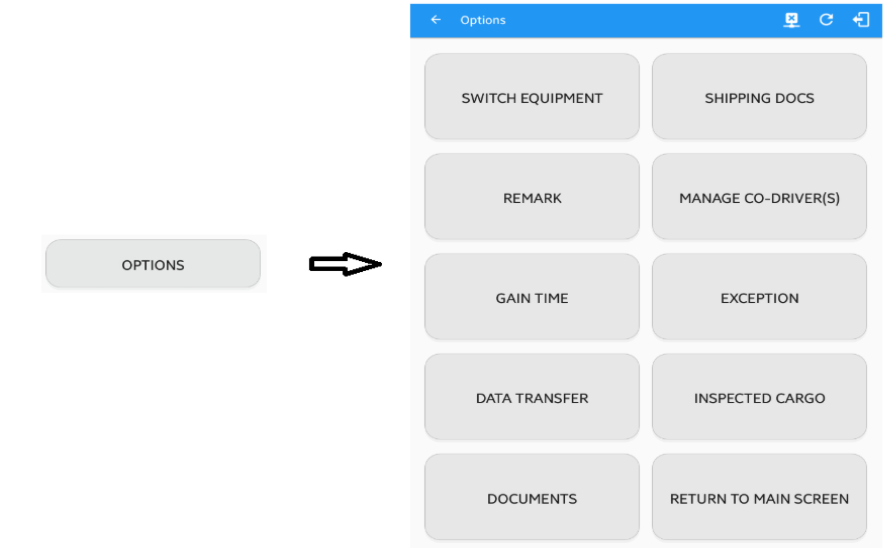
- Options Tile: This will navigate the user to the Options screen.
- Logs Tile:This will show the user to open the Driver Logs navigation drawer.

- DVIR Tile: This will navigate the user to the DVIR screen.

Note: Once a new driver has log on to the HOS app, the forms for the Vehicles/Trailers ID used by the prior driver shouldn't retain. Form fields must be empty. - Roadside Inspection Tile: The Roadside Inspection feature provides the ability to view the driver daily logs for the past one (1) week. It includes information on the vehicle used, shipments and driving statuses. It also has the ability to send all the logs that have already been certified to an intended recipient.
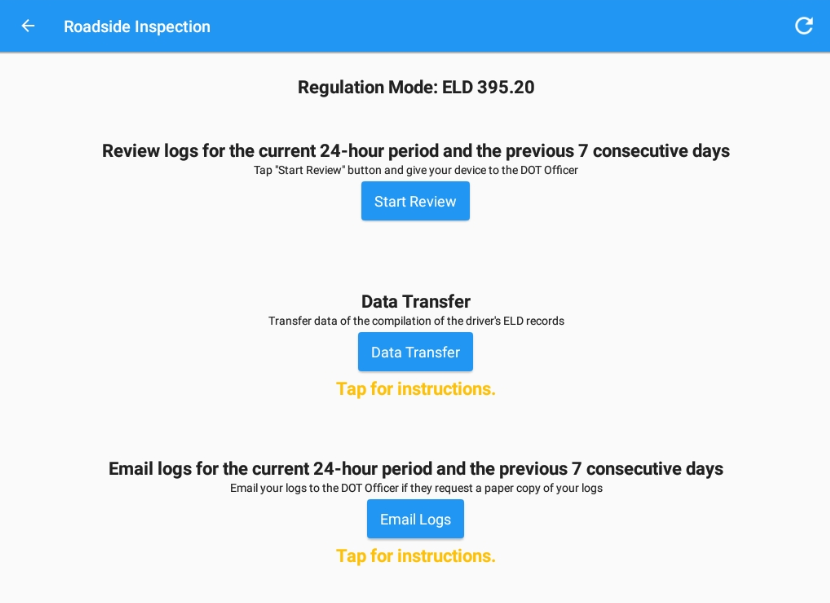
- Reviewing Logs
- Tap the
 Start Review button.
- You will then be directed to the Driver's Daily Log screen.
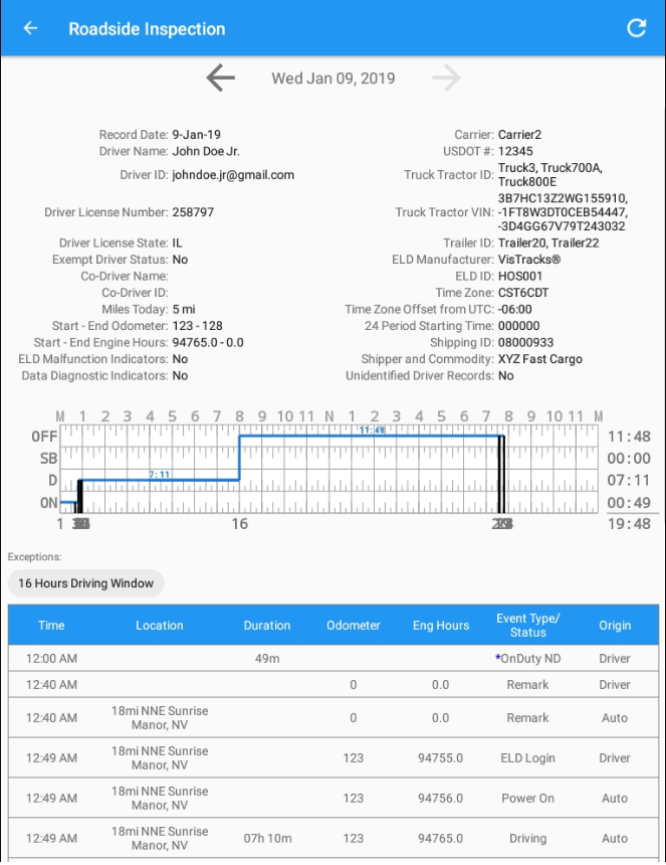
'Note: Vehicle and trailer information is not shown on Roadside Inspection if driver was OffDuty all day for a specific day. - Tap the
 Previous button to go to the previous log.
 - Tap the
 Next button to go to the next log.
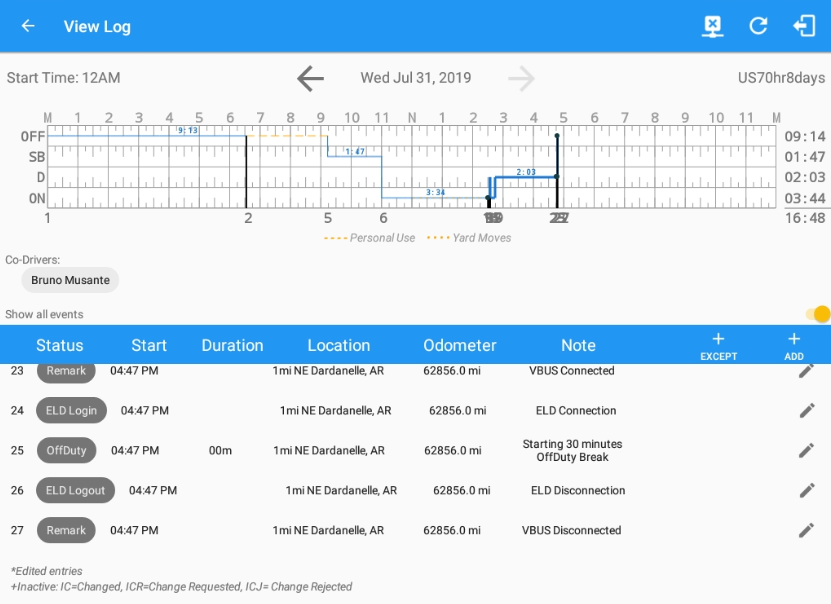
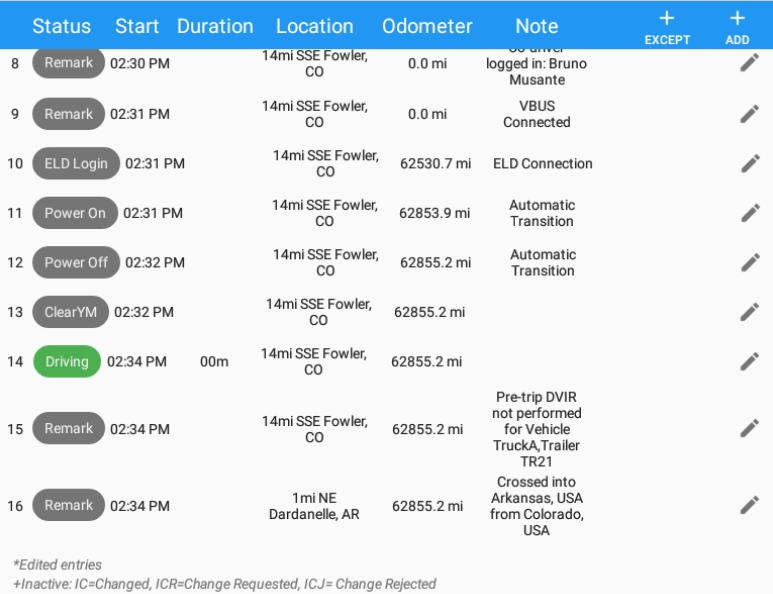
A legend (*Inactive: IC=Changed, ICR=Change Requested, ICJ=Change Rejected) has been added on the PDF reports located below the events history table when the driver is on ELD mode. Events that have been edited out and the asterisk annotation is not shown when the driver is on AOBRD mode.
- Tap the
- Data Transfer
- Tap the
 Data Transfer button.
- This will show the dialog displaying the supported data transfer options. See the Data Transfer section for more details
Note: User must provide a password when exiting from the Roadside Inspection screen.
- Tap the
- Reviewing Logs
- Shift/Cycle Tile: This will show a dialog displaying the total work hours of driver’s current work shift and total working hours that the driver can legally accumulate over a certain cycle or a consecutive multi-day period

- Changing the Driver’s Ruleset: The country flag (US
 or Canadian
  ) indicates the ruleset the driver is currently using. To change the drivers’ ruleset, tap the on the country flag and select the appropriate driver country/ruleset from the dialog.
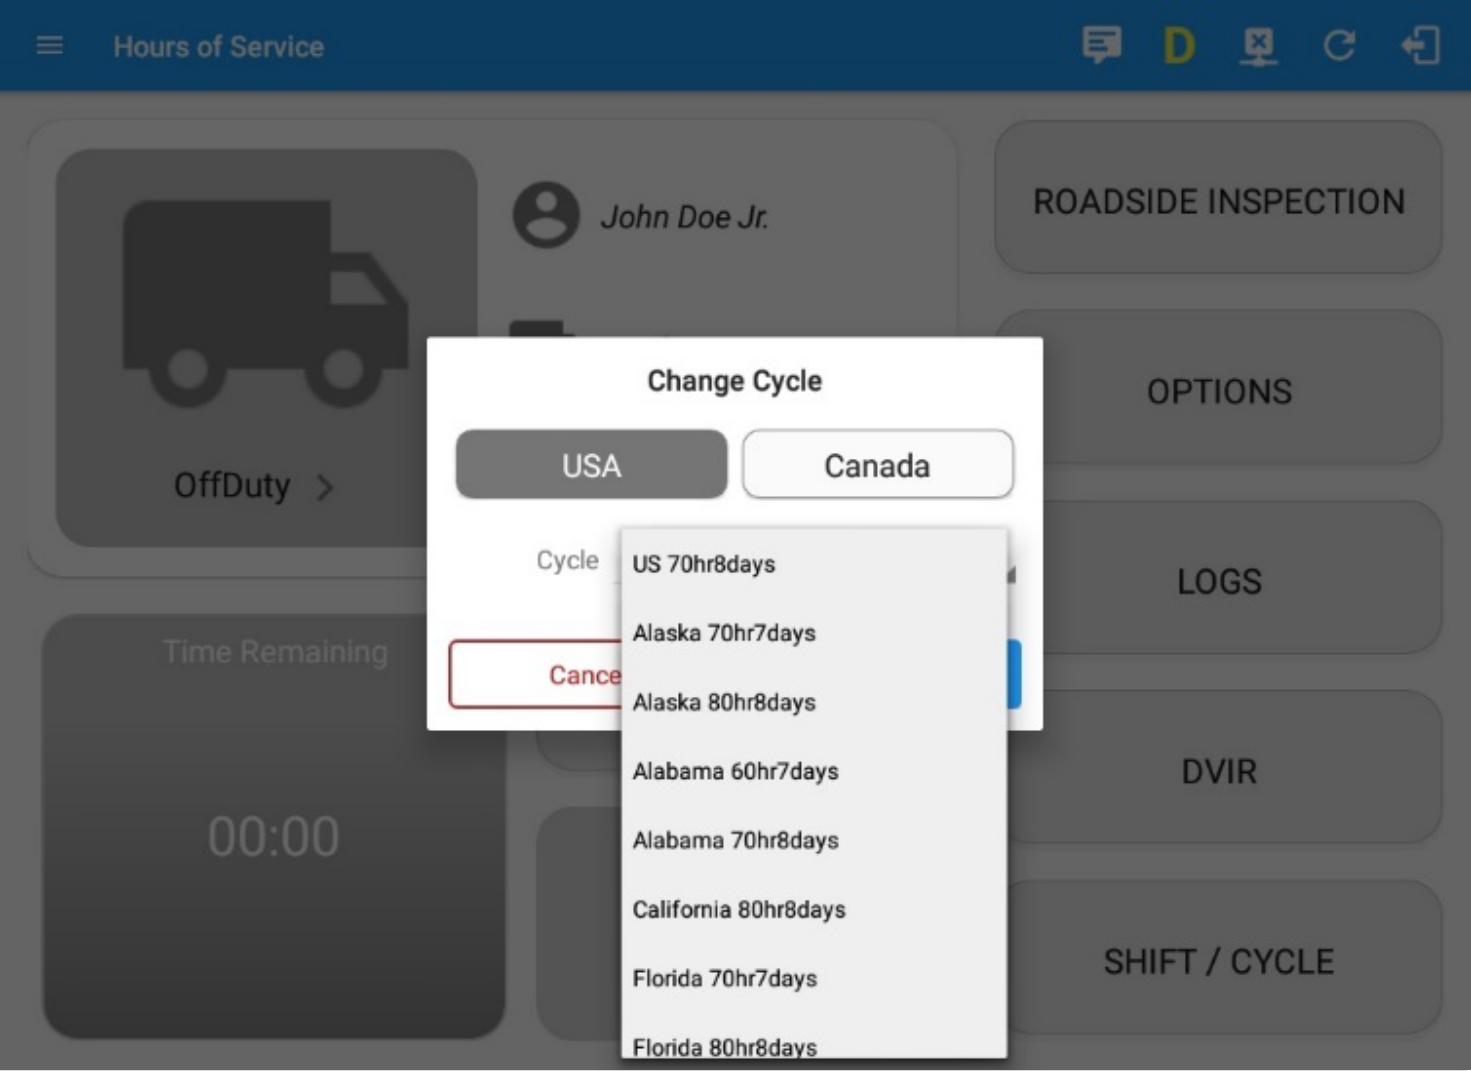
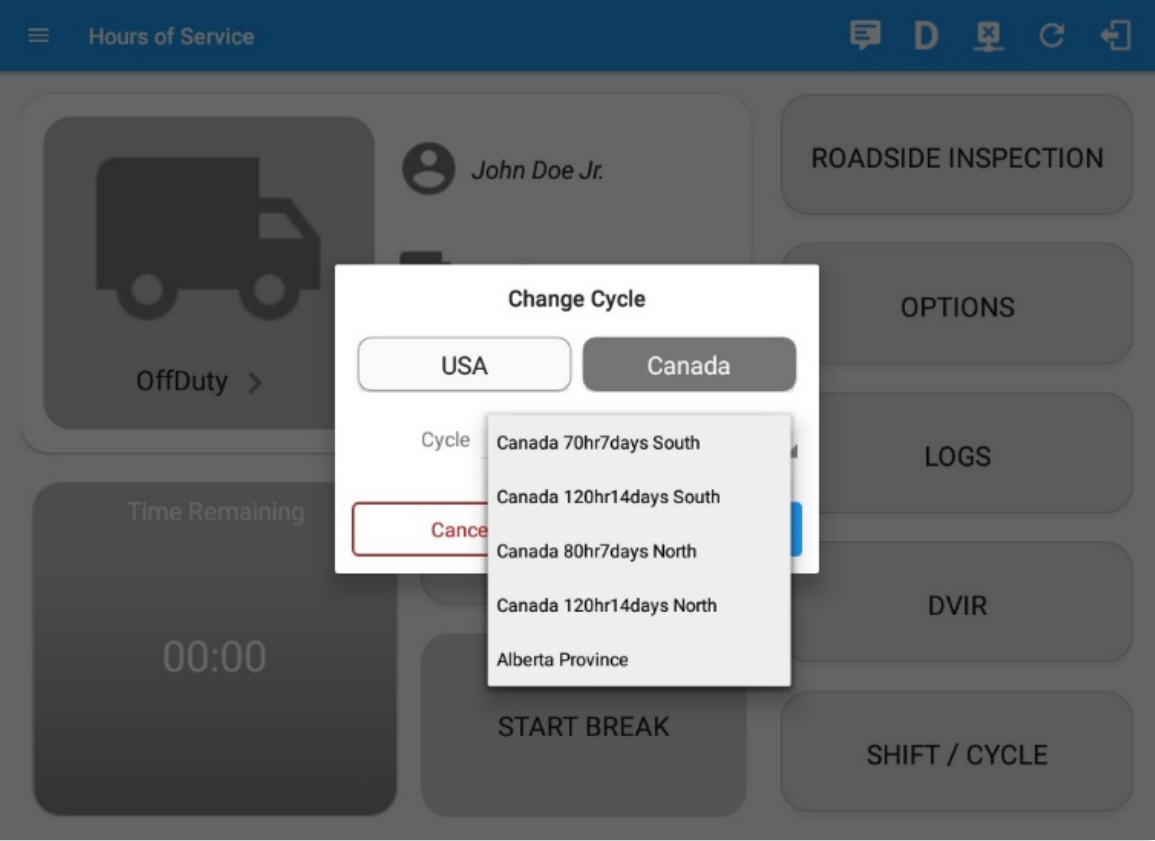
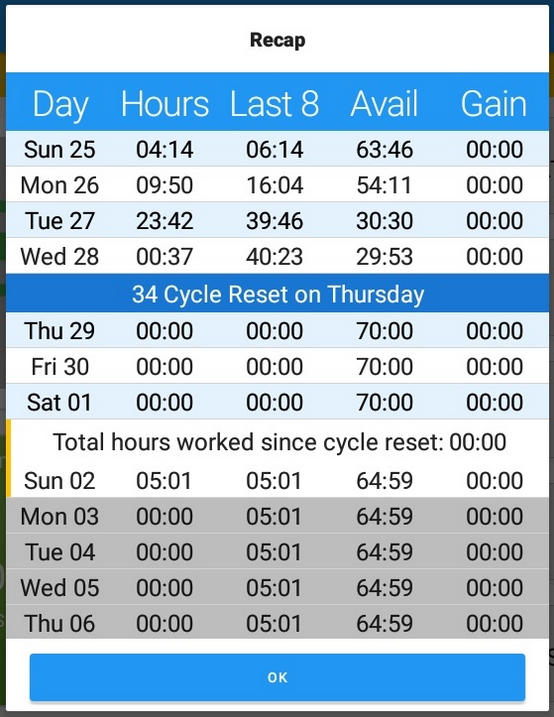
Recap: Tap the Recap button to bring up the recap information for the specified duty day and corresponding cycle data.
5. Warning Features
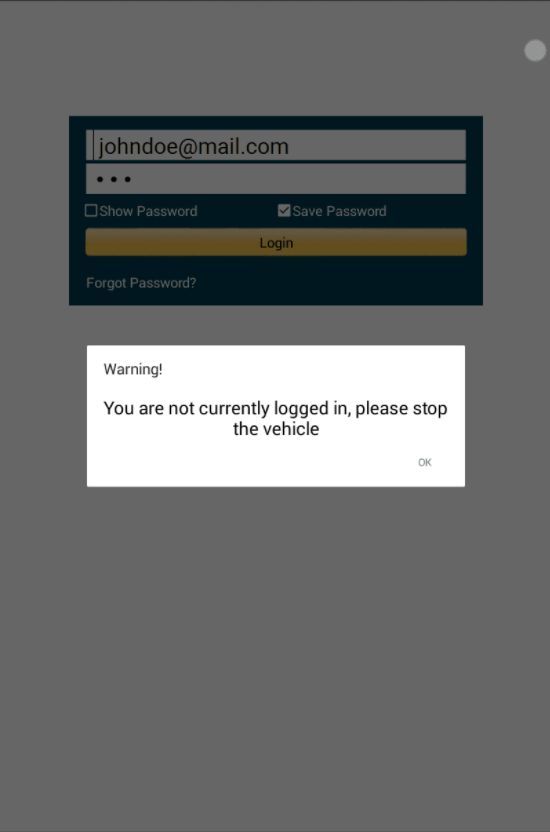
- If the driver logged out from the app and that he does not log onto the ELD, as soon as the vehicle is in motion, the ELD prompts a visual and audible warning reminding the driver to stop and login to the ELD.
- If the driver logged into the application without the Location Services turned on, a snackbar will display on the main dashboard and to other screens as well

- However, the snackbar will not display to the screens navigated through the Settings menu. The snackbar will no longer display when the Location Services if the device is turned on.
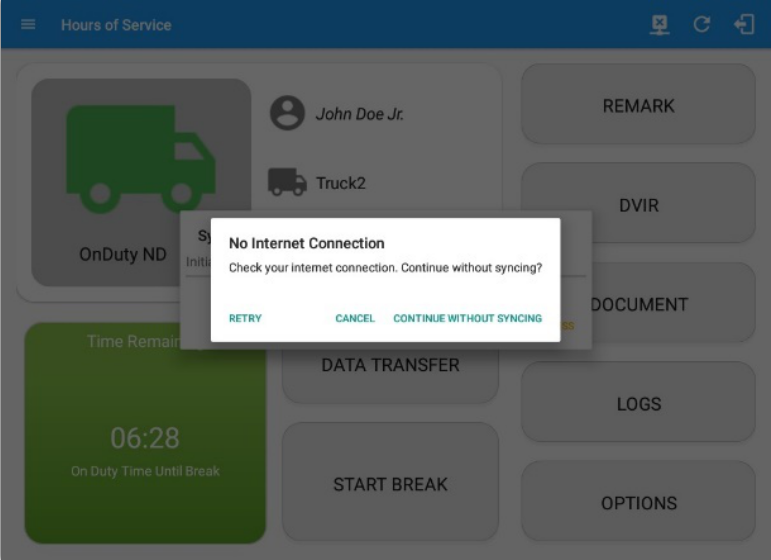
- If a driver logged into the application on a device that he/she has logged in before, the driver can login and logout successfully to the app even when internet connection is not available.
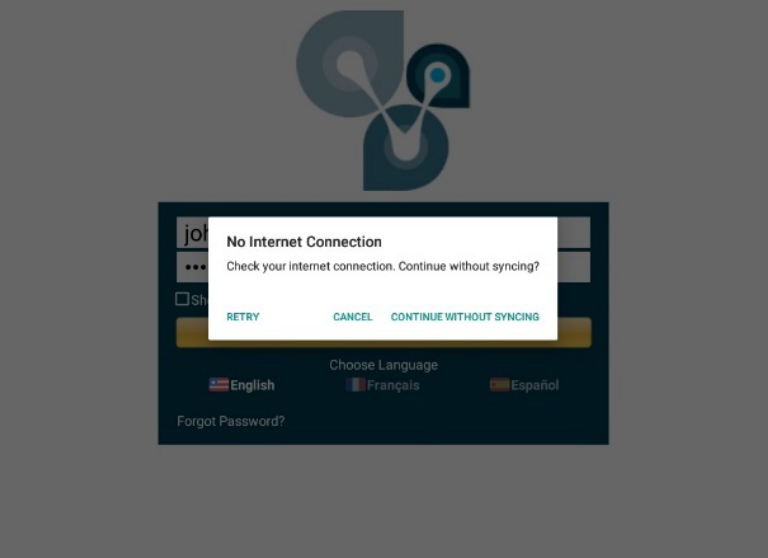
- Eventually when device is connected to network, logs will be automatically synced to the portal.
- Logging into the app when app server is down will prompt a dialog stating that 'Unable to Communicate with HOS server. Check your internet connection displayed'. Driver will be able to log in once the app server is up.
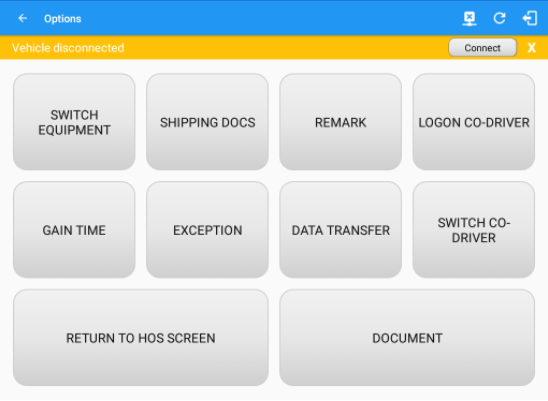
Driver Options
The Driver Options menu allows access to various hours of service tasks including the following: management of vehicle/trailer information, adding of documents and remarks, reviewing of logs, and displaying of how much driving time you will gain after off duty.
Go to the Hours of Services Main Screen.
Tap on the Options button  from the HOS Main Screen will display the Options module.
- '‘Switch Equipment' button.
- The Switch Equipment feature allows a driver to easily ‘switch’ from one vehicle to another. It also assists in monitoring and documenting the vehicles being used as part of their driver logs.
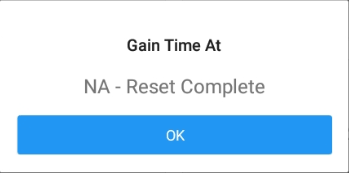
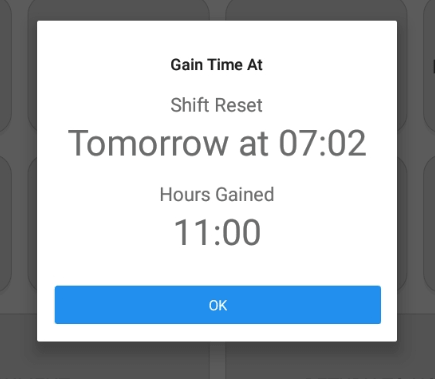
- 'Gain Time' button: Displays how much driving time you will gain after going Off Duty.
The following are the different pop up message dialog for the Gain Time At action:- Off Duty (Initial Status)
(Note: The values change as the status changes.) - On Duty or Driving

- Sleeper/Off Duty
- Off Duty (Initial Status)
- 'Shipping Docs' button: This enables you to provide the transport document (manifest) that serves as the detailed summary of all the bills of lading issued by a particular carrier for a particular travel of a particular vehicle. The information of the shipper (the person or company that sends or transports the products) and raw materials or products sold or bought are also provided.
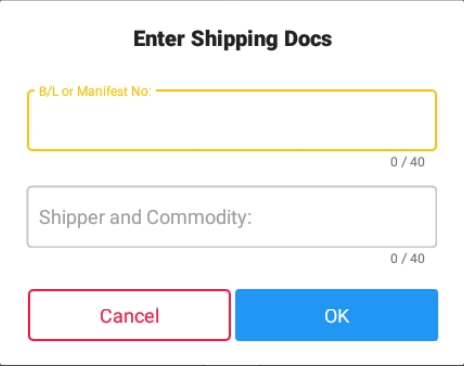
(Note: Entered data will be retained within the fields after clicking 'Ok' button.)
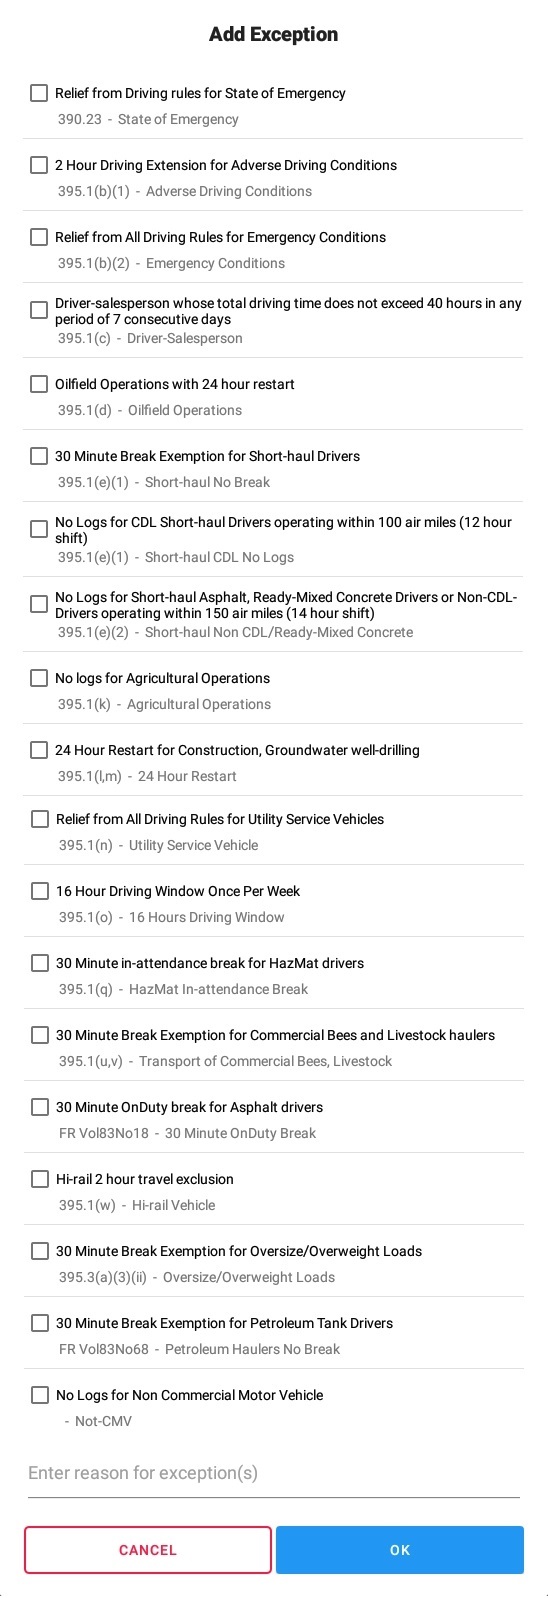
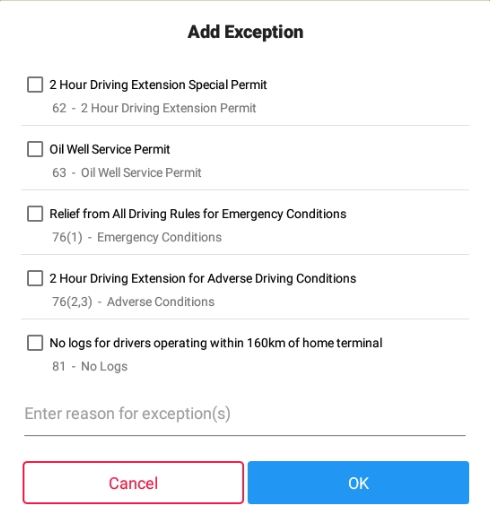
- 'Exception' button: The options that will appear here will allow the driver to enable various exceptions from the HOS rules for as long as certain conditions are met as stipulated in the Hours of Service section of the Code of Federal Regulation (49 CFR Part 395.1 - Hours of Service of Drivers - Scope of rules in this part) and other pertinent FMCSA regulations. Tap on the OK button to apply your exception/s. You can also select the Cancel button to disregard the changes you made.
- Available US Exception Options:
- Relief from Driving rules for State of Emergency - 390.23
- 2 Hour Driving Extension for Adverse Driving Conditions - 395.1(b)(1)
- Relief from all driving rules for Emergency Conditions - 395.1(b)(2)
- Driver-salesperson whose total driving time does not exceed 40 hours in any period of 7 consecutive days - 395.1(c)
- Oilfield Operations with 24 hour restart - 395.1(d)
- 30 Minute Break Exemption for Short-Haul Drivers - 395.1(e)(1,2)
- No Logs for CDL Short-haul Drivers operating within 100 air miles (12-hour shift)
- No Logs for Short-haul Asphalt, Ready-Mixed Concrete Drivers or Non-CDL-Drivers operating within 150 air miles (14-hour shift)
- No logs for Agricultural Operations - 395.1(k)
- Note: When a driver enable this exception a confirmation dialog will be displayed with options for Yes and No.
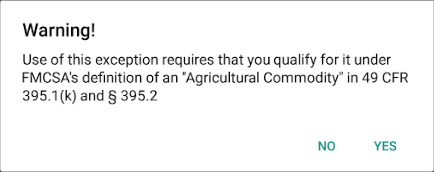
- Note: When a driver enable this exception a confirmation dialog will be displayed with options for Yes and No.
- 24 Hour Restart for Construction, Groundwater well-drilling - 395.1(l)(m)
- Relief from All Driving Rules for Utility Service Vehicles - 395.1(n)
- 16 Hour Driving Window Once Per Week - 395.1(o)
- Note: This exception can only be used for the last 7 days or once in every 70hr cycle, if the driver attempted to enable the exception an error dialog will display stating the following:
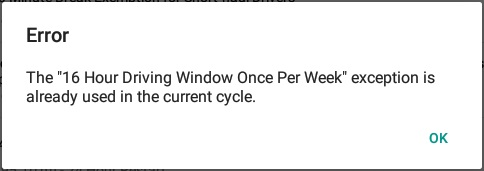
However, it is possible for the driver to add another 16 Hour Driving Window exception when a cycle reset has occurred. Nevertheless the driver will need to wait for the current cycle to end to be able to enable the exception again.
- Note: This exception can only be used for the last 7 days or once in every 70hr cycle, if the driver attempted to enable the exception an error dialog will display stating the following:
- 30 Minute in-attendance break for HazMat drivers - 395.1(q)
- 30 Minute Break Exemption for Commercial Bees, Livestock Transportation - 395.1(u,v)
- 30 Minute OnDuty break for Asphalt drivers
- Hi-rail 2 hour travel exclusion – 395.1(w)
- 30 Minute Break Exemption for Oversize/Overweight Loads - 395.3(a)(3)(ii)
- 30 Minute Break Exemption for Petroleum Tank Drivers – FR Vol83No68
- No Logs for Non Commercial Motor Vehicle
- Note: A warning dialog is displayed upon attempting to add a new event in current time while in Not-CMV exception. Tap Yes button to remove exception or tap No button to cancel.
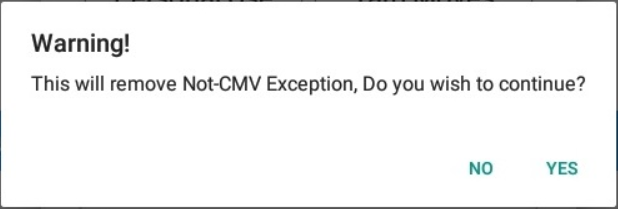
- Note: A warning dialog is displayed upon attempting to add a new event in current time while in Not-CMV exception. Tap Yes button to remove exception or tap No button to cancel.
- Michigan seasonal construction 70/80 and may drive 12 hours during a 16 hour shift (available in Michigan Cycles only)
- California flammable tank drivers may drive 10 hours within a work shift - 13 CCR 1212.5(a) (available in California Cycles only)
US exceptions that are currently suspended by FMCSA:
- Include Two 1am to 5am Rest Periods for 34-hour Restart
- Use 168 Hour Rule for 34-hour Restart
Available Canada Exception Options:- 2 Hour Driving Extension Special Permit - Section 62
- Oil Well Service Permit - Section 63
- CanEmergency Conditions - Section 76(1)
- 2 Hour Driving Extension for Adverse Driving Conditions - Section 76(2,3)
- No Logs for drivers operating within 160km of home terminal - Section 81
Available Alberta Exception Options:
- CanEmergency Conditions – Section 76(1)
- 2 Hour Driving Extension for Adverse Driving Conditions – Section 76(2,3)
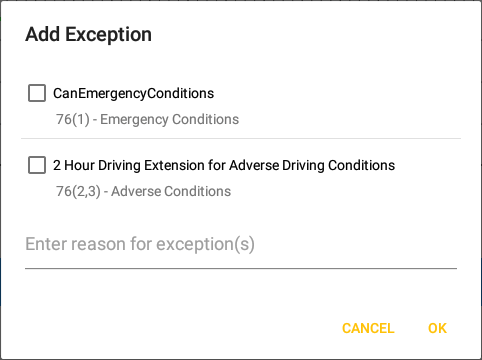
Note: Exceptions differ by Region.
- Available US Exception Options:
- 'Remark' button: This is where you can add a particular remarks or comment in a particular location.
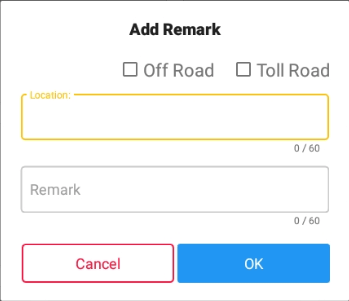
Off Road and Toll Road- You may also enable the Off Road and Toll Road options. These options are used for the IFTA calculations.
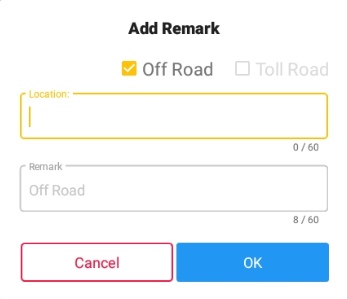
- Check the options to create a remark with a Note: Off Road and On Toll Road, respectively. To indicate that the driver has entered a normal road again, uncheck the Off Road or Toll Road option. This will create a remark with a Note: On Road and End Toll Road, respectively.
(Note:The location field will populate automatically if your GPS is turned on and a location is detected.)
After clicking 'Ok' button, remarks added are seen in the Driver's Log. - You may also enable the Off Road and Toll Road options. These options are used for the IFTA calculations.
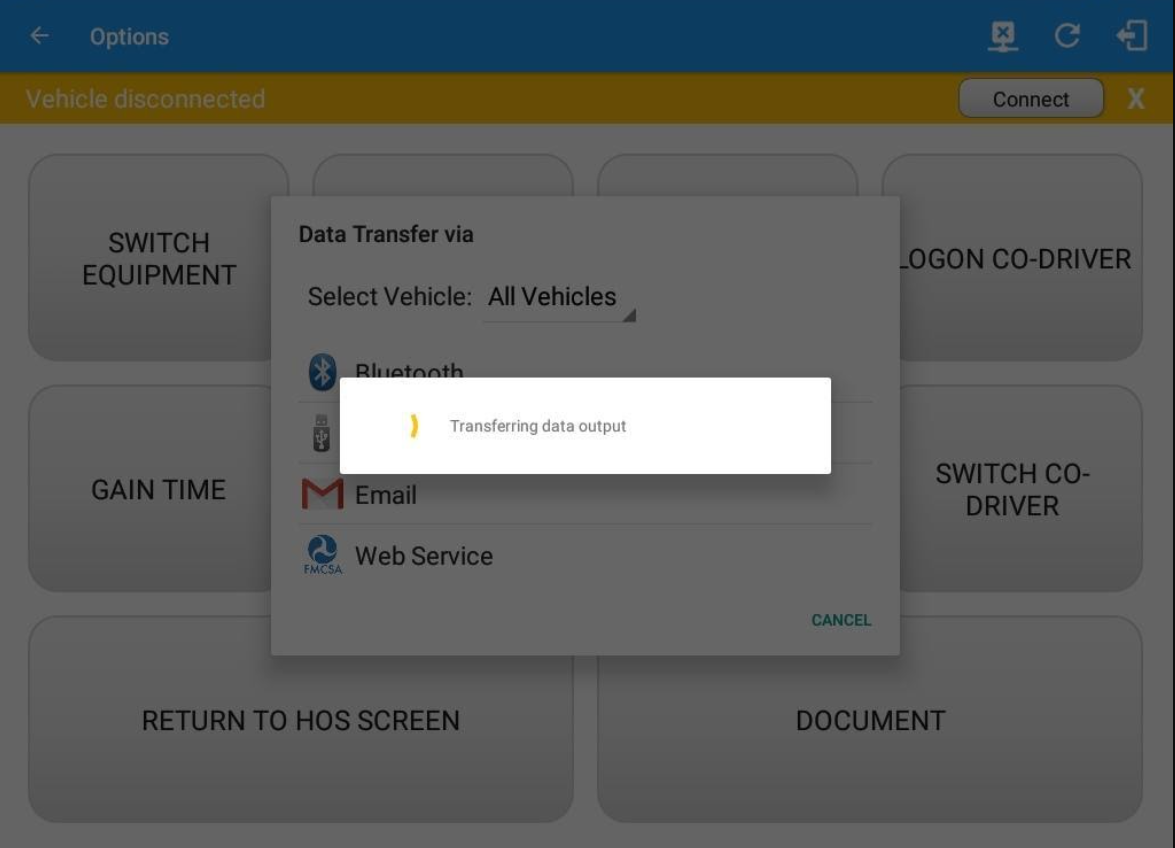
- 'Data Transfer' button: This is where you can display the dialog with the supported data transfer options.
- Tap the
 Data Transfer button.
 - The Data Transfer dialog with then be shown. See the Data Transfer section for more details.
- Tap the
- 'Logon Co-Driver' button: This will allow another driver to log onto the app. Tap Logon Co-Driver button, after which the login activity will then be displayed.
Note: Only authenticated users with a driver role are allowed to log-in to the application.
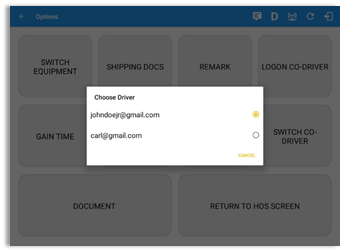
- 'Switch Co-Driver' button:This will allow the driver(s) to easily switch driving when on duty.
- Tap Switch Co-Driver button
 , after which the Select Driver dialog will then be displayed.
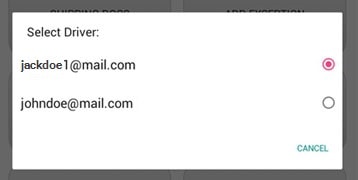
- After selecting a driver it will then ask for the password before displaying the Hours of Service Main Screen of the current driver.

Note: By checking the Make Primary Driver checkbox, you can set the switching driver to be the primary driver.
- Tap Switch Co-Driver button
- 'Return to HOS Screen' button: This allows you to go back to the Main Screen.
Tap button to be able to navigate to the Main Screen.
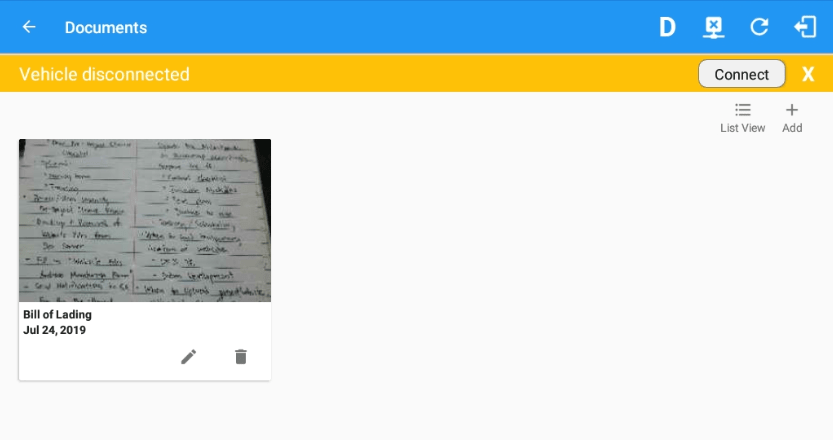
 - 'Document' button: The Document's feature provides an easy way to capture and view documents related to hours of service activities. This includes documentation such as bill of lading, fuel receipts, accident photo, etc.
Tap the Document button after which the Documents screen will then be displayed.
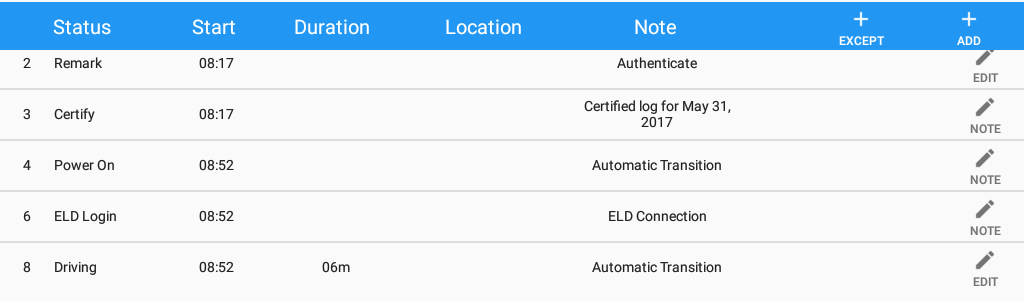
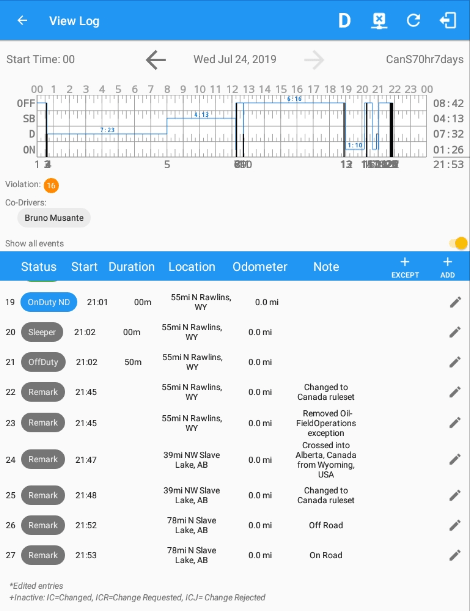
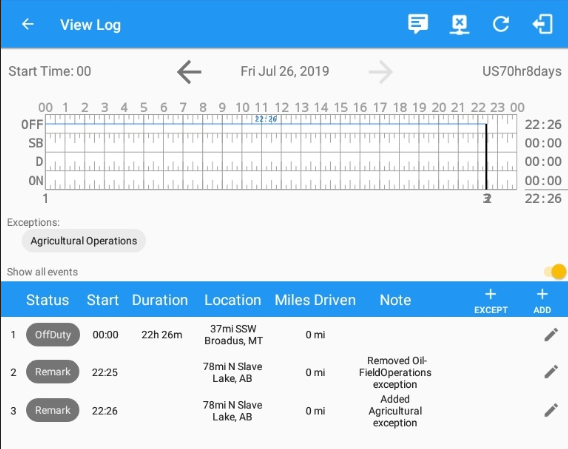
Driver Logs
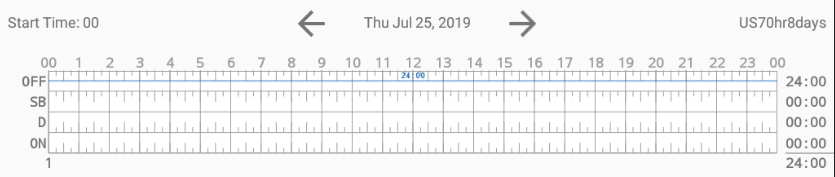
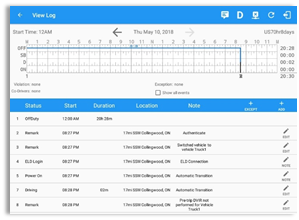
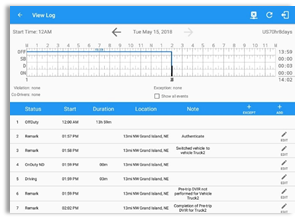
Selecting the Logs button from the HOS Main Screen will display the current days log and provide the ability to navigate backwards to view the previous seven logs:

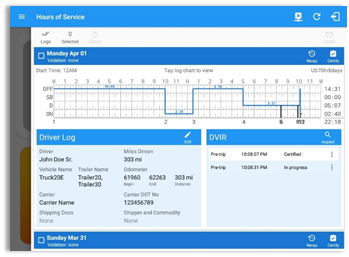
The Driver Logs allows you to view and update the electronic recording of your duty status events in the HOS app’s online driver logs. This is where you also store shipment data, send the certified logs to its intended recipients and manage other driving duty information. Also this is where you can determine the cycle used and 'Start Hour' time.
Note: The daily log for the current day will be in expanded view by default. The daily driver logs for the previous days will be in collapsed view.
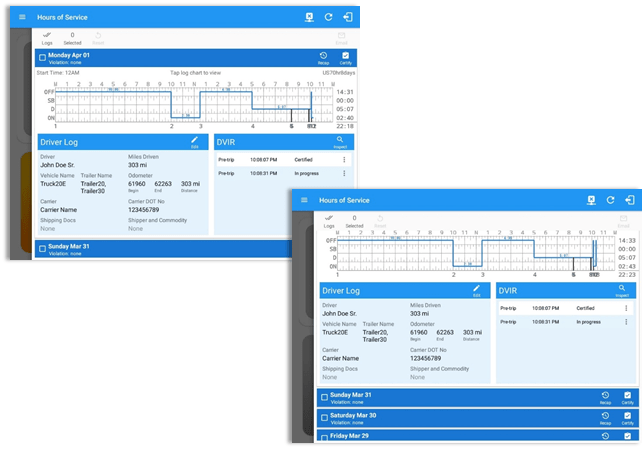
Scroll the screen to view all of the information, or, tap the log grid to view the log events. The daily log for the current day will be in expanded view by default. The daily driver logs for the previous days will be in collapsed view.
To expand or collapse a daily log, tap the Collapsible Menu Header.
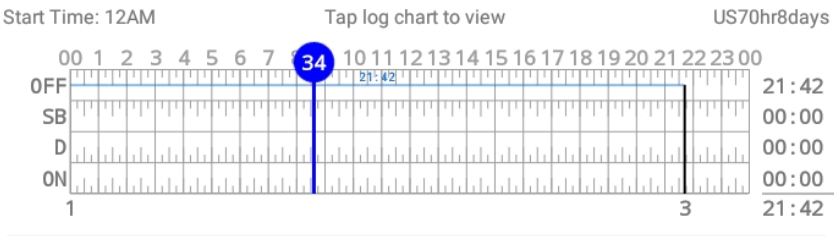
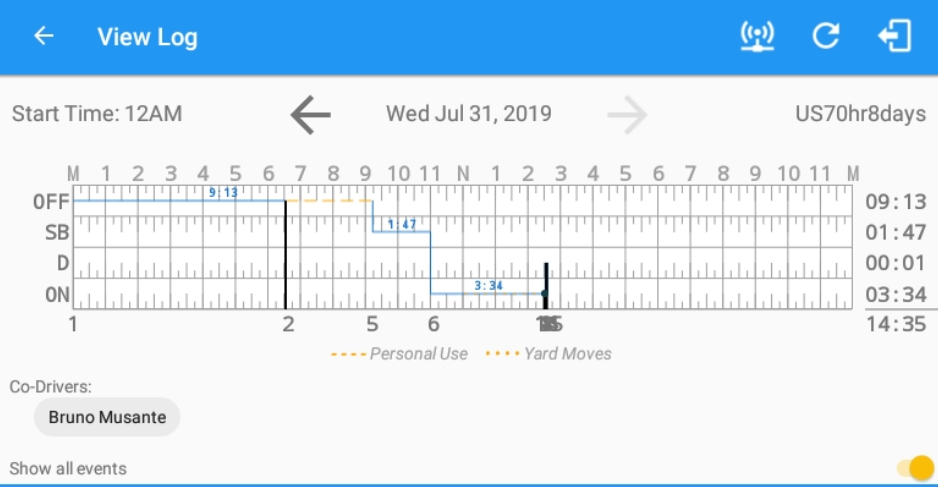
Cycles and the Start Hour time used are also shown in the Log, it is found on the upper right corner just above the Grid Chart.
Tap the Driver Log Accordion/Collapsible Menu Header to expand or collapse the driver log entries.
![]()
Using the Driver Logs Bulk/Multiple Selection Functions
The first part of the Drivers Log’s user interface features controls and information for the bulk/multiple selection features. These controls will allow you to perform features for multiple selected driver logs.
 Select All Certified Logs Button: Tap the button to select all certified driver logs.
 Selected Certified Logs Counter: This shows the number of selected driver logs.
 Reset Button: This clears/deselects all of the selected driver logs.
The Driver Logs Accordion Header Features
- Accordion/Collapsible Menu Header: To expand or collapse a daily log, tap the Driver Logs Accordion/Collapsible Menu Header.


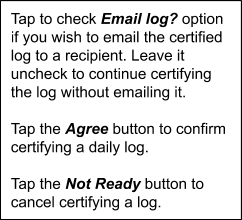
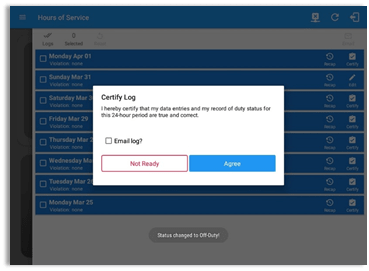
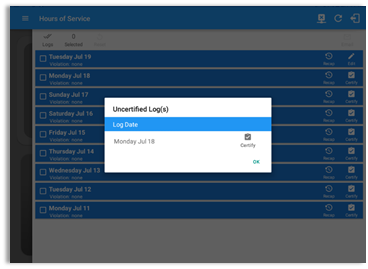
Note: Driver Logs title shows the full-time range when the Start Hour time is not zero. You can change the time by going to Settings > HOS Preferences - Daily Driver’s Log Entry Check-box (Still Uncertified Log): Tap the check-box to certify the selected daily log.

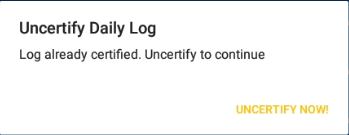
- Daily Driver’s Log Entry Check-box (Already Certified Log): Tap the Edit button to uncertify the selected daily log.

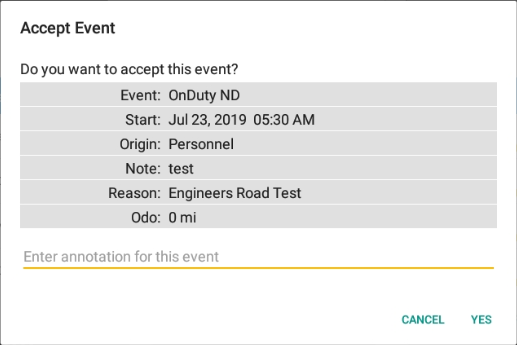
- Daily Driver’s Title Log (Recertify Log): When a certified log has been edited in the portal, it prompts the driver to either accept or reject the proposed changes through the “Edit Suggestions” dialog. Once the driver accepts an edit request, it will display a note on the daily driver’s title log stating “Recertify”, which indicates the log needs to be certified again in order to include the records changes.

 Recap Button: Tap the Recap button to bring up the recap information and corresponding cycle data for the specified duty day.

 Certify Button: Tap the button to certify the selected daily log.
- Select the Certify Now button, if the current status is Driving, a dialog will pop-up to confirm changing the status to off-duty.
- If there are Pending Edit Requests, the Pending Edit Request dialog will appear prompting the driver to accept or reject the events before certifying the log
- Choose the Cancel button to cancel changing the status.


Note: During log certification, if the PDF upload fails, a copy of PDF file is saved into the PDF Archived folder under the App directory: Internal storage/ [App Name Folder]/PDF Archived/Certified Logs. This can be obtained manually if user reaches to more than two retries of failed upload. - The Daily Log PDF report will then be generated.
- The application also supports generation of the Driver’s Daily Log when in Offline mode. These logs are then stored locally in the App Name’s directory, same location as to where the DVIR Reports (pdf) are stored.
Per FMCSA ELD rule 395.15 (c) (11) The names of the co-drivers are displayed and are listed either on the same line as the list of Violations and Exceptions or below it. Also the Vehicles/Trailers used by the driver(s) are also displayed. Click here to view a sample of the Daily Log PDF report.- Tap the OK button to confirm the certification of the driver’s daily log.

- However if the driver did not certify all the daily logs, the ELD prompts the driver upon logging in and logging out to the app when there’s a past recorded log that are not yet certified.
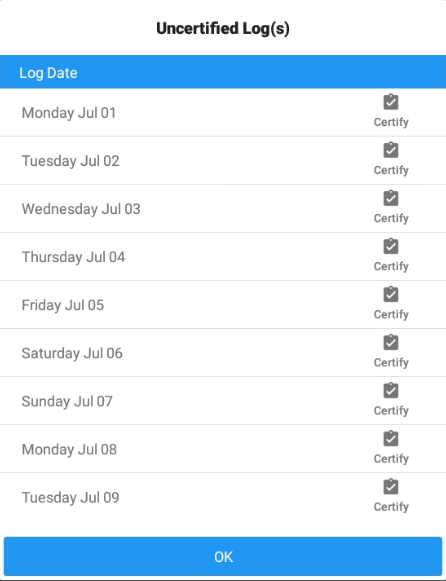
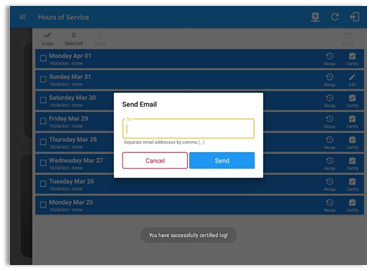
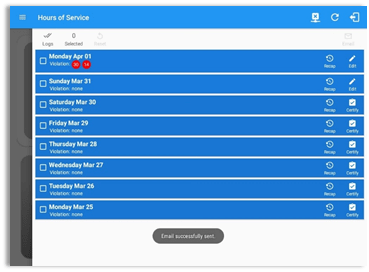
- Tapping on the Certify button will display the certify dialog. Upon certifying the driver’s daily log(s) it will create a Certify event with a remark which states: “Certified Log <date of the log> ” and will be recorded and displayed on the Edit Logs screen.
 Edit Button: Tap the button to uncertify the selected daily log and reopen the said log for editing.
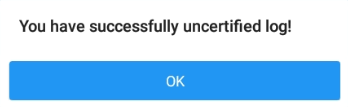
Note: Only driver logs that have not yet been certified can be edited, If a user wants to edit an entry for a day that's already certified, a warning dialog will launch the "uncertify dialog" before letting the edit occur.- Select the Uncertify Now button to confirm uncertifying a daily log.
- Tap the OK button to confirm the uncertification of the driver’s daily log.
- Select the Uncertify Now button to confirm uncertifying a daily log.
- Daily Driver Logs Full Time Range: Displays when the Start Hour value is not set to zero or default (12AM).

The Driver Logs Accordion - Expanded View Features/Editing a Driver Log Daily Driver’s Log Chart: Tap the driver’s log chart to start editing it.
For further information on how to update driver logs, please proceed to the Hours of Service App Edit Driver’s Log help screen.
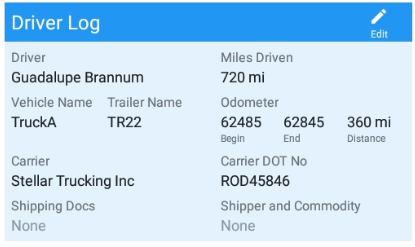
Daily Driver’s Form: This is where you can view the other required information that should be in the driver’s daily log.

The following are the information you can view:
- Driver Information
- Driver Name - This shows the name of the driver.
- Vehicle Information
- Vehicle Name - This displays the Vehicle ID.
- Trailer Name - This is where you can view the Trailer ID.
- Carrier - This displays the name of the carrier. Driver can change their carrier (for driver who drives for more than one fleet or DOT number) if the are allowed to do so. This permission can be enabled in driver settings > Allow Carrier Change option.
- Shipping Information
- Shipping Docs - This is where you can view the bill of lading or manifest number.
- Shipper & Commodity - This displays the shipper name and the type of commodity which the shipment contains.
- Edit Daily Driver’s Log Form Button: Tap this button to bring up the Driver Log Form which is the form where you can update the other required information that should be in the driver’s daily log.
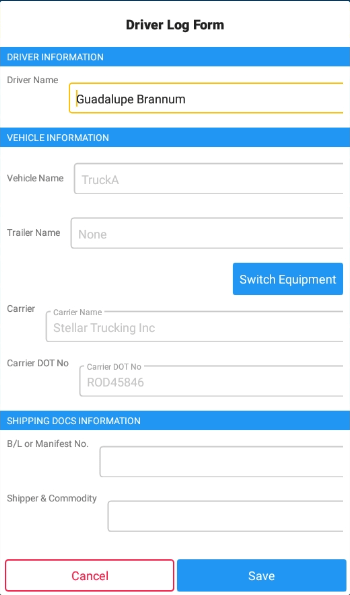
The following fields and button can be seen within this form:- Driver Name - This is where you fill in the name of the driver.
- Vehicle Information
- Vehicle Name - This field indicates the Vehicle Name.
- Trailer Name - This field indicates the Trailer Name.
- SWITCH EQUIPMENT- Tap this to launch the Switch Equipment dialog and change the Vehicle Name and Trailer Name.
- Carrier - This field indicates the name of the carrier. This is not editable
- Carrier DOT No. - This field indicates the DOT No. of the carrier. This is not editable
- Shipping Information
- B/L or Manifest No. - This is where you input the bill of lading or manifest number.
- Shipper & Commodity - This is where you key in the shipper name and the type of commodity which the shipment contains.
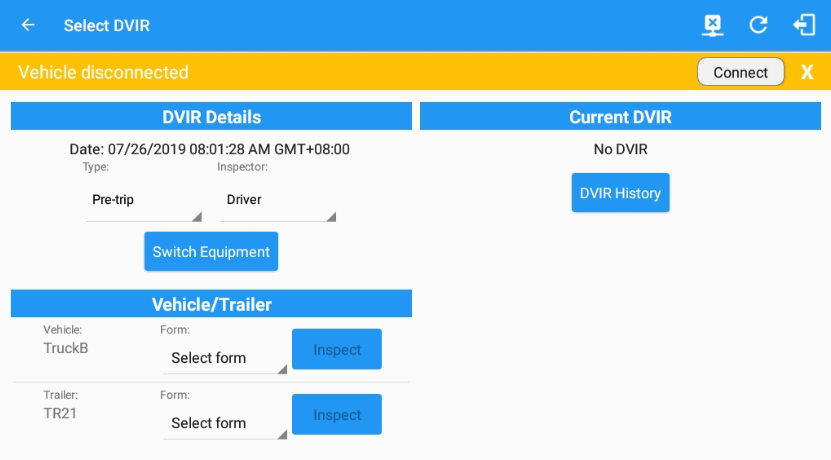
- DVIR: This is where you can view a list of the DVIR conducted during the selected working day.
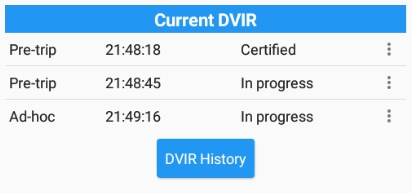
- Tap the
 icon to open the pane for the Email and View options.
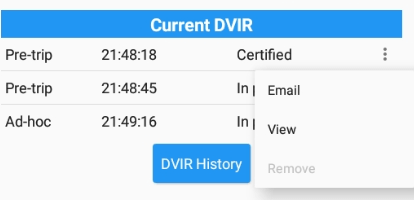
- Tap the
 Email Button to send the completed vehicle inspection to an intended recipient.
 - Tap the
 View Button to view the vehicle inspection details.
 - Tap the
 Remove Button to remove the inspection (Note: You can only remove In Progress vehicle inspection.)
- Tap the
 DVIR Button: Tap this button to bring up the DVIR screen of the HOS app which is where you can perform a DVIR. For more information on how to manage DVIR, please proceed to the Hours of Service DVIR help screen.
Editing a Driver Logs
The Edit Log screen can update/correct the driver’s or driving duty data entries logged through the HOS app. It can also view the history of an edited log.
- Daily Driver’s Log Chart: Touch the driver’s log chart to start editing it.
- You can navigate through the daily driver logs by selecting either the
 Previous Day or
  Next Day Button.
 - You can also view the cycle used and the Starting Hour of the day set by the carrier which is placed just above the grid chart
- You can navigate through the daily driver logs by selecting either the
- By default, secondary events are not displayed and only primary events can be viewed in the Event History List.
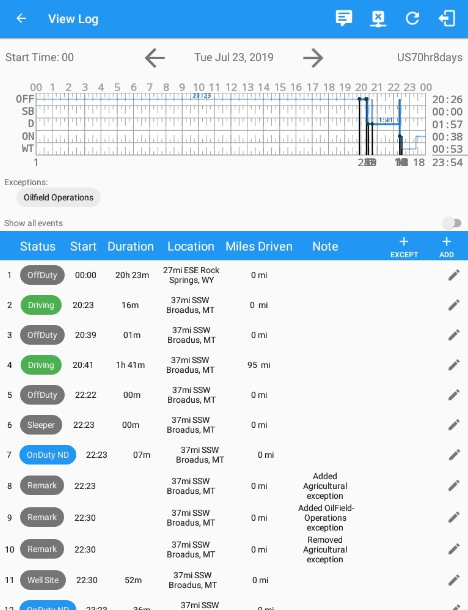
You can show all events by tapping the Show All Events option.
- You can add exceptions by tapping the
 Add Exception Button.
The Exception Pop-up Dialog will then appear where you select as to which exception the driver will use.
When adding an exception, the reference is displayed below the log grid and that it creates a remark event when an exception has been added. Also it creates another remark event when an exception is removed (or disabled).
Note for the remark states: "Exception added: " example: "Exception added: 395.1(d)" and "Exception removed: " example: "Exception removed: 395.1(d)"
- You can add new events by tapping the
 Add Events Button. The Create Event Pop-up Dialog will then appear where you can input the details of the new event.
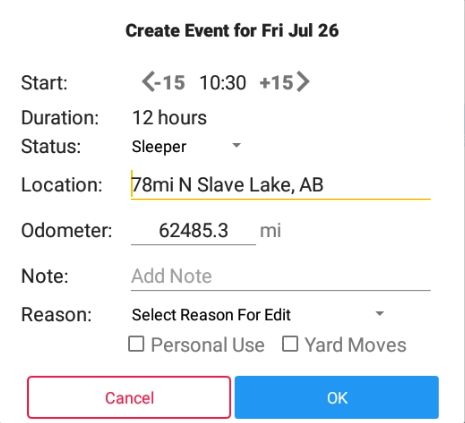
Notes:
- The current status of the app is disabled to prevent adding the same status consecutively.
- The backward and forward time arrows are being disabled to prevent time from going before or after the current day. (eg. 12:00AM – 11:59PM)
- The driver is allowed to add or edit an event in the app if ‘Allow ability to edit logs option in portal->settings->account setting under Portal Controls and ‘Allow ability to edit logs’ in Drivers Management page are enabled.
- Select the
 Edit Log Button of the driver log event that you wish to edit.

Note: The Edit Log Button will show NOTE instead of Edit because the driver will only be able to add a note to the following events:
- Intermediate log
- Login/logout
- CMV Engine power up/shut down
- Malfunctions and diagnostic events
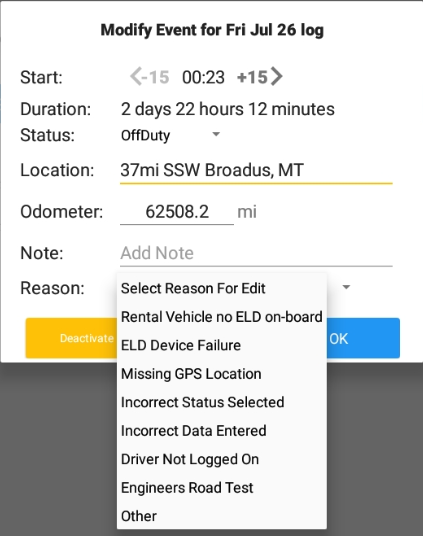
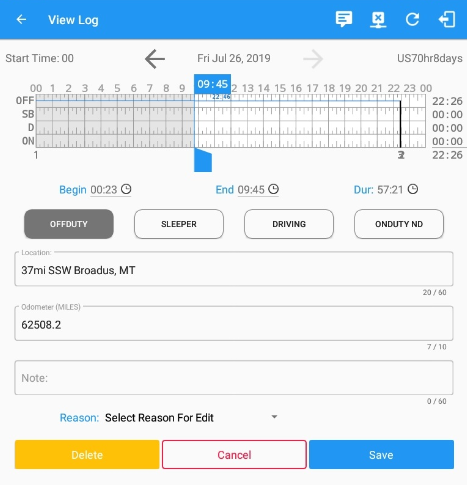
- The Modify Event pop-up dialog will then appear.
- You can update the duty status from the Status Drop-down List.

- You can also manually update the Location field.
- Location will be displayed as street address if driver is in Canadian cycle or vehicle used is in AOBRD mode and 'Display Street Address for AOBRD Mode' option is enabled in Account Settings > App Controls.

- You may fill in the Note field for your notes or remarks.

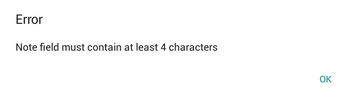
In creating or editing an event status, the ELD requires annotations to be 4 characters or longer, including embedded spaces if driver annotation is required and driver is prompted by the ELD. If the driver enters an annotation with less than 4 characters then a warning dialog will prompt the driver.
- Tap Reason dropdown selection to select a reason for updating the log.

Note: Adding/Editing a current/previous record should not require a reason or a note, However, if a record is being added/edited in the previous logs then the Note field should not be empty and must contain at least 4 characters.
- You may fill in the Odometer field for your odometer value.

Note: When the Odometer value was supplied for a previous driving status the value entered is carried over to the new driving status when making a status change. Hence, the Odometer value entered for the current day will set as the Begin Odometer value.
- Touch the
 OK Button to save the changes you made to the duty status event.
You can select the Cancel Button to cancel the updates to the said duty status or
the Deactivate Button to deactivate said event.
Notes:
- When the driver is in AOBRD mode then the edit "*" sign & events will not be displayed in the Edit Logs screen and on the Certified PDF logs.
- Regardless if the vehicle currently used is in AOBRD or ELD mode, driver can be able to edit the Auto OnDuty ND event the same with editing a manually created events.
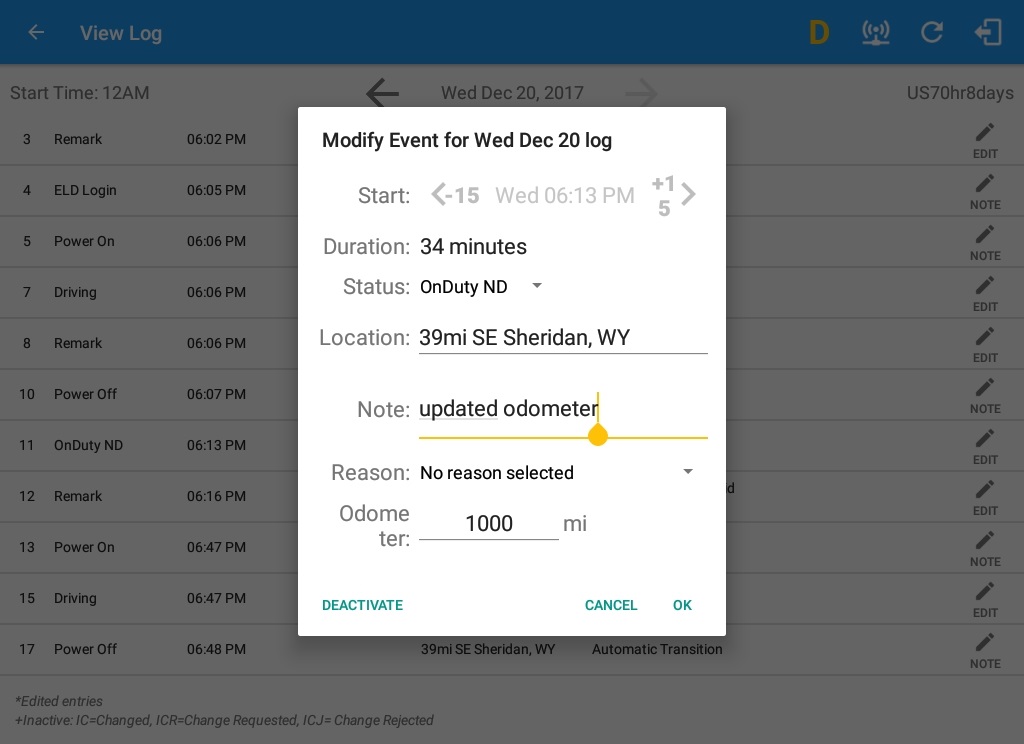
- When Use GridView Editing is enabled in Settings->HOS Preferences, a grid view editing will display upon tapping Edit button to any of the existing log events. User can then make any required changes, select a reason for the edit from the drop down list and then tap the Save button to save the changes.
- Display Street Address option will allow drivers to select where to get the location if it is the actual location or the nearest City with 5,000 population when in AOBRD mode. The option will only display for drivers that have permission which is set by the personnel in the portal->Account Settings under App Controls > ’Display Street Address for AOBRD mode’.
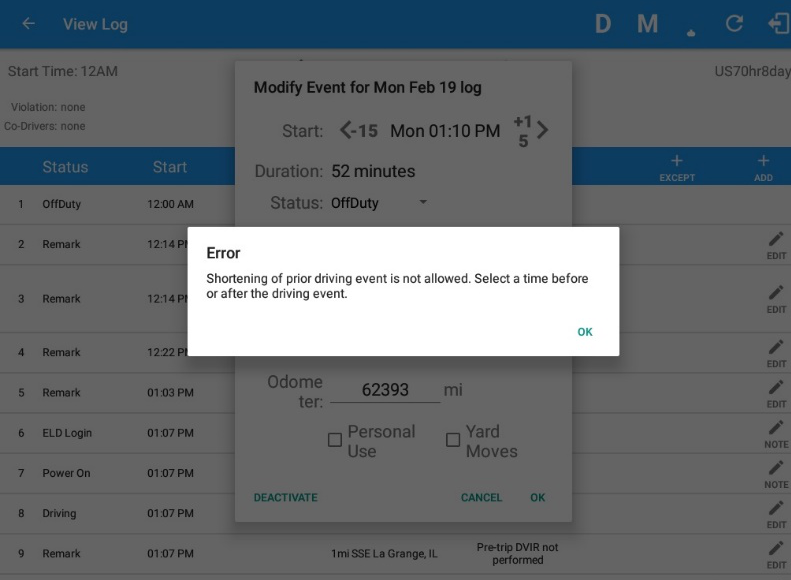
Attempt to create or edit an event such as Off Duty, On Duty, Sleeper Berth in the middle of an automatically Driving event is not allowed, instead an error dialog is displayed stating "Error: shortening of prior driving event is not allowed. Select a time before or after the driving event.". Editing the event can only be allowed if the set start time is the time after the app has lost VBUS connection or when Bluetooth device is disabled.
- Personal Use and Yard Moves options are not displayed when editing an event (both via Legacy Editing and Grid View Editing mode)
Created Events
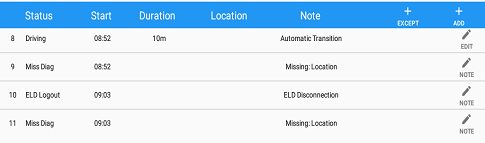
Upon logging in and logging out of the HOS app, as well as connecting and disconnecting to a VBUS Device, new event types will display on the Event History List. The New Event Types are as follows:
- Certify
- Remark - with a note of “Authenticate” (if logging in) or “Unauthenticate” (if logging out)
- ELD Login - event that will be recorded when app is connected to VBUS Device
- ELD Logout - event that will be recorded when app is disconnected to VBUS Device
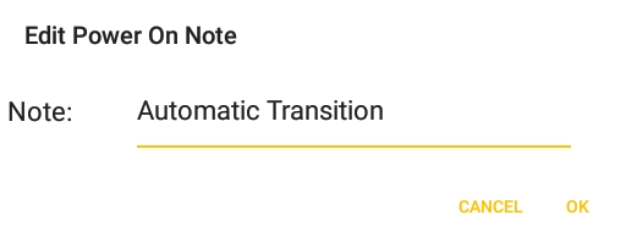
Note: Auto events created are recorded in the app with a note stating: “Automatic Transition”
- Personal Use - If this is enabled, the status will be set to Off Duty automatically and will disable the Yard Moves checkbox. Selection of this option will be recorded within the events history list.
- Yard Moves - If this is enabled, the status will be set to On Duty automatically and will disable the Personal Use checkbox. Selection of this option will be recorded within the events history list.
Note: Not all of the events statuses are displayed on the grid chart. Personal Use and Yard Moves are also displayed on the grid chart as an Amber color line to be visually different with the other event statuses, a dashed line represents the Personal Use event and a dotted line represents the Yard Moves event. The legends for Personal Use and Yard Moves event will only display when the said events occurred. A driver’s indication that the CMV is being operated for authorized personal purposes may span more than one CMV ignition on cycle if the driver proactively confirms continuation of the personal use condition prior to placing the vehicle in motion when the ELD prompts the driver at the beginning of the new ignition power on cycle. In addition, upon disabling the events "Personal Use" or "Yard Moves", it records a new event on the list stating "ClearPC or ClearYM" which indicates the clearing of the option for Personal Use and Yard Moves. Thus, it will not reflect on the grid chart.
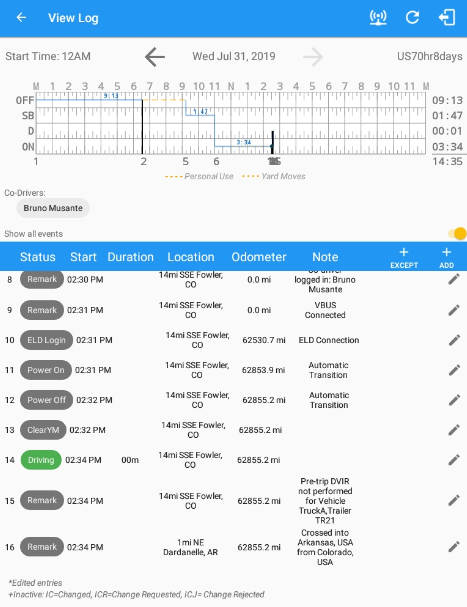
Note: When a co-driver is log into the HOS app, the co-drivers name is displayed on the daily logs which is placed right below the grid chart.
Re-assigning driving time to a co-driver
The Primary driver is allowed to re-assign his driving status/time to his co-driver (if the co-driver logs in).
- Tap the Edit icon on the edit logs screen to re-assign the status
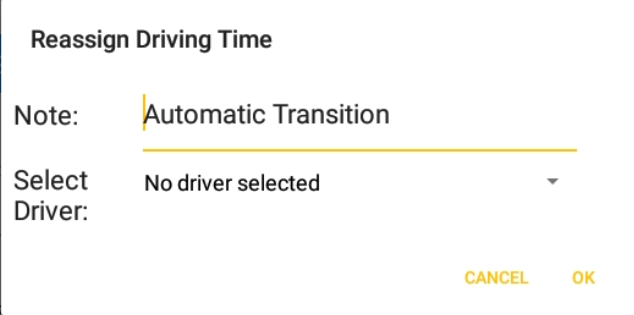
- You will need to login the Co-Driver to make it active.
- You can also check on the event history list of the co-driver to confirm that the status is re-assign.
- When back to main driver, check also the event history list of the main driver to confirm that the driving status is no longer there.
Note: Only driving events that are created automatically can be reassigned, non-driving events such as Login or Power On can only be annotated.
Crossing Boundaries
The border crossing calculation uses the VBUS GPS coordinates if they are available, and the android coordinates if they are not. The following instances happens when the driver crossed boundaries between Canada and US (vice versa):
- If the GPS coordinates are changed to a different state or province, a remark event will be recorded in the driver log.
- If the current location is in Canada, the driving rules will automatically switched to Canadian rules; similarly, if the location is in the US, the driving rules automatically switched to US rules.
- If there is a co-driver logged in, both the remark and the rules changes will be occurring for them as well.
Note: These remark events will be reflected in the portal’s Logs Tab
DVIR
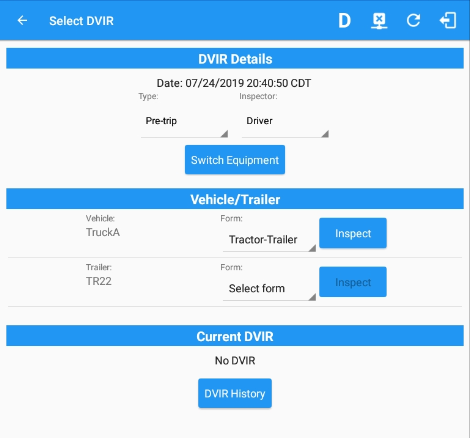
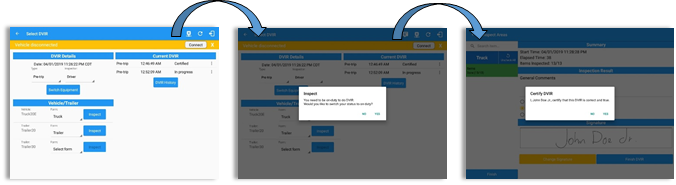
Creating Your Pre/Post Trip Vehicle/Trailer DVIR
The DVIR feature provides a way for you to create online DVIR reports while in the field. This helps to ensure that your vehicle conforms to the FMCSA’s safety regulations.
Driver can have a DVIR feature only if they have DVIR product enabled as allowed feature on their driver’s account.
Different ways to go to DVIR Page:
- Main Navigation Menu

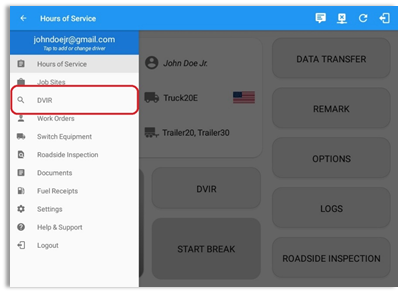
- DVIR Button
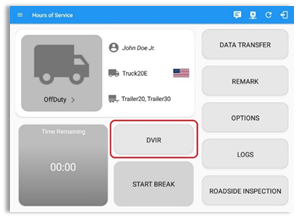
- Go to Hours Of Service Main Screen.

Notes:- When a driver manually/automatically change to 'Driving' event without completing the Pre-trip DVIR, a toast message will be displayed at the bottom of app stating: "Please perform a Pre-trip DVIR“.
- It will also create a 'Remark' event with a note ‘Autogenerated: Pre-trip DVIR not performed.’
- The Remark event will be created once after it detects or when a first Driving event on the shift cycle is created.
- Also, an alert is sent only once for each vehicle or trailer that begins to drive without having done a Pre-Trip DVIR.
- Go to Hours Of Service Main Screen.
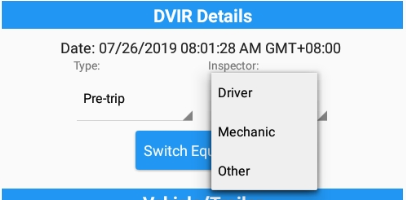
Setting Up Your DVIR Type
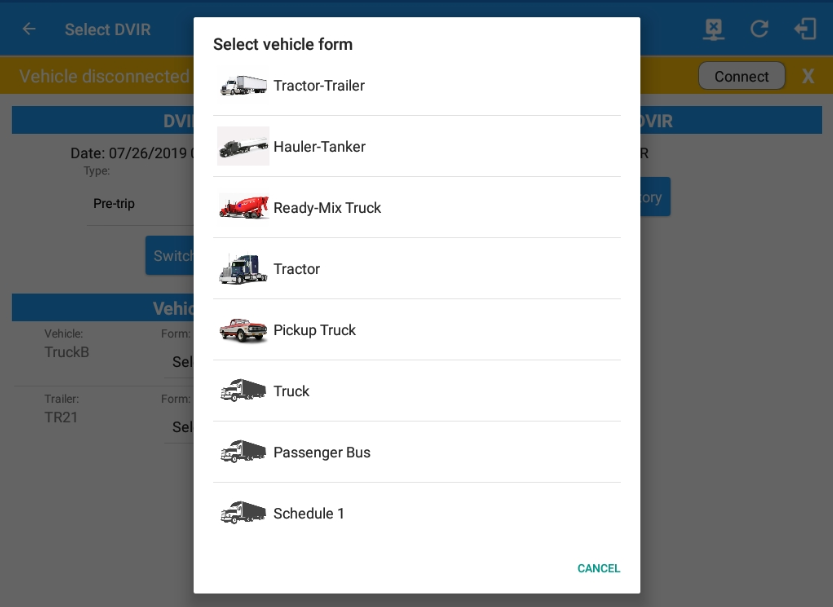
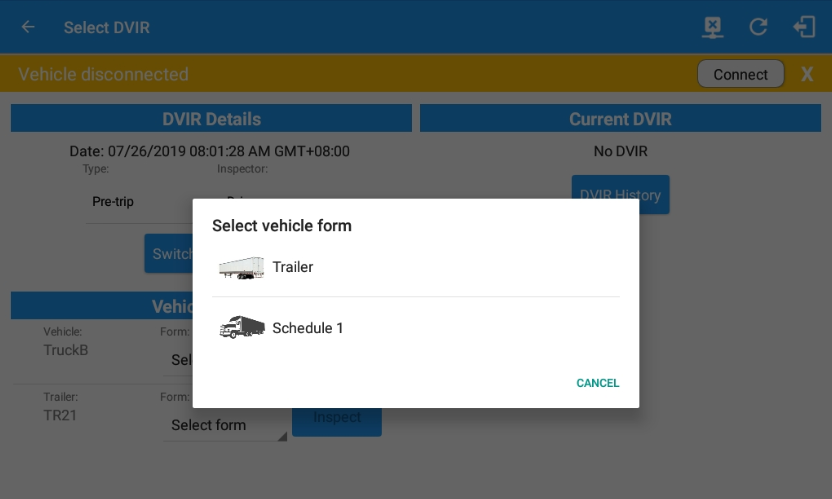
- You can select a DVIR Form from the drop downs (Vehicle/Trailer).
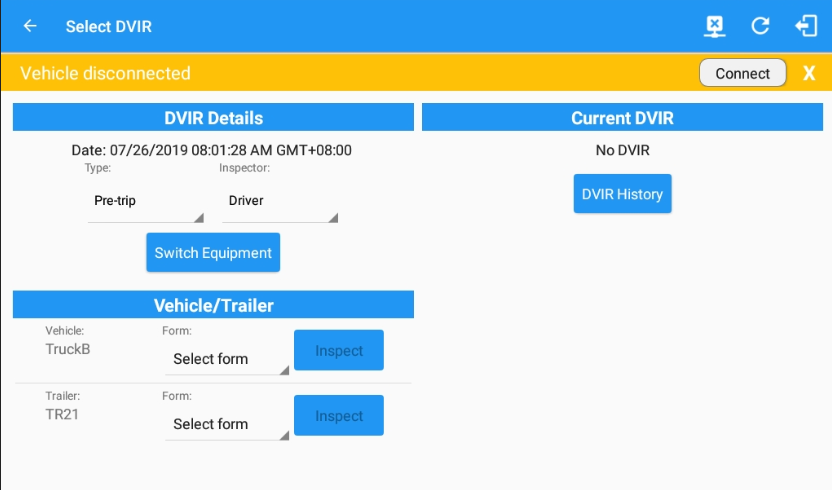
Note: Highlighted text only displays when conducting an inspection for the first time and that no DVIR forms are associated to the current equipment used.- Vehicle Form
- Trailer Form
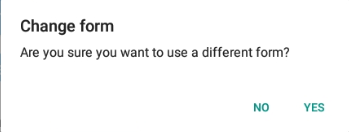
- Some Equipment has an associated form, so whenever the driver tries to change the form a pop up dialog will show. Clicking 'OK' will automatically change the forms used with the associated ones.
- Once a new driver has logon to the app, the forms for the Vehicles/Trailers ID used by the prior driver shouldn’t retain. Form fields are empty.
- The application also supports generation of the DVIR Reports when in Offline mode. The DVIR Reports are then stored locally in the App Name’s directory, same location as to where the Driver’s Daily log PDFs are stored.
- Vehicle Form
- Choose the appropriate DVIR Type from the following options:
- Pre: A DVIR conducted before driving the CMV.
- Post: A DVIR conducted after driving a CMV.
- Ad Hoc: Any DVIR conducted in any other period than the ones specified above.
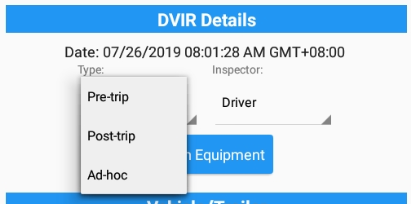
- Choose the appropriate Inspector Type from the following options:
- Driver: The current driver conducted the DVIR.
- Mechanic: A mechanic conducted the DVIR.
- Other: Another personnel conducted the DVIR.
Starting Your DVIR
Tap the Inspect Button to start the inspection, you will be directed to the DVIR Page.
![]()
Note: However, a dialog as shown below will display that will ask confirmation to switch you to On Duty status to do DVIR if current duty status is in Off Duty or will take you out to Personal Use if current status is Off Duty under Personal Use.
- If current duty status is Off Duty
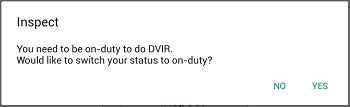
If current duty status is Off Duty under Personal Use

Completing the First DVIR Area
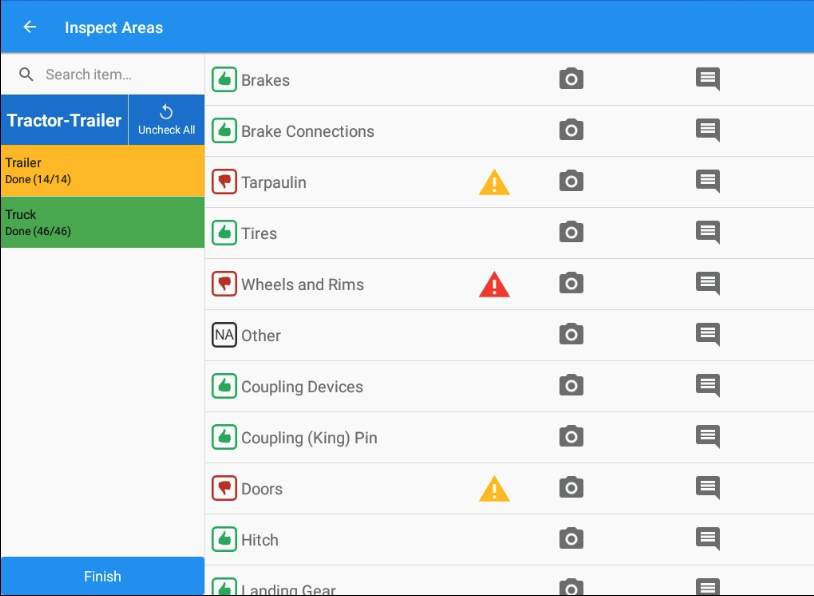
- The 1st DVIR Area is selected by default, you can also tap its corresponding tab to display the DVIR items under this area.
- You can select the status of each DVIR Item by tapping their respective tri-state check-boxes.
- Tap the unselected check-box once or select the green
 Thumbs Up Icon to specify that the item is in a good condition.
 - Tap the unselected check-box twice or select the red
 Thumbs Down Icon to specify that the item is in a bad condition.
 - Tap the unselected check-box thrice or select the
 Not Applicable Icon to specify that the item is not applicable for the current DVIR.
 - A "Check All" button will appear if it is enabled in your account to check all points automatically.
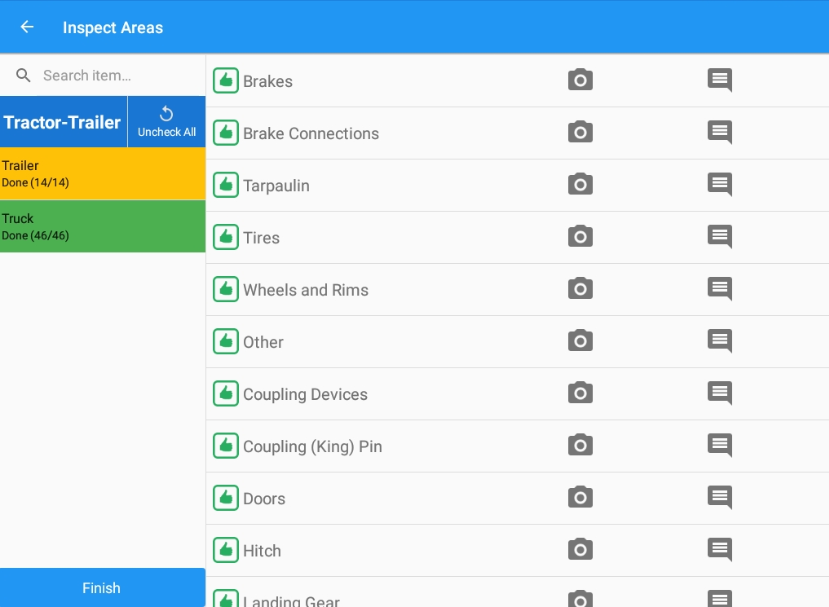
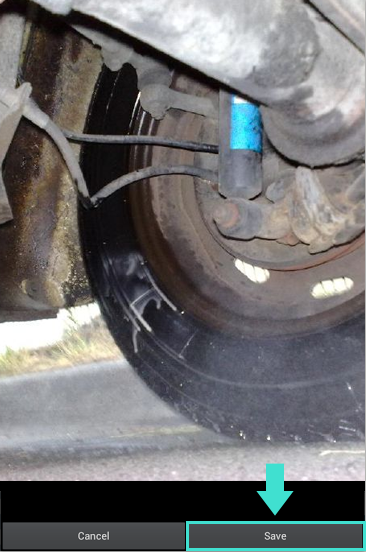
- If you wish to capture an image of the DVIR item, you can tap on the
 Camera Button.
 - The Camera app will then appear, proceed to take a picture of the DVIR item.
- After tapping the Capture Image Button, select the Save button to save the image and add it to your item report. You can also discard the captured image by selecting the Cancel button.
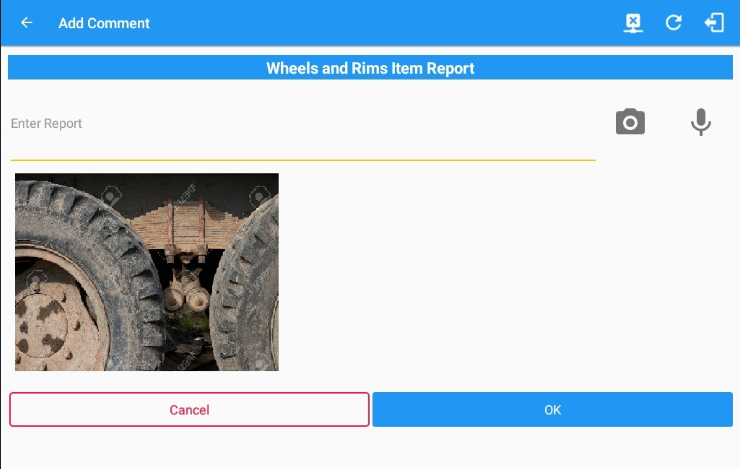
- You may add comments or remarks for an DVIR item by tapping the
 Comments Button.
 - Fill in the Enter Report Field for your comments or remarks.
- Tap the
 Camera Button to add more images to the item report.
 - Select the Voice Dictation Button to use voice dictation feature instead in adding your comments or remarks.
- Tap on the OK button to finish adding your images and comments or remarks.
Completing the Succeeding DVIR Areas
Note: All DVIR items under all DVIR categories and areas must be updated before you can finish your DVIR Report.
- Complete updating the status of the other DVIR items using the same preceding steps.
Finishing/Certifying Your DVIR
Select the Finish tab. ![]()
The following information will then be displayed:
- Summary
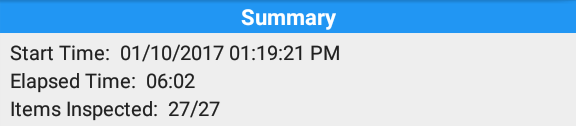
- Start Time - The date and time the DIVR started.
- Elapsed Time - The duration of the current DVIR.
- Items Inspected - This is a counter for the number of items already inspected.
- Items Remaining -It will be present if you have not yet updated all of the DVIR items, this will show the item/s that are still to be inspected.

- Final Items - You may wish to accomplish these ones as part of your DVIR Report.
- General Comments - This is where you key in your general DVIR Report comments. The status of these check-box items will also be reflected in the DVIR Report:
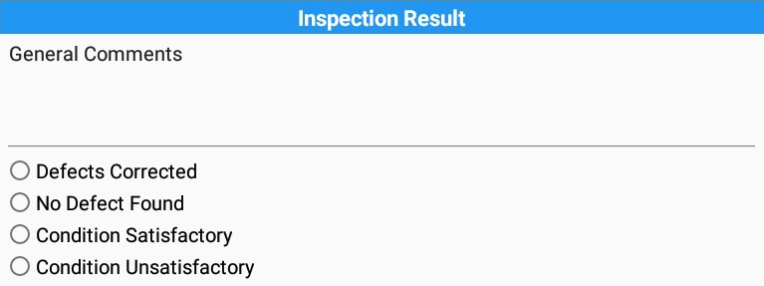
- Defects Corrected
- No Defect Found (Note: ‘No Defect Found’ option is only available for Canadian cycle drivers)
- Condition Satisfactory
- Condition Unsatisfactory
- General Comments - This is where you key in your general DVIR Report comments. The status of these check-box items will also be reflected in the DVIR Report:
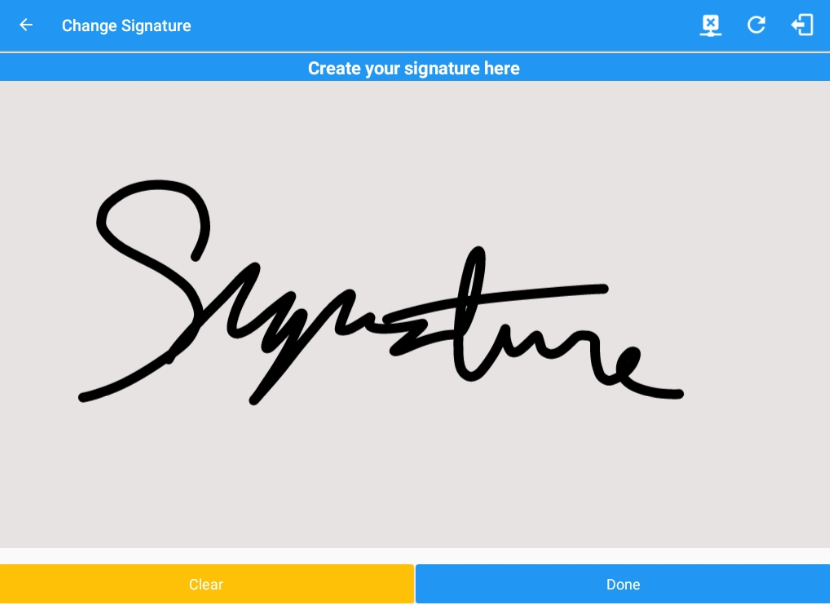
- Signature
- For drivers - You may wish to change your signature by tapping the Change Signature Button.
- For mechanics and other inspectors - You may create your signature by tapping the Change Signature Button.
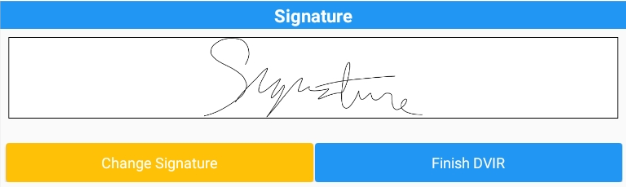
- Select the Done Button to save your signature. You may also select the Clear Button to discard the signature you made.
- Tap the Finish DVIR Button to finish the current vehicle DVIR.

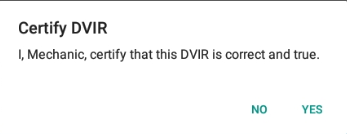
- Finally, after reviewing all of the DVIR details, you can select the OK Button to certify the DVIR. You can also cancel certifying the DVIR by selecting the Cancel Button.
- After successfully certifying the DVIR, a 'Remark' event will be created in the Edit Logs screen stating the completion of Pre/Post/Ad-Hoc DVIRs. Sample note: Completion of Pre-Trip DVIR for <EquipmentName>
Deleting Vehicle DVIR
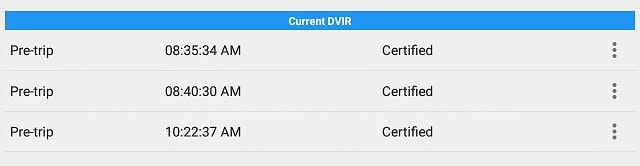
- Go to Current DVIR section. This is where you can view a list of the DVIR conducted within the DVIR screen.
- Tap the
 Email Button to send the completed DVIR to an intended recipient.
Tips: You can only email a Certified DVIR. - Tap the
 View Button to view the DVIR details.
 - Tap the
 Remove Button to remove the DVIR.
Note: List of completed/in-progress DVIR are ordered to show the most recent DVIR(s) first and the oldest ones last.
- Highlighting Previously Failed DVIR Previously failed DVIR points are highlighted in RED.

Below the inspection point displays the text stating id the points have been updated or not.
Viewing the DVIR History
- Tap the DVIR History button

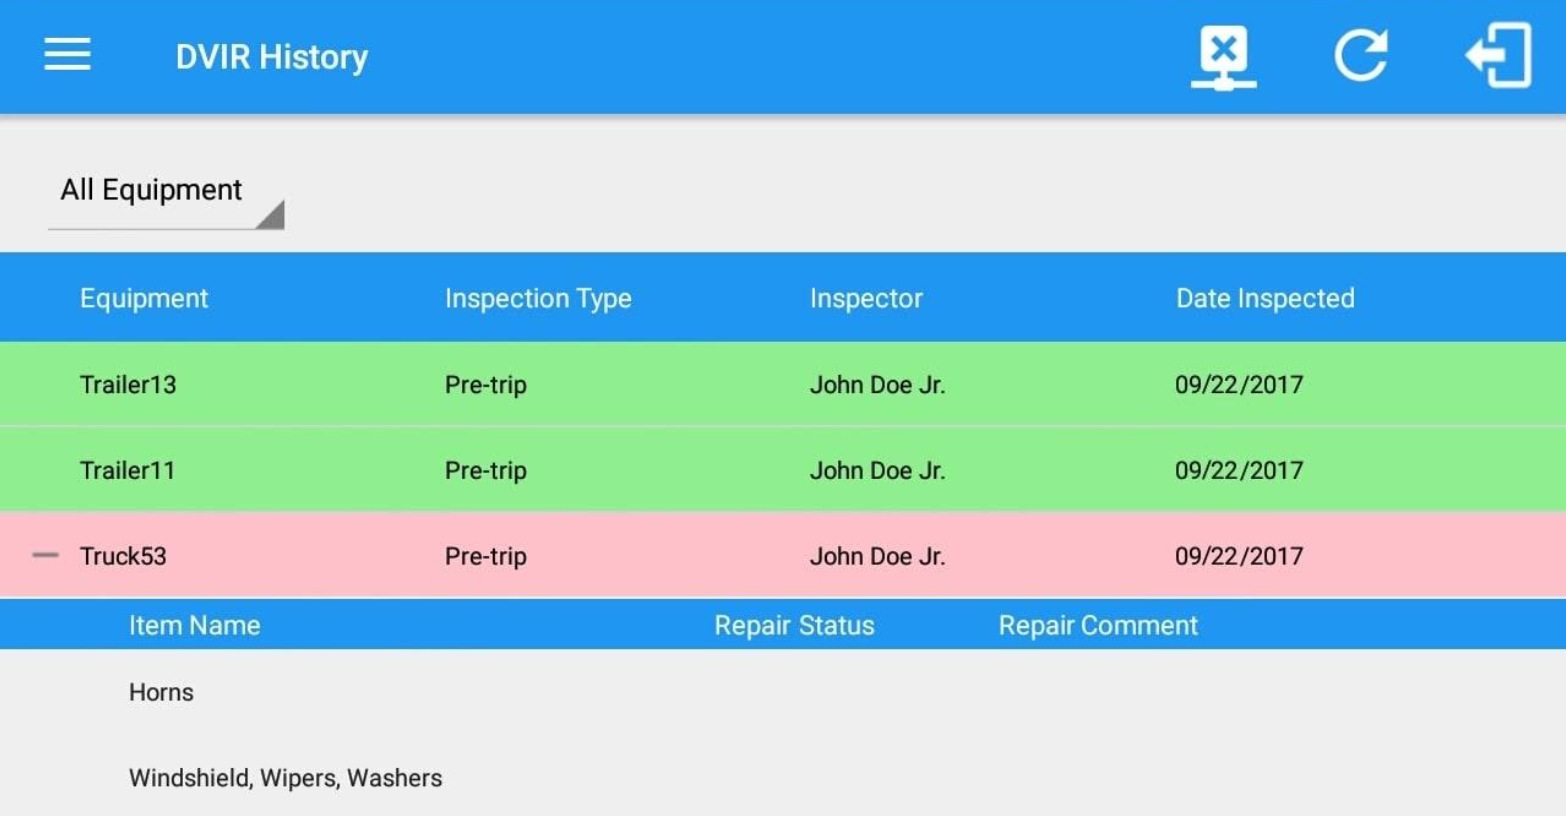
- In the DVIR History screen, you can view all the DVIRs done to all the Vehicles and Trailers you are currently using. You can also select a specific Equipment from the drop down (All Equipment).
- A DVIR that does not have failed inspection items will show up with a GREEN background.
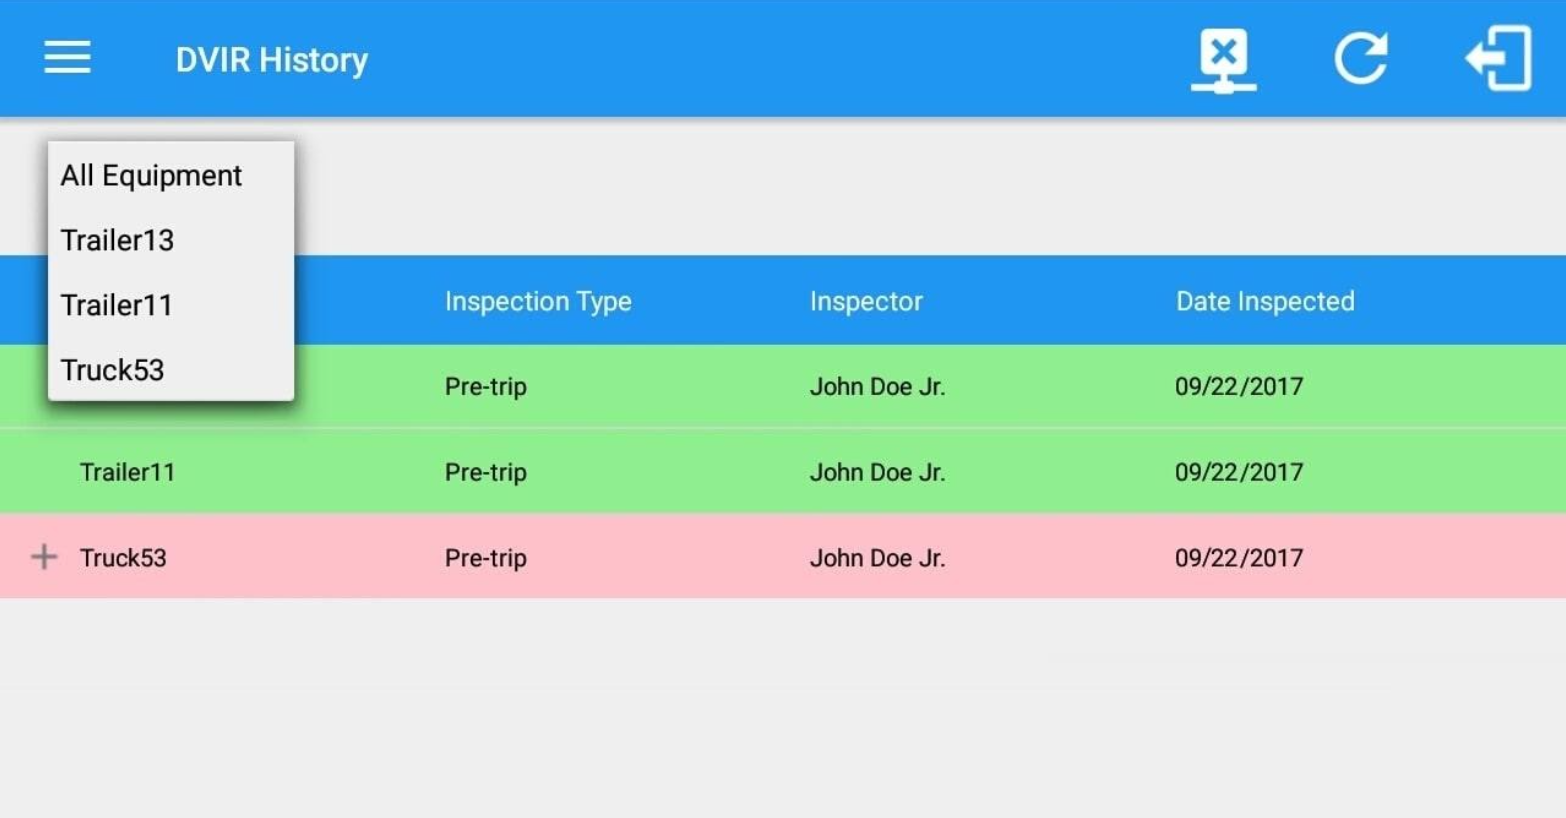
- A DVIR with failed inspection items will show up with a RED background.
- To view the failed inspection items, tap on the + icon below its name. Inspection items that have been repaired will have a repaired status and repair comment on the right side.
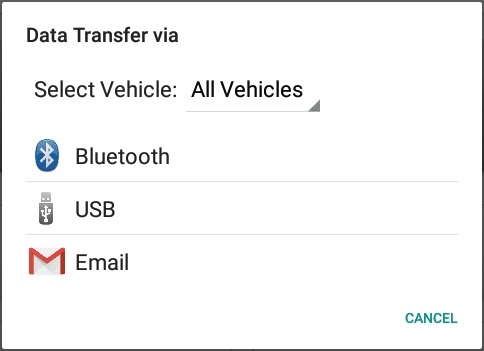
Data Transfer
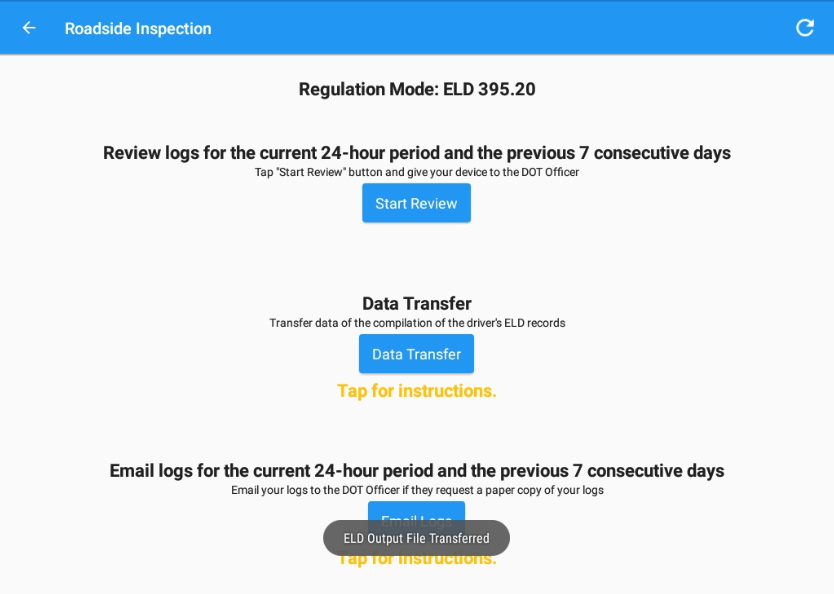
This will show the dialog displaying the supported data transfer options. The ELD provides a standardized single-step compliation for the driver’s ELD records and initiation of the data transfer to authorized safety officials when requested during a roadside inspection.
The following are the different ways to access the Data Transfer dialog
- Main Navigation Menu
- Swipe in from the left edge of the screen, or tap the
 Main Navigation Hamburger icon to show the main navigation menu.
- Tap the Roadside Inspection option in the Main Navigation Drawer, after which the roadside inspection screen will then be displayed.

- Tap the Roadside Inspection option in the Main Navigation Drawer, after which the roadside inspection screen will then be displayed.
- Tap the
 Data Transfer button.
- Swipe in from the left edge of the screen, or tap the
- Driver Options
- Go to the HOS Main Dashboard.
- Tap the Options button.
- Tap the Data Transfer button.

- Go to the HOS Main Dashboard.
Transferring Data
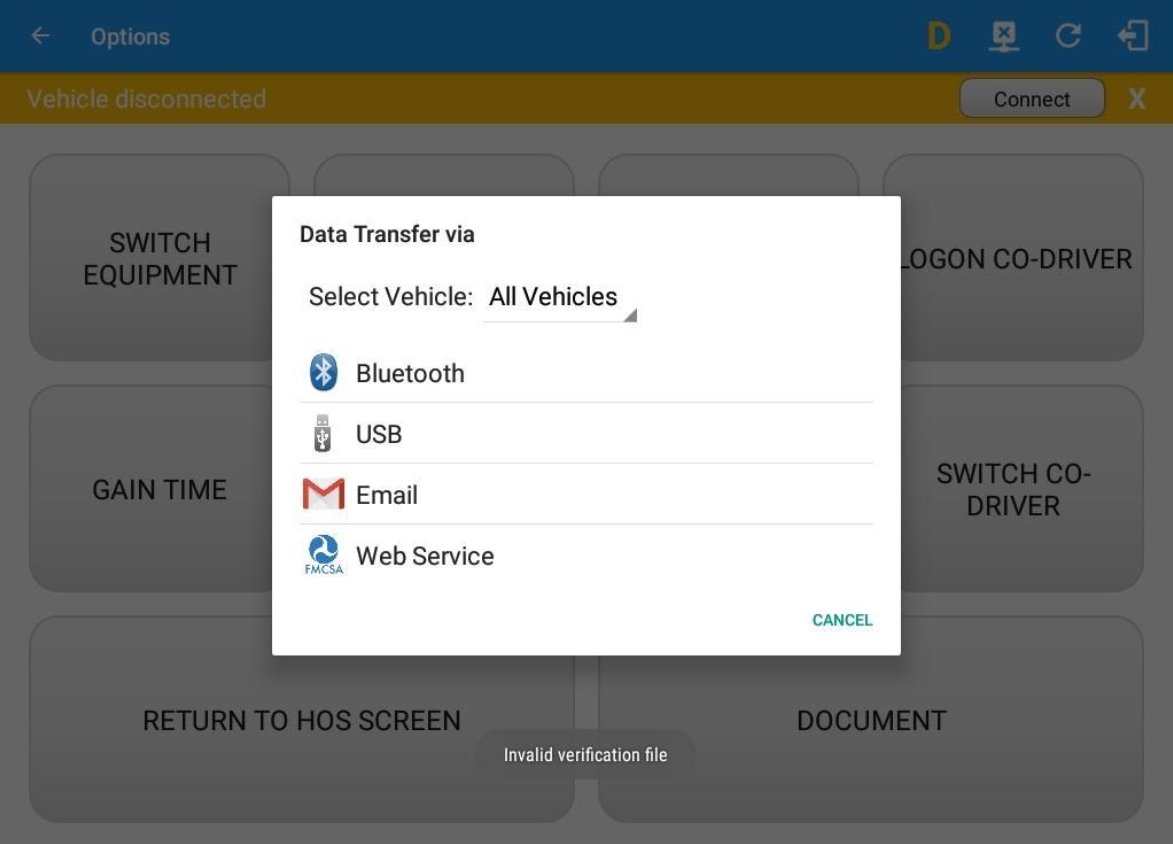
- Once the Data Transfer button is tapped, a selection of the supported data transfer options by the ELD will prompt to the user.
- On Android the supported data transfer options are Bluetooth, USB, Email and Web Service only.
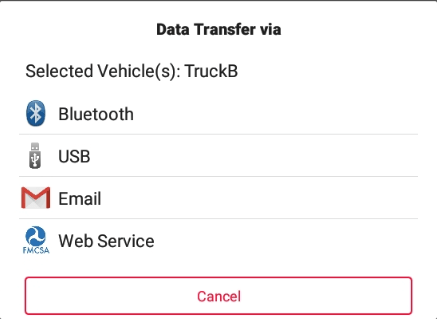
- On iOS the supported data transfer options are Bluetooth, Email and Web Service only.
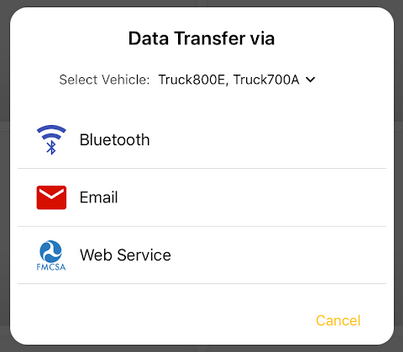
- On Android the supported data transfer options are Bluetooth, USB, Email and Web Service only.
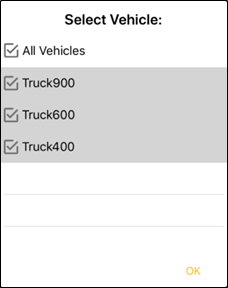
- Select Vehicle – this option enables the ELD to produce a data file or a series of data files of ELD records for a subset of its vehicles used by the driver.
- Tap the Select Vehicle menu to show the list of vehicles used by the driver.
- The ‘All Vehicles’ option will only display on the list when the driver has already driven multiple vehicles for the day.
- For Android app, list of vehicle/s are displayed in checkboxes. After selection of vehicle(s), it will then prompt the Data Transfer dialog to select data transfer options: Bluetooth, USB, Email or Web Service.
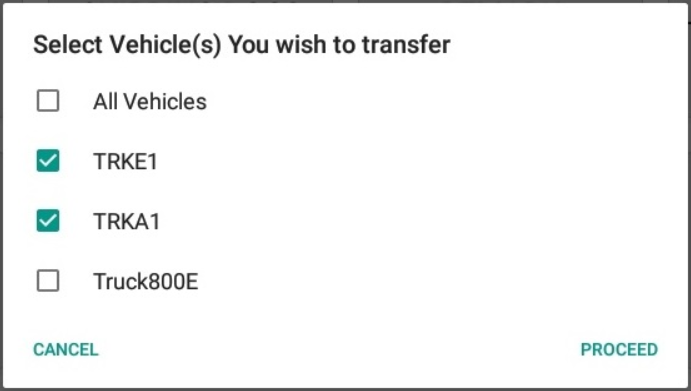
- For iOS app, list of vehicle/s are displayed in checkboxes. The app allows to select specific vehicle(s) to be included in ELD output file. The list of vehicles displayed are the vehicles that the driver used within the current cycle.
- Select or deselect vehicle or vehicles by tapping the checkbox button. Tap OK button to save selection.
Note: All Vehicles option will only display on the list when the driver has already driven multiple vehicles for the day.
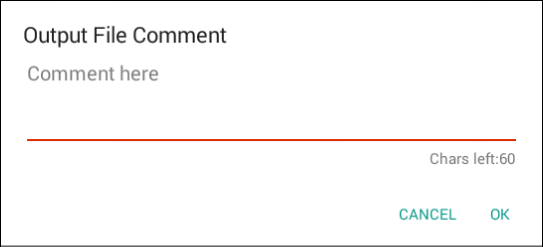
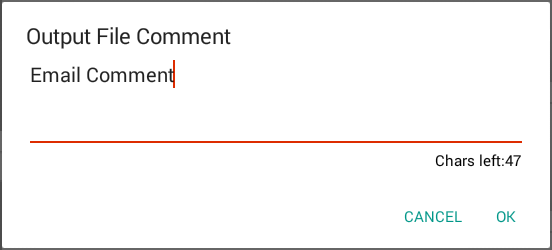
- Output File Comment – After selecting a data transfer option, the ELD prompts the output file comment in which the driver may or may not input as specified in section 4.3.2.5. The ELD accommodates the entry of an output file comment up to 60 characters long
 Upon confirmation, the ELD generates the compliant output file and performs the data transfer.
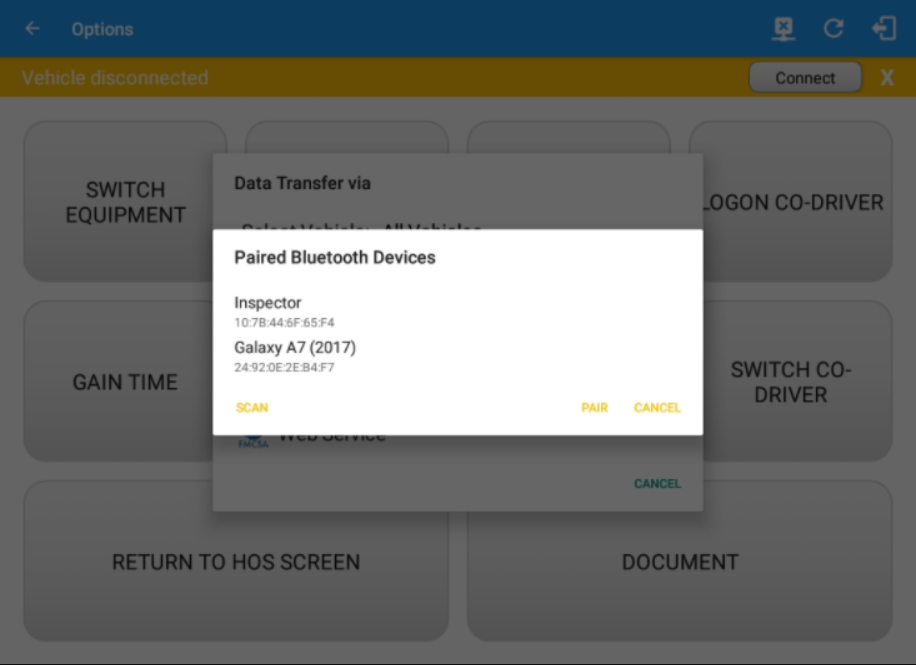
- Transfer via Bluetooth – this option enables the user to transfer files through Bluetooth tethering. The ELD prompts the output file comment in which the driver may or may not input as specified in section 4.3.2.5. After the input, if Bluetooth is not yet turned on, a prompt will appear asking you to turn it on.
 You will then be asked to pick the device to which the data will be transferred via Bluetooth Tethering.
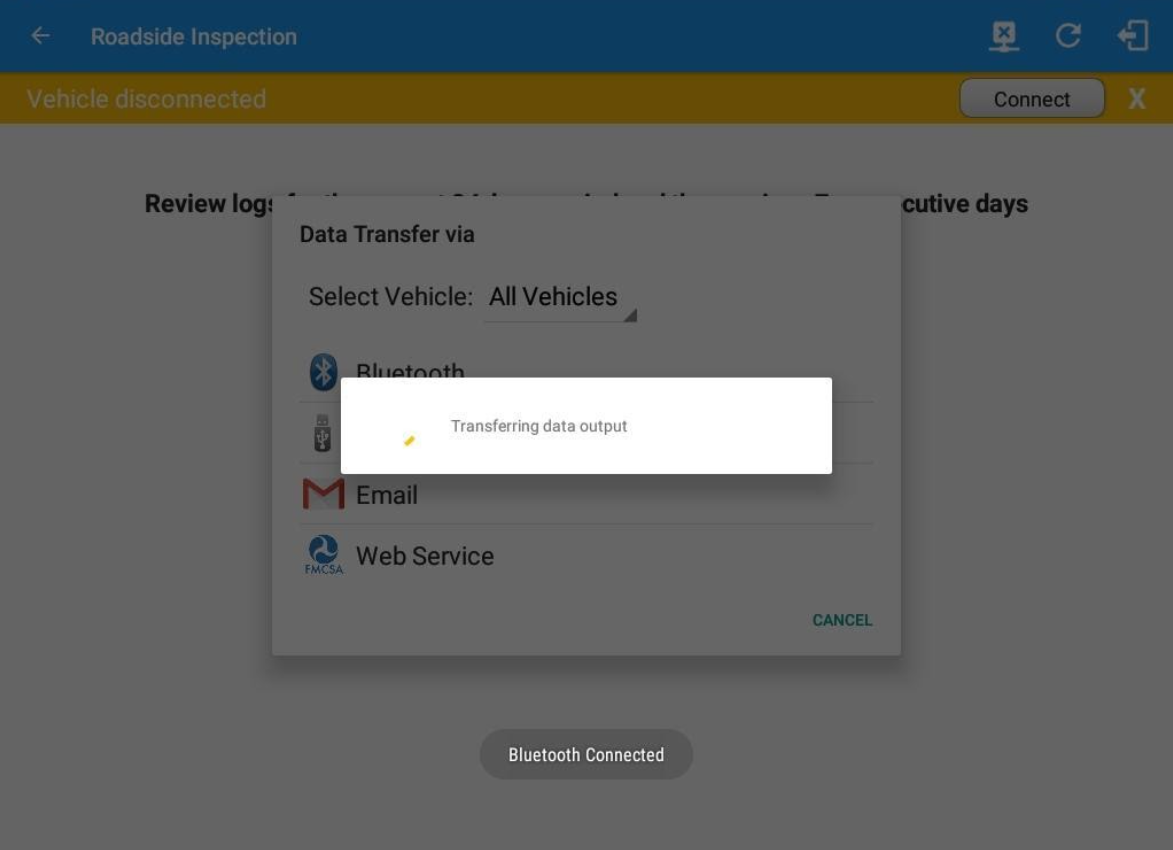 After the data transfer process is successful, a toast message will display at the bottom of the screen stating that the ‘ELD Output File Transferred’.
- Transfer via Email – this option enables the user to transfer files through email. The ELD output file transferred is encrypted using AES-256 in FIPS Publication 197. Before sending, the ELD prompts the output file comment in which the driver may or may not input as specified in section 4.3.2.5.
After the data transfer process is successful, a toast message will display at the bottom of the screen stating that the ‘ELD Output File Transferred’.
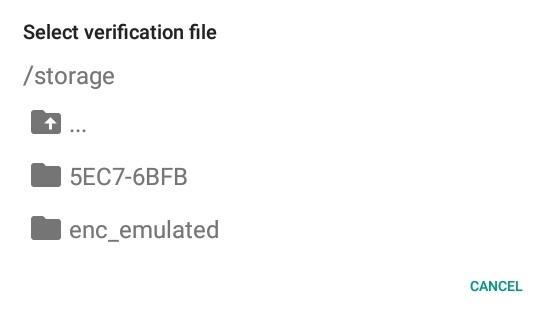
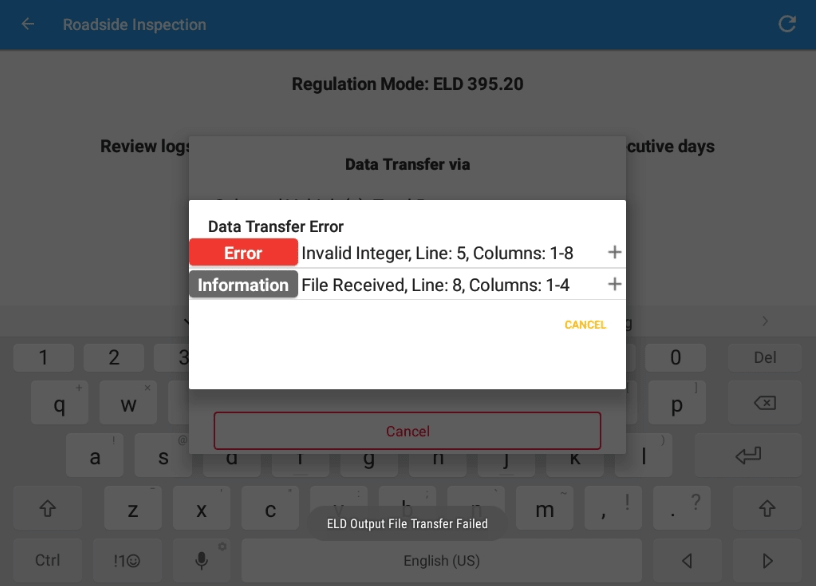
- Transfer via USB (Android Only) – this option enables the user to transfer files through USB (external devices). However, prior to saving the driver’s ELD file to an external storage/device, the ELD must read a verification text file from the USB device provided by the Authorized Safety Officials. This can be done by selecting the path where the verification file is located on the Safety Official’s USB device.
 If the verification process is successful, a ‘Verification Successful’ dialog will display.
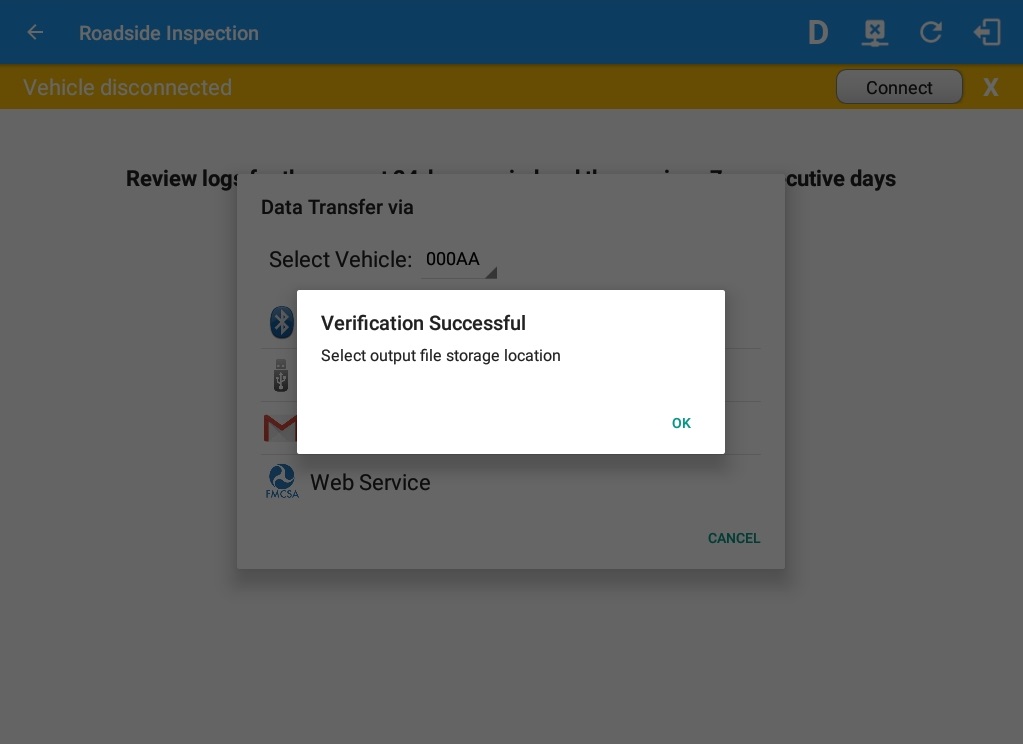
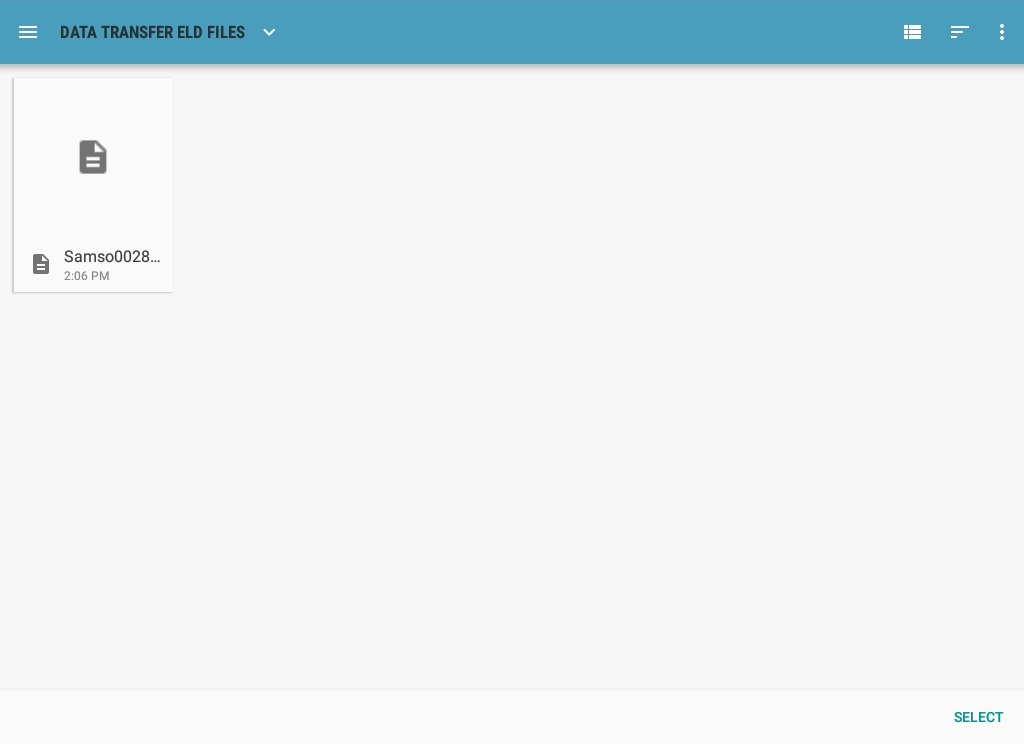
Once ‘OK’ button is tapped, then the driver can now select on where to save the ELD file.
Note: You cannot transfer a file via USB when the verification file on the device is not the same as the verification file on the inspector’s USB drive. If this issue occurs a toast message will display stating ‘Invalid verification file’.
- Transfer via Web Service – this option enables a user to submit ELD output files, and verify that ELDs’ certificate, ELD identifier and Registration ID are still valid.
After the data transfer process is successful, a toast message will display at the bottom of the screen stating that the ‘ELD Output File Transfered’.
Note: If data transfer is not successful, a toast message will then display at the bottom stating that ‘ELD Output File Transfer Failed’ with corresponding data transfer error messages.
- Transfer via Bluetooth – this option enables the user to transfer files through Bluetooth tethering. The ELD prompts the output file comment in which the driver may or may not input as specified in section 4.3.2.5. After the input, if Bluetooth is not yet turned on, a prompt will appear asking you to turn it on.
Switch Equipment
The Switch Equipment feature allows a driver to easily 'switch' from one vehicle to another. It also assists in monitoring and documenting the vehicles being used as part of their driver logs.
The following are the different ways to perform a Switch Equipment action:
- Main Navigation Menu
- Swipe in from the left edge of the screen, or tap the Main
 Navigation Hamburger icon to show the main navigation menu.
- Touch the Switch Equipment option in the Main Navigation drawer after which the Switch Equipment dialog will then be displayed.
- Note: the list of equipment are displayed in an alphabetical order
- Swipe in from the left edge of the screen, or tap the Main
- Main Dashboard Vehicle/Trailer icons
- Touch the Vehicle/Trailer icons in the Main Dashboard screen.
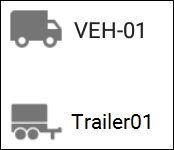
- After which the Switch Equipment dialog will then be displayed.
- Touch the Vehicle/Trailer icons in the Main Dashboard screen.
- Switch Equipment Button (Options)
- Go to Hours of Service Main Screen.

- Tap the Options button.

- Tap the Switch Equipment button.
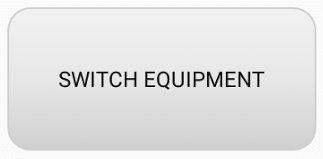
- Go to Hours of Service Main Screen.
- DVIR Screen
- Swipe in from the right edge of the screen or tap the Logs button
 to show the Driver Logs Drawer.
 - Tap the Inspect button of a specific driver log.
- Tap the Switch Equipment button.

- Swipe in from the right edge of the screen or tap the Logs button
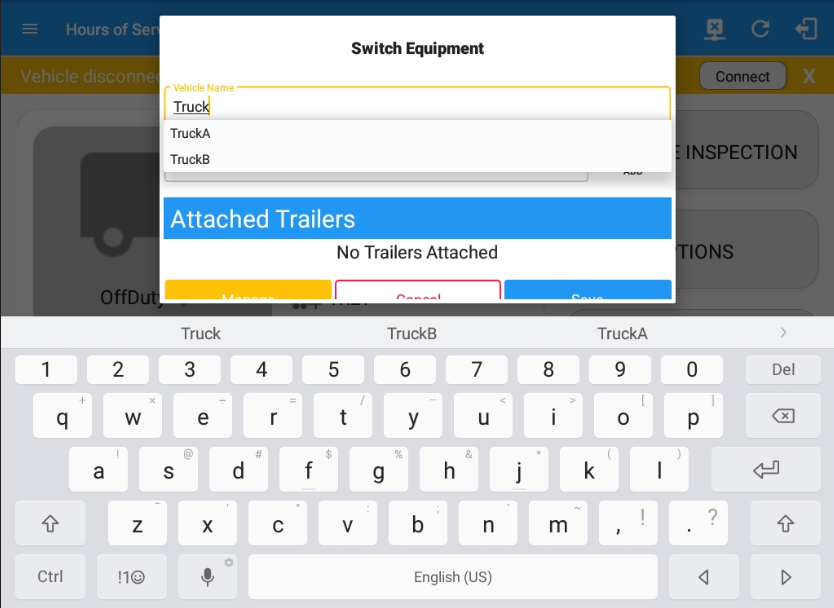
Switching Equipment
- Select Vehicle from Vehicle Name drop down list.
- Select trailer from Trailer Name drop down list.
- Tap on the Add button to add the selected trailer to the list of Attached Trailers. Tap on the X button on the right side of the Trailer to remove it from the list.
- Tap the OK button to switch equipment successfully. To exit Switch Equipment form, tap the Cancel button.
Note: When the vehicle is in motion, neither the main driver nor a logged in co-driver is allowed to switch trucks.
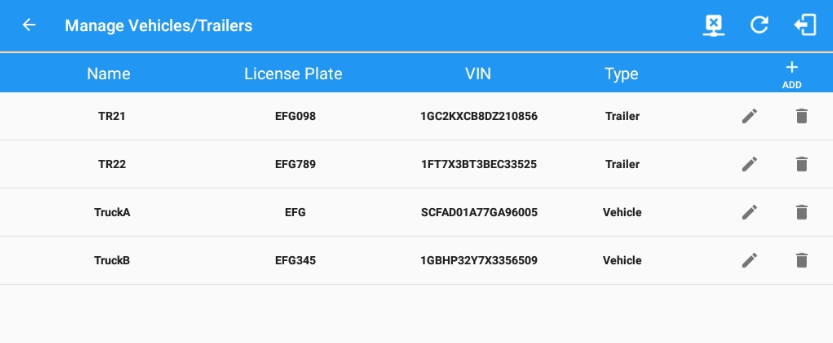
Managing Vehicles/Trailers
You can add, update and delete Vehicles/Trailers by tapping the ![]() Manage button which will then display the Manage Vehicles/Trailers screen.
Manage button which will then display the Manage Vehicles/Trailers screen.
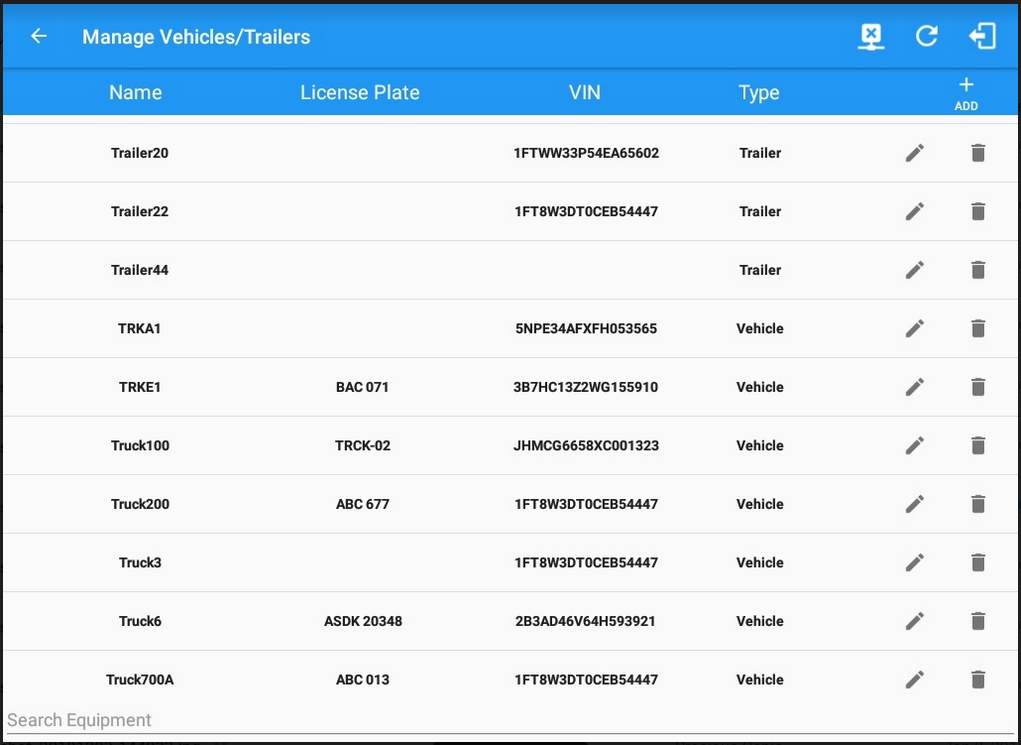
Note:
- The 'Manage' button is only available given a situation, that the driver is an asset admin and that the Allow drivers to manage equipment option is both enabled in account settings and driver settings (found in Account Settings Page > Portal Controls and Driver Management Page ). Otherwise, the button will not be available on the Switch Equipment dialog. Driver can then add, edit or delete equipment via app depending on the permission set on driver setting.
- Adding Vehicle/Trailers
- Tap the
 Add button.

- Fill in the vehicle name in the Vehicle Name field.
- Fill in the VIN in the VIN field.
- Fill in the License Number in the License Plate field and its state in the License Plate State
- Select vehicle type in the Vehicle Type drop down list.
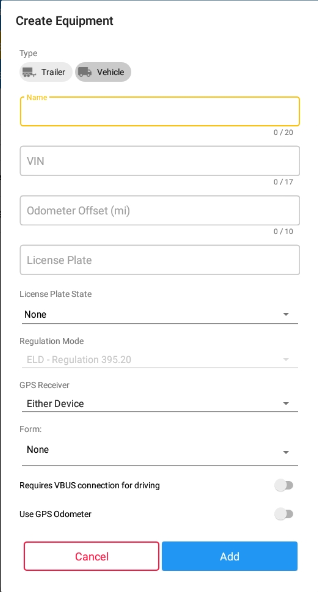
- Then, tap the Add button to successfully add the vehicle/trailer. You can also cancel adding the vehicle/trailer by tapping the Cancel button
Note:- When creating/modifying an equipment with a selected type of “Trailer”, the VIN field is also enabled but is not required when saving. VIN field does not require valid format.
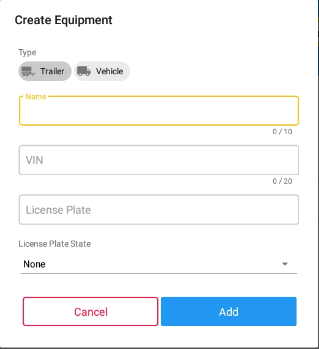
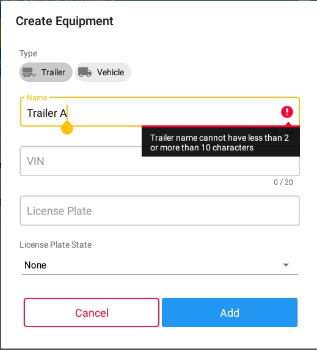
- When creating/modifying a Trailer, the name must only contain alphanumeric characters, must not have spaces nor exceed 10 characters.
- When creating/modifying an equipment with a selected type of “Vehicle”, and the Connection Type is ”Digi WVA”, then the admin password field is required.
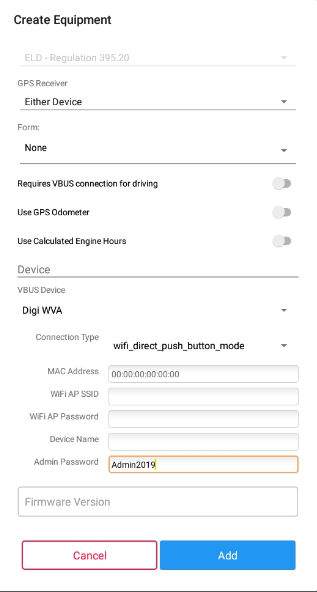
- However, if no device was selected during the creation of the equipment, the default selected device option is set to “None” and all the other fields on the ELD configuration section will be hidden.
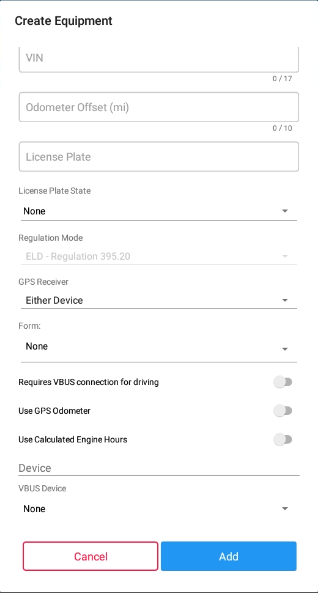
- When a vehicle does not provide engine hours and odometer values, switch on the Use GPS Odometer and Use Calculated Engine Hours
- When establishing a connection to the VBUS device, the Vehicle VIN is one of the required data elements that needs to be present in all logs and DVIRs. Currently the app initially uses the VIN if it is present in the data set received from the device. However, If the app cannot acquire the VIN from the VBUS device then it uses the one present in the Equipment which will be auto converted to capital letters when saved.
- A Regulation Mode option to switch between 395.15 (AOBRD) and 395.20 (ELD) support is available. When 395.15 (AOBRD) mode is selected it turns off all 395.20 (ELD) features. It simply records the drivers’ events regardless to the FMCSA rules. By default, ELD is set as the regulation mode for all new equipment.
- Drivers on the app cannot change the Regulation Mode unless the driver is allowed to do so by enabling the account control within the Account Settings under App Controls > ‘Allow drivers to specify vehicle HOS Regulation Mode (AOBRD or ELD)'.
- When in AOBRD mode, disable the data transfer button in the Options screen and changed the button to ‘Email Logs’ in the Roadside Inspection
- GPS Receiver option allows the user to change how to get the device GPS positions. The GPS Receiver settings can be set in a specific vehicle in the portal's Equipment Management page.
- An Odometer Offset allows driver or personnel to adjust the odometer so that the driver will see an odometer that will match their dashboard, rather than the engine odometer. Possible scenario is when the engine is replaced and the value is not yet synchronized.
Notes:
- Odometer offset does not affect app screens like Roadside Inspection and Cerified Logs PDF.
- If the saved offset is 100, and the logs have odometer values of 10, 20, 30, 40, will display to the driver 110, 120, 130, 140 (Odometer + Offset).
- If the offset is 100, and the driver edits an event to change the odometer from 140 to 130, will display 130 - 100 (the Offset) or 30 to the log.
- Negative entry for odometer offset field is allowed.
- Firmware version can be manually populated. For some VBUS device, it is already pre-populated.
- When creating/modifying an equipment with a selected type of “Trailer”, the VIN field is also enabled but is not required when saving. VIN field does not require valid format.
- Tap the
- Updating Vehicles/Trailers
- Tap the
 Edit button to edit Vehicle/Trailer.
- Update the appropriate fields in the Edit Vehicle/Trailer form.
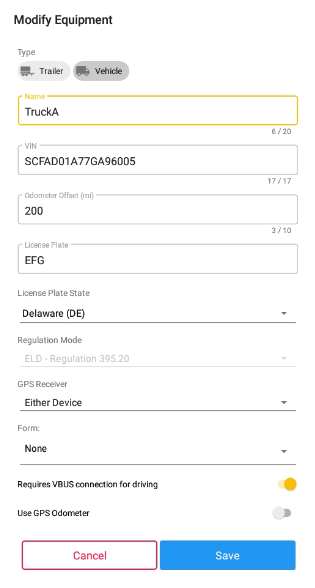
- To save the changes you made, tap the Save button. You can also cancel modifying the Vehicle/Trailer by tapping the Cancel button.
- Tap the
- Deleting Vehicles/Trailers
Tip: The current selected Vehicle/Trailer can’t be deleted- Tap the
 Delete button.
- To successfully remove the vehicle/trailer, tap the Delete button. You can also tap the Cancel button to cancel deleting the vehicle/trailer.
- Tap the
- Searching Vehicles/Trailers
On the Switch Truck dialog the driver is allowed to filter the vehicle and trailer list through text entry, ex: typing in 'Trailer 8' and seeing a list of the trailers that begin with the number 8. This feature is only available for customer who have hundreds/thousands of trailers
Note: Text entry availability starts if the total number of trailers/vehicles reached 100 or more.
- Type in the vehicle/trailer name on the vehicle/trailer field
- Type in the vehicle/trailer name on the vehicle/trailer field
Switch Driver
The Switch Driver feature allows for easy switching of drivers.
The following are the different ways to perform a Switch Driver action:
- Main Navigation Menu
- Swipe from the left edge of the screen, or tap the Main Navigation Menu icon to show the Main Navigation Menu.
- Tap on the highlighted portion on top stating “Tap to add or change driver”

after which the ‘Switch Driver’ screen will then be displayed.
- Tap the
 to add another driver, this will redirect the HOS app to the login screen.
- Swipe from the left edge of the screen, or tap the Main Navigation Menu icon
- Switch Co-Driver button (Options)
- Go to Hours of Service Main Screen.
- Tap the Options button. After which the Options screen will then be displayed.
- Tap the Switch Co-Driver button.

- From within the Choose Driver dialog, tap the driver’s name who you wish to switch to. Tap the CANCEL button to return to the Options screen.
Note: If there are no other drivers who are currently logged into the HOS app, a popup dialog will show.
You can also add a driver by tapping the LOGON CO-DRIVER button.
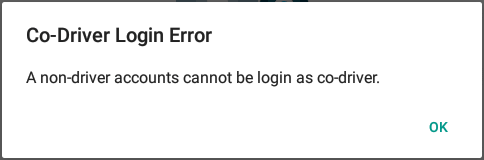
Notes:- Personnel accounts cannot be Co-Drivers. Only authenticated users with a Driver role are allowed to log-in as Co-Driver.
- The Co-Driver must enter his/her Username & Password and then tap the Login button to continue, he/she will then be logged on successfully and the Hours of Service Main Screen will display their log details.
- Displaying the Team Driving buttons such as 'LOGON CO-DRIVER' and 'SWITCH CO-DRIVER' are based on the value set on its account property. Having a value of false will disable the buttons and will not display it.
- When logging in a Co-Driver, the default Truck and Trailer value will be the current Truck and Trailer value of the Main Driver.
- Also the HOS app will always ask for the password every time a co-driver switch to active .
- Go to Hours of Service Main Screen.
By checking the Make Primary Driver checkbox, you can set the switching driver to be the primary driver.- In addition, the Co-Driver’s name is displayed in the daily logs which is placed under the grid chart.

- (Per FMCSA, (a) ELD must provide an account secure access to data recorded and stored on the system by requiring user authentication during system login. Driver accounts must only have access to data associated with that driver, protecting the authenticity and confidentiality of the collected information.)
Team Driving
Team Driving is the ability for two or more drivers to work in tandem which enables them to cover longer routes in a shorter amount of time. This also enables them to deliver goods/products to customers in the fastest amount of time possible while minimizing driver fatigue and other safety risks.
Each driver can login to the app and can monitor his daily working status as given in the example below:
- Tap on the Change Current Status button.
- Select Driving as the driver duty status from the status options.
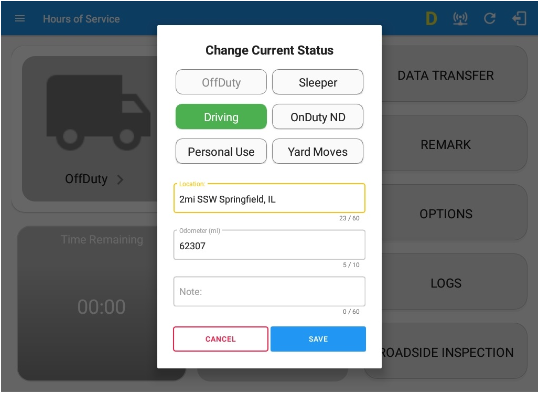
Note: The Driving status option is only available for the main Driver (currently using the application). The Driving status option is not available for the Co-Driver on a Review Mode.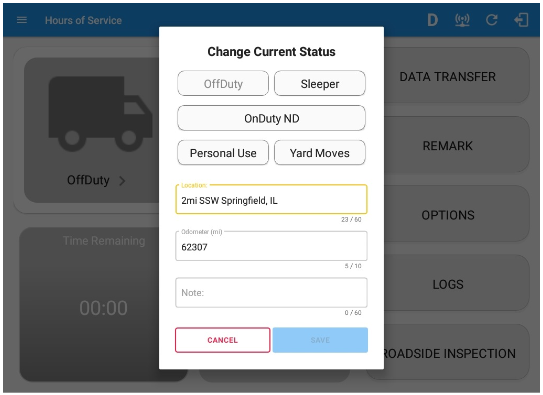
- Tap SAVE button and status will be changed successfully.
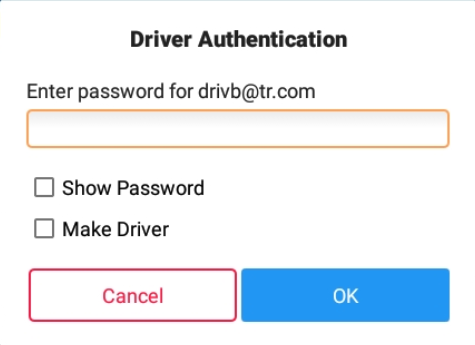
Make Driver
When a Co-Driver is on Review Mode and that the vehicle is not in motion, the Make Driver option is available to make the Co-Driver as the main Driver.
- Logging in a Co-driver
(See Switch Driver Tab for the steps.)
- Tap on the Make Driver button to display the Make Driver dialog with a Yes or No confirmation.
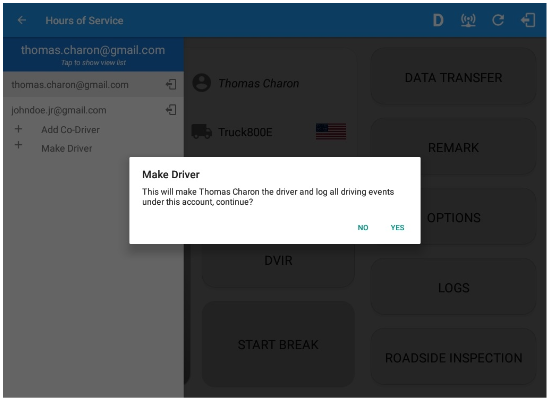
- If Yes is tapped
- It will restart the vbus service again then makes the Co-Driver as the main Driver.
- When the Co-Driver is now the main Driver, the Make Driver option will no longer be available for the said account.
- If No is tapped
- It will close the dialog
Notes:- The Make Driver option will not display if the main Driver (currently using the application) status is Driving. Instead, it will display Cannot Change Driver While Driving.

- Switch back to the main Driver’s account. On the Driver’s list, the Make Driver option is not visible.
- But when tapping the Co-Driver’s email address and current status of the main Driver is not in Driving, the Make Driver option is available within the Driver Authentication dialog.
- If Yes is tapped
Logging in as Review Mode
In Team Driving, a Co-Driver is allowed to review his data by logging in as Review Mode.
- Restrictions
- Driving Notifications and alerts will not pop-up, anything which relates to the main Driver.
- The lock screen is disabled even if the vehicle is in motion.
- Switching of vehicles is prohibited, attempts to switch vehicle while:
- the vehicle is not in motion, will display a toast message stating, Switch failed, only the current driver can switch equipment.
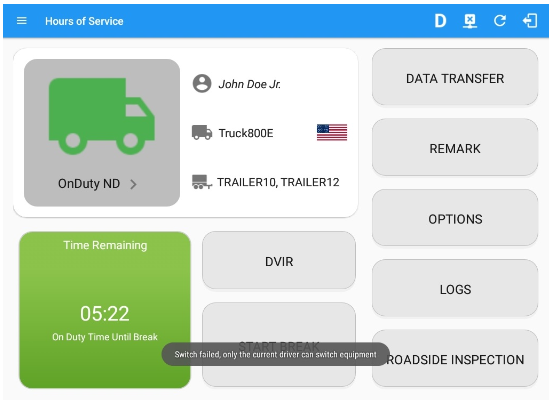
- the vehicle is in motion, will display an error message stating, Currently driving, cannot switch vehicle.
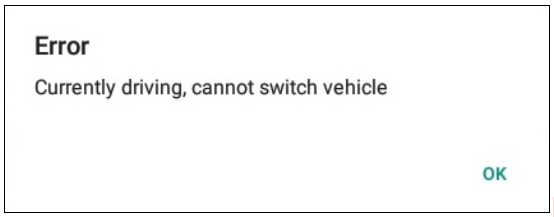
Note: The switch truck option in the left menu is no longer available.
- the vehicle is not in motion, will display a toast message stating, Switch failed, only the current driver can switch equipment.
- Changing the current event status to Driving is not allowed. Therefore, the Driving event status is no longer available on the status options.
- The Vehicle Data Settings is no longer available in Review Mode, to prohibit updates on the preferences related to background services (vbus preferences, tracking preferences, etc.).
- Accepting a Requested Driving event is also not allowed. Attempts to accept or reject the Driving event will display an error dialog stating, Only Primary Driver can switch to Driving as current status.
- Access
- The Co-Driver logging in the Review Mode can still receive Pending Edit Requests.
- Notifications and alerts for Malfunctions and Data Diagnostics events are still available.
- Modifying the previous logs are still allowed.
- Can still change the current event to OnDuty ND, OffDuty, Sleeper Berth except for Driving event.
Documents
The Document’s feature provides an easy way to capture and view documents related to hours of service activities. This includes documentation such as bill of lading, accident photo, etc.
The following are different ways to go to the Document’s Screen:
- Main Navigation Menu
- Swipe in from the left edge of the screen, or tap the Main Navigation Hamburger icon to show the main navigation menu.
- Tap the Documents option in the Main Navigation Drawer, after which the documents screen will then be displayed.
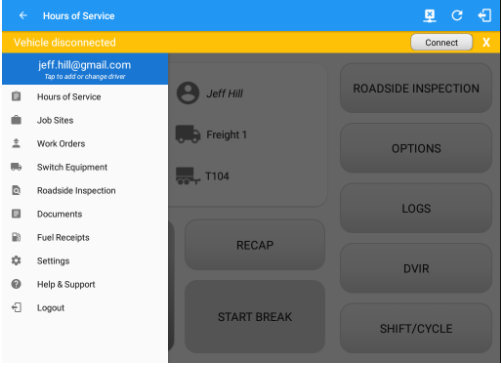
- Swipe in from the left edge of the screen, or tap the
- Driver Options
- Go to Hours of Service Main Screen.
- Tap the Options button.
- Tap the Add Document button.

- After which the Documents screen will then be displayed.
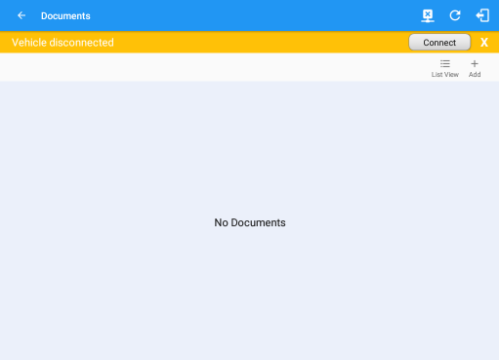
Tip: You can change the documents’ view to either “List View” or “Grid View”.
Adding Documents
- Tap the
 Add button.
 - The camera app will then appear to take a picture of the document.
- After tapping the Capture Image button, select the Check mark button to save the image and add it to your document. You can also discard the captured image by selecting the X mark button.
- Select what type of document you wish to report by tapping the Document Type drop down list.
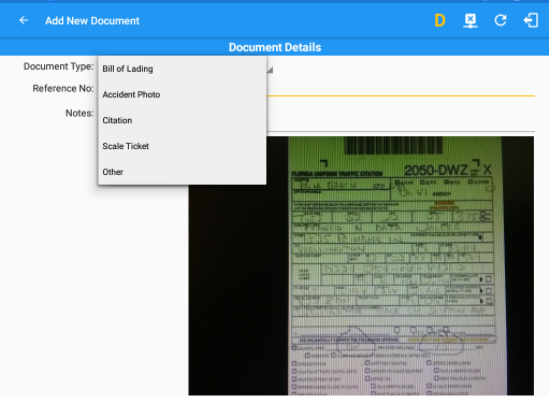
- Provide the document information
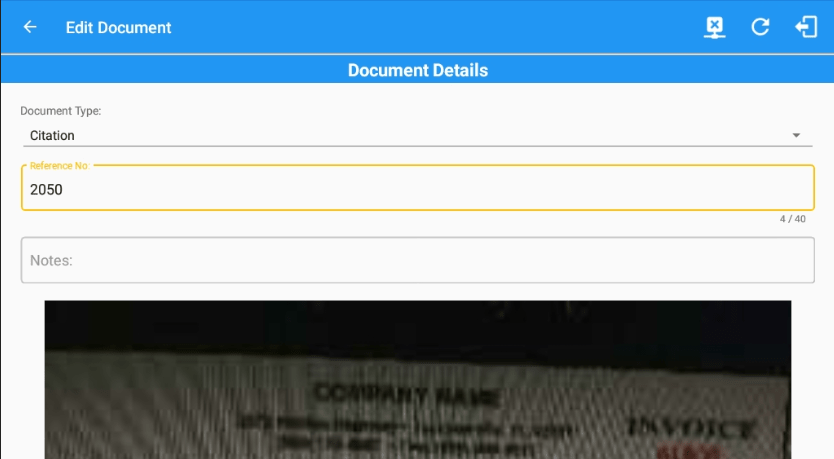
- Fill in your reference number in the Reference No. field.

- Fill in the Notes field for your notes/remarks.

- After filling in all the fields you can now tap the
 button to successfully add the document.
You can also tap the button to cancel adding the document.
- Fill in your reference number in the Reference No. field.
Updating and Deleting a Document
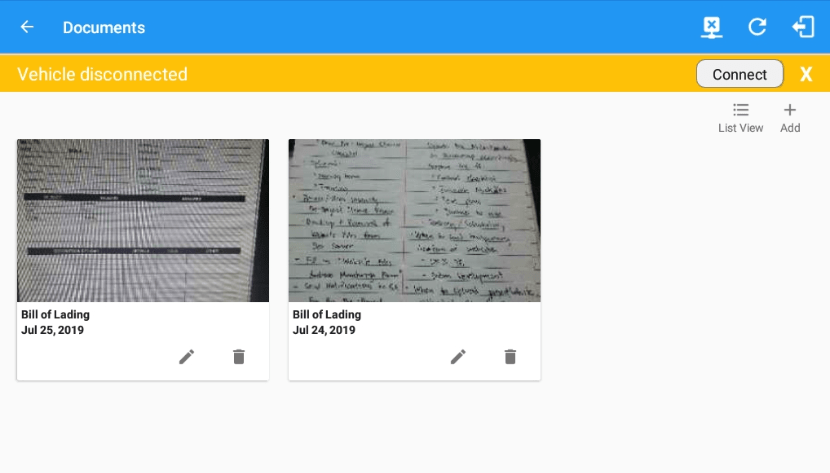
- Updating a Document
- Tap the
 Edit button of a specific document.
 - You can update the appropriate areas on the Edit Document screen.
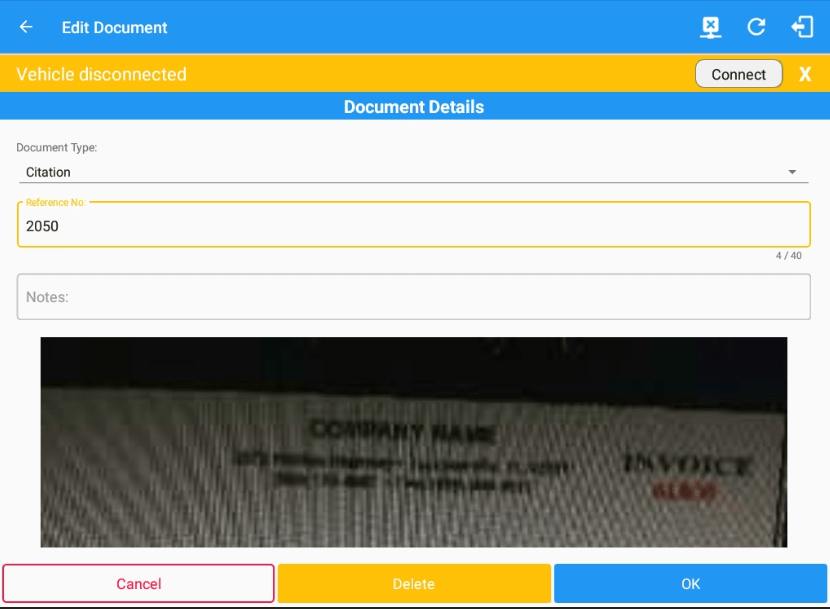
- Tap the Ok button to save the changes you made in the document.
Tap the Cancel button to cancel modifying the document. You can also delete the document by tapping the  Delete button.
- Tap the
- Deleting a document
- Tap the
 Delete button of a specific document.
 - A message dialog will prompt asking for a confirmation either you want to successfully delete the document or not.
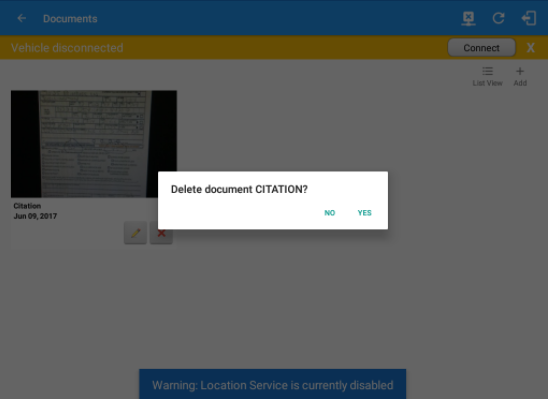
- Tap the Yes button to successfully delete the document. You can also tap the No button to cancel deleting the document.
- Tap the
Fuel Receipts
The Fuel Receipt’s feature provides an easy way to capture and view fuel receipts purchased related to hours of service activities.
- Main Navigation Menu

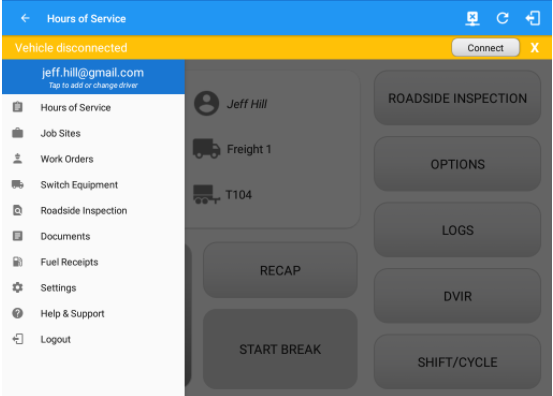
- After which the Fuel Receipts screen will then be displayed.
Tip:You can change the documents’ view to either “List View” or “Grid View”.
Adding a Fuel Receipt
- Tap the Add button.
- The camera app will then appear to take a picture of the fuel receipt.
- After tapping the Capture Image button, select the OK button to save the image and add it to your document. You can also discard the captured image by selecting the RETRY button.
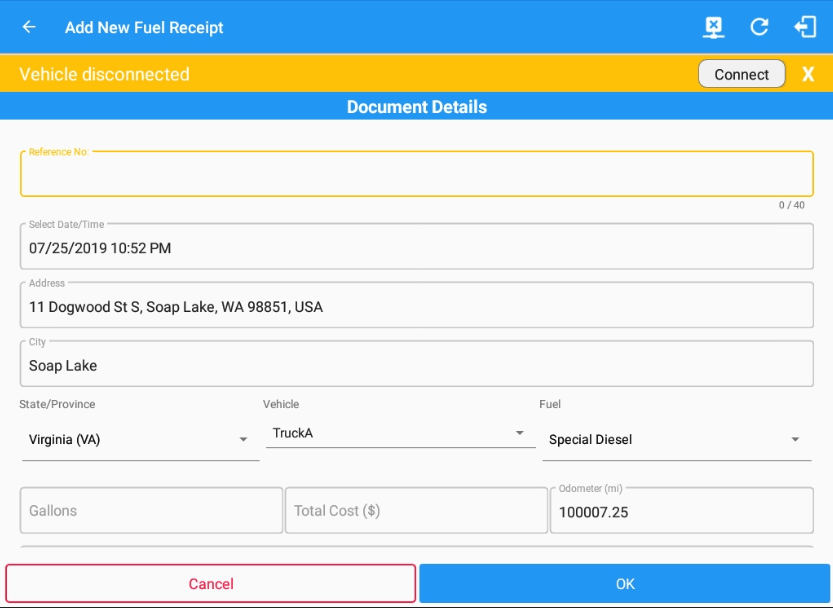
Note: Address, City and State/Province are pre-populated when location is captured. Unlike adding a document (e.g Citation or Bill of Lading), additional fields will be displayed when adding a Fuel Receipts. - Fill in the necessary information.
- Select a state.
- If the state selected is in US, the odometer and volume unit display is in Mi & Gallons.
- If the state selected is in Canada, the odometer and volume unit display is in KM & Liters.
- Select the Vehicle.
- Select a Fuel Type.
- Gallons and Total Cost values are required.
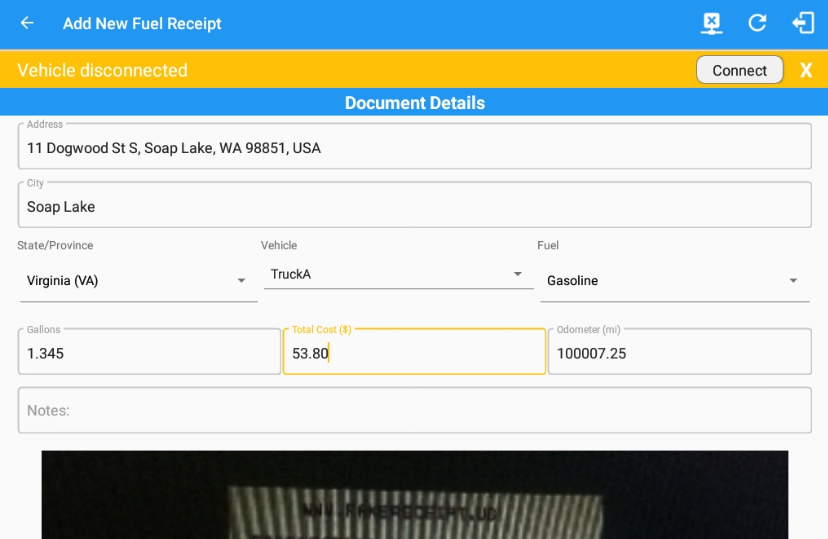
- Fill in the Odometer value (optional, this automatically populated with the odometer provided by the VBUS device)
- Fill in your reference number in the Reference No. field.

- Fill in the Notes field for your notes/remarks.

- After filling in all the fields you can now tap the
 button to successfully add the document.
You can also tap the button to cancel adding the fuel receipt.
Notes: For every Fuel Receipt created via the App Fuel Receipt feature, it creates a Remark event, found on the Edit Logs screen, with a note "Purchased 1.345 gallons at $53.80 price (sample note for the above purchased).
- Select a state.
Updating and Deleting a Fuel Receipt
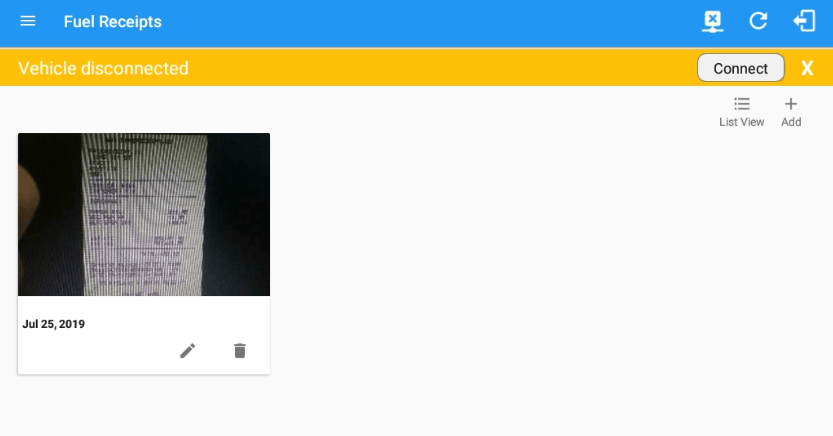
- Updating a Fuel Receipt
- Tap the
 Edit button of a specific document.
 - You can update the appropriate areas on the Edit Fuel Receipt screen.
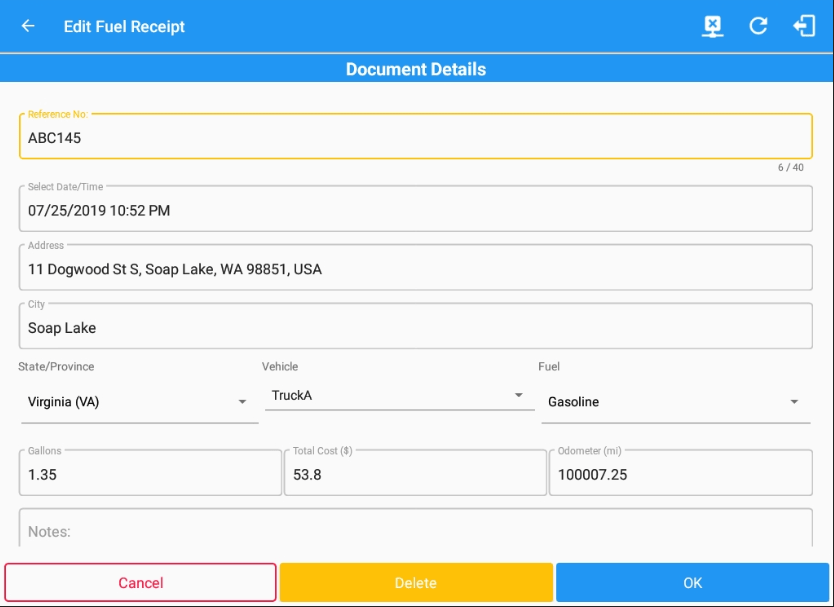
- Tap the Ok button to save the changes you made in the fuel receipt.
Tap the Cancel button to cancel modifying the fuel receipt. You can also delete the fuel receipt by tapping the  Delete button.
- Tap the
- Deleting a Fuel Receipt
- Tap the
 Delete button of a specific fuel receipt.
 - A message dialog will prompt asking for a confirmation either you want to successfully delete the fuel receipt or not.
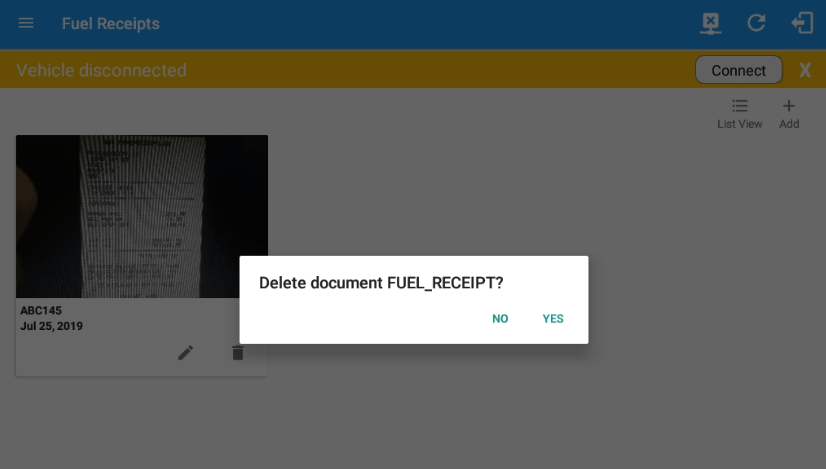
- Tap the Yes button to successfully delete the fuel receipt. You can also tap the No button to cancel deleting the fuel receipt.
- Tap the
Preferences/Settings Menu
This is where the basic driver, vehicle, carrier and shipping data is entered and stored. The identification data stored here is then used by the HOS app, web portal and in the Driver’s Daily Log report.
After Logging In to the HOS app For The First Time
When the app is used for the first time, the driver is taken directly to the Main Dashboard after which a Select Equipment dialog box will be displayed. It will continue to display until the user chooses a specified vehicle and trailer(s) to use. User can select option ‘None’ to use the app without selecting a vehicle.

If you are logging in to the device you have logged in to before, the driver can login and logout successfully to the app when an internet connection is not available.
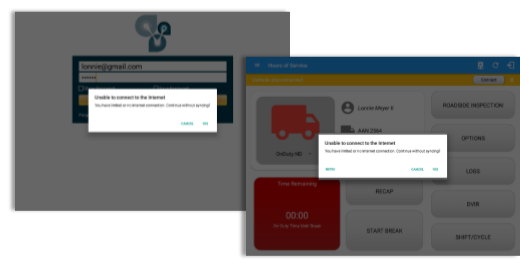
Using the Hours of Service Settings Module At Any Time
The HOS app’s user can view the Driver Information and update his/her password and signature:
- Viewing the Driver Information
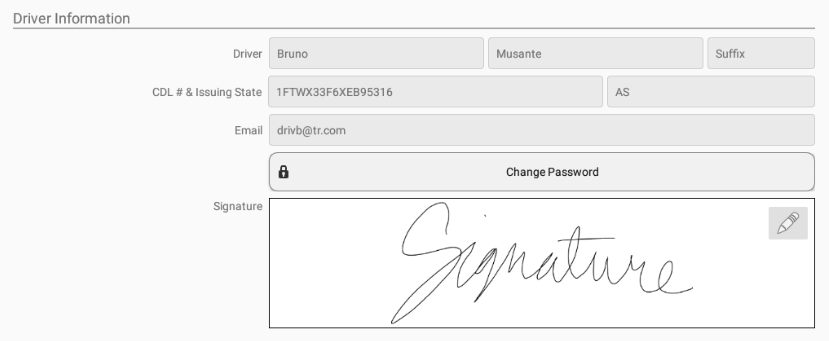
Note: The email cannot be updated. This is only available for view after setting it up after initial login. - Changing the Driver’s password
- Tap the Change Password button to launch the dialog
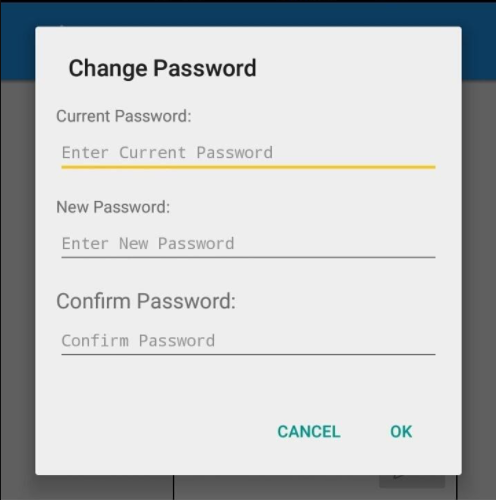
- Tap the Ok button to save your changes
- Tap the Change Password button to launch the dialog
Capturing the Driver’ Signature
The HOS app can capture the signature of the driver which is used for digitally certifying a log.
- The Driver Information section of the screen will be displayed along with any signature that has been created for the driver. Tap on the
 Create/Update Signature button.
 - Create/Update your signature in the HOS app by using your finger to create your signature.
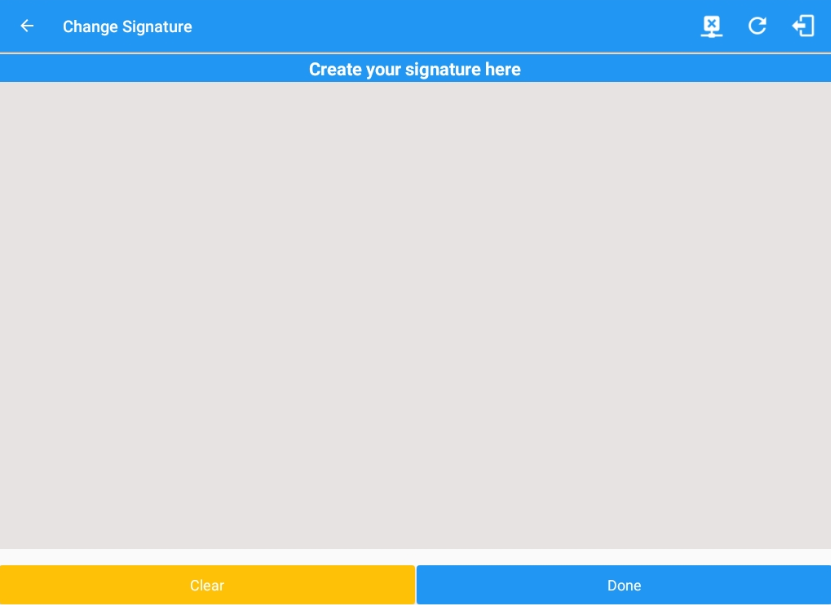
- Tap the Done button to save your signature. You can also select the Clear button to clear the captured signature and start again.
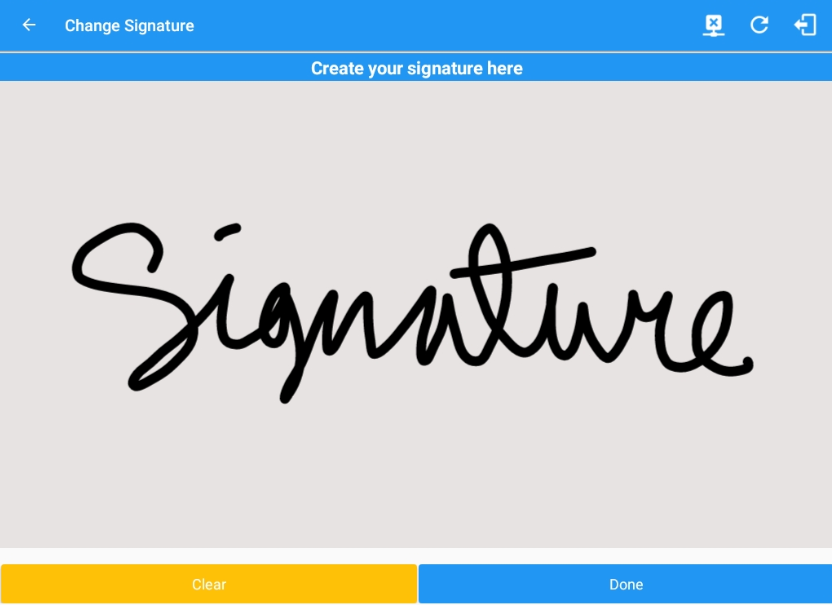
Customizing the Carrier Information
The Carrier Information can be set in this section. Fill in the following fields to set the carrier information required by the HOS app:
- Carrier
- Carrier
- Carrier DOT No.
- Street
- City
- State
- Zip
- Phone Number
- Home Terminal
- Street
- City
- State
- Zip
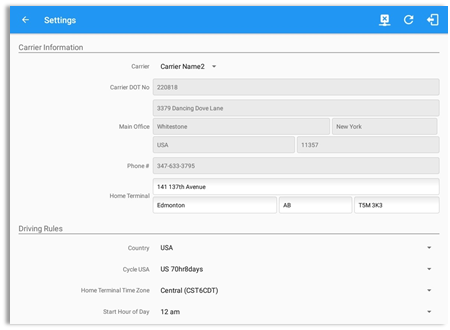

Note: Drivers have the ability to select a Carrier on the mobile device when the Account enabled the ' Allow driver editing of carrier information' which can be seen in the portal->settings->account settings under Carrier Information and enabled the 'Allow carrier change' in the portal->settings->drivers then edit the selected driver.
Driving Rules
This is where you change the HOS rules or the Federal Motor Carrier Safety Administration’s (FMCSA) regulations that govern the hours that a commercial vehicle driver can legally accumulate driving or being on duty for a motor carrier in a working day and week. This is where you also apply the HOS rules exceptions. Select the HOS rules that you would like the HOS app to use in the appropriate drop-down list. You can customize cycle, cargo, exceptions and time zone rules.
The driving rules can also be set from within the Hours of Service section (main navigation hamburger > Settings > Hours of Service). You can scroll the screen down to the Driving Rules section:
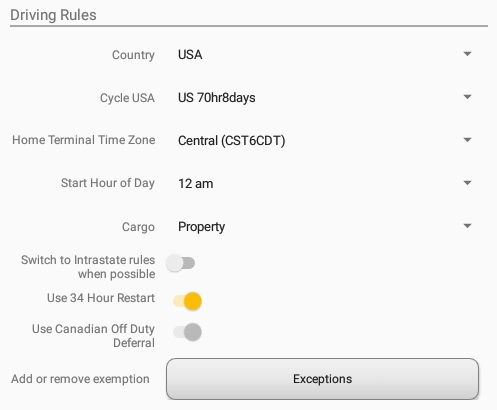
Select the appropriate HOS rules that you would like the app to use from the drop-down list. You can customize the region, cycle, cargo, exceptions and time zone rules
- Cargo - this will set the applicable HOS rules for property-carrying or passenger-carrying commercial vehicles.
Available Cargo Rules Options:- Property: the 11 and 14 hours rule will then apply
- Passenger: the 10 and 15 hours rule will then be used by the HOS app
Either of the above cargo rules can be applied by selecting the appropriate rule from the drop down
Cycle - this is where you set the consecutive multi-day duty period which the driver will follow. Choosing a cycle will take into effect the corresponding legal limitations on the hours that can be used by the driver in a 7-day or 8-day working cycle. The cycle changes depending on the Country selected. Also, the cycle being used is included in the driver's Certified Logs.
Available USA Cycle Rules Options:
Cycle | Shift Limit | Drive Limit | Until Break | Break Left | |
US60hr7days | 7 days | 14 hours | 11 hours | 8 hours | 30 minutes |
US70hr8days | 8 days | 14 hours | 11 hours | 8 hours | 30 minutes |
Alaska70hr7days | 7 days | 20 hours | 15 hours | 8 hours | 30 minutes |
Alaska80hr8days | 8 days | 20 hours | 15 hours | 8 hours | 30 minutes |
California80hr8days | 8 days | 16 hours | 12 hours | N/A | N/A |
Intrastate Cycle Rules
Cycle | Shift Limit | Drive Limit | Break Limit | |
Alabama60hr7days | 7 days | 15 hours | 10 hours | N/A |
Alabama 70hr8days | 8 days | 15 hours | 10 hours | N/A |
Florida 70hr7days | 7 days | 16 hours | 12 hours | N/A |
Florida 80hr8days | 8 days | 16 hours | 12 hours | N/A |
Illinois 60hr7days | 7 days | 14 hours | 11 hours | N/A |
Illinois 70hr8days | 8 days | 14 hours | 11 hours | N/A |
Maryland 70hr7days | 7 days | 16 hours | 12 hours | N/A |
Maryland 80hr8days | 8 days | 16 hours | 12 hours | N/A |
Massachusetts 60hr7days | 8 days | 14 hours | 11 hours | N/A |
Massachusetts 70hr8days | 8 days | 14 hours | 11 hours | N/A |
Michigan 60hr7days | 7 days | 14 hours | 11 hours | 30 minutes |
Michigan 70hr8days | 7 days | 14 hours | 11 hours | 30 minutes |
New Hampshire 60hr7days | 7 days | 14 hours | 11 hours | N/A |
New Hampshire 70hr8days | 8 days | 14 hours | 11 hours | N/A |
New York 60hr7days | 7 days | 14 hours | 11 hours | N/A |
New York 70hr8days | 8 days | 14 hours | 11 hours | N/A |
North Carolina 70hr7days | 7 days | 16 hours | 12 hours | N/A |
North Carolina 80hr8days | 8 days | 16 hours | 12 hours | N/A |
North Dakota 70hr7days | 7 days | 16 hours | 12 hours | N/A |
Pennsylvania 60hr7days | 7 days | 14 hours | 11 hours | N/A |
Pennsylvania 70hr8days | 8 days | 14 hours | 11 hours | N/A |
South Carolina 70hr7days | 7 days | 16 hours | 12 hours | N/A |
South Carolina 80hr8days | 8 days | 16 hours | 12 hours | N/A |
Tennessee 60hr7days | 7 days | 14 hours | 11 hours | N/A |
Tennessee 70hr8days | 8 days | 14 hours | 11 hours | N/A |
Texas 70hr7days | 7 days | 15 hours | 12 hours | N/A |
Wisconsin 70hr7days | 70 days | 16 hours | 12 hours | 30 minutes |
Wisconsin 80hr8days | 80 days | 16 hours | 12 hours | 30 minutes |
Vermont 60hr8days | 7 days | 14 hours | 11 hours | N/A |
Vermont 70hrs8days | 8 days | 14 hours | 11 hours | N/A |
Virginia 70hr7days | 7 days | 16 hours | 12 hours | N/A |
Virginia 80hr8days | 8 days | 16 hours | 12 hours | N/A |
Canada Cycle Rules
Cycle | Shift Limit | Drive Limit | Break Limit | |
Canada 70hr7days South | 7 days | 16 hours | 13 hours | N/A |
Canada 120hr14days South | 7 days | 16 hours | 13 hours | N/A |
Canada 80hr7days North | 7 days | 20 hours | 15 hours | N/A |
Canada 120hr14days North | 7 days | 20 hours | 15 hours | N/A |
Alberta Province | N/A | 15 hours | 13 hours | 30 minutes |
- Alberta Province:
- Break:
- for a period of time of up to 4 consecutive hours if at theconclusion of driving for that period of time the drivertakes at least 10 consecutive minutes off duty or ofnon-driving time, or
- for a period of time that exceeds that permitted underclause (a) but does not exceed 6 consecutive hours if atthe conclusion of driving for that period of time the drivertakes at least 30 consecutive minutes off duty or ofnon-driving time.
Any of the above cycle rules are depending on the region selected and can be applied given the appropriate rule from the region drop down list
- Perform Intrastate Check - when enabled, the app checks when connecting to the VBUS device if the driver has been in the same state for the last 7 or 8 days (depending on the cycle). If so, a dialog will appear providing an option to go to Intrastate Driving Rules.
In addition to Intrastate Check, the app also automatically checks and switches to Interstate Driving Rules every time the driver crosses a state line and is in Intrastate mode.
- Exceptions button - tap on this button
 to open up the Add Exception dialog.
 - Add Exception dialog - the options that will appear here will allow the driver to avail of exceptions from the HOS rules for as long as certain conditions are met as stipulated in the Hours of Service section of the Code of Federal Regulations (49 CFR Part 395.1 - Hours of Service of Drivers - Scope of rules in this part) and other pertinent FMCSA regulations. Tap on the OK button to apply your exception/s. You can also select the Cancel button to disregard the changes you made.
Available US Exception Options:
- Relief from Driving rules for State of Emergency – 390.23
- 2 Hour Driving Extension for Adverse Driving Conditions – 395.1(a)(1)
- Relief from all driving rules for Emergency Conditions – 395.1(b)(2)
- Driver-salesperson whose total driving time does not exceed 40 hours in any period of 7 consecutive days
- Oilfield Operations with 24 hour restart – 395.1(d)
- 30 Minute Break Exemption for Short-haul Drivers (14 hour shift) – 395.1(e)(1)
- No Logs for CDL Short-haul Drivers operating within 100 air miles (12-hour shift)
- No Logs for Short-haul Asphalt, Ready-Mixed Concrete Drivers or Non-CDL-Drivers operating within 150 air miles (14-hour shift)
- No Logs for Agricultural Operations – 395.1(k)
- 24 Hour Restart for Construction, Groundwater well-drilling – 395.1(l)(m)
- Relief from All Driving Rules for Utility Service Vehicle – 395.1(n)
- 16 Hour Driving Windows – 395.1(o)
Note: ‘16 Hour Work Shift Once Per Week’ exception can only be used once for the last 7 days or in every 70hr cycle, if the driver attempted to enable the exception an error dialog will display stating the following:
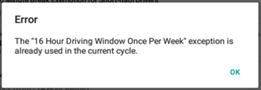
However, it is possible for the driver to add another ‘16 Hour Work Shift Once Per Week’ exception when a cycle reset has occurred. Nevertheless, the driver will need to wait for the current cycle to end to be able to add the exception again.
- 30 Minute in-attendance break for HazMat drivers – 395.1(q)
- 30 Minute OnDuty break for Asphalt drivers
- 30 Minute Break Exemption for Commercial Bees, Livestock Transportation – 395.1(u,v)
- Hi-rail 2 hour travel exclusion – 395.1(w)
- 30 Minute Break Exemption for Oversize/Overweight Loads – 395.3(a)(3)(ii)
- 30 Minute Break Exemption for Petroleum Tank Drivers – FR Vol83No68
- No Logs for Non Commercial Motor Vehicle
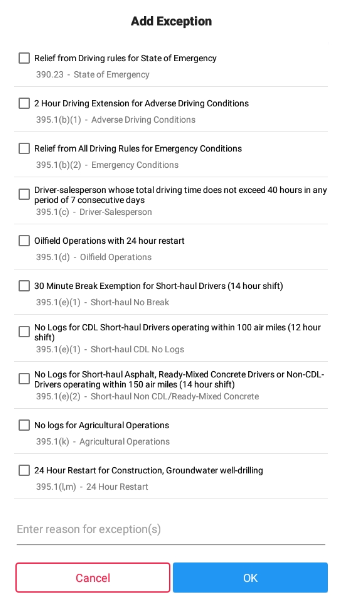
Select the appropriate exception from the list; you must then enter a reason for applying the exception in the Enter reason for exception(s) field. Once complete, select the OK option to apply the selected exception
Note: Exceptions are different depending on the Region selected.
- Available Canada Exception Options:
- 2 Hour Driving Extension Special Permit – Section 62
- Oil Well Service Permit – Section 63
- CanEmergency Conditions – Section 76(1)
- Relief from all Driving Rules for Emergency Conditions – Section 76(2,3)
- No Logs for drivers operating within 160km of home terminal – Section 81
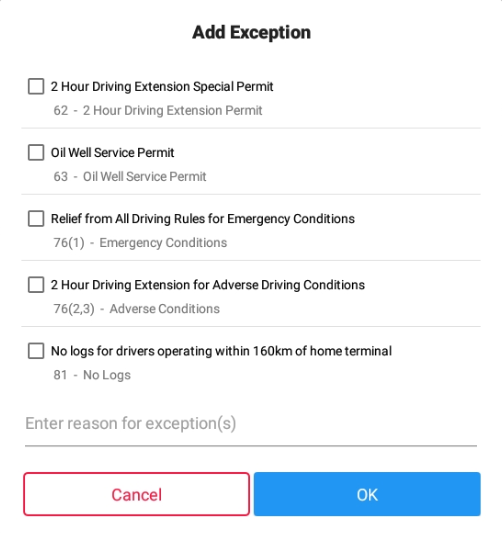
- Relief from All Driving Rules for Emergency Conditions– Section 76(1)
- 2 Hour Driving Extension for Adverse Driving Conditions – Section 76(2,3)
- No Logs for drivers operating within 160km of home terminal – Section 81
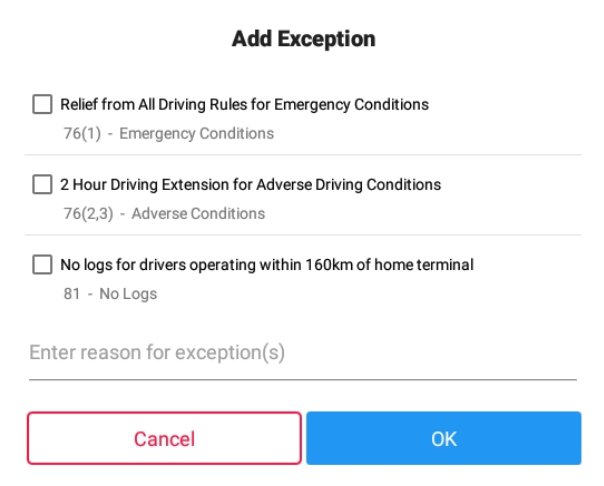
Note: Exceptions differ by Country - Reason for Exceptions - this is where you input the reason for applying the exception.
- Time Zone - this sets the time zone to be used by the HOS app.
Available Time Zone Options:
Select the driver’s Home Terminal time zone. Time zones available are:
- Eastern Time (EST5EDT)
- Central Time (CST6CDT)
- Mountain Time (MST7MDT)
- Pacific Time (PST8PDT)
- Canada/Newfoundland
- Atlantic
- America/Anchorage
- Asia/Manila
- Hawaii
- Saskatchewan
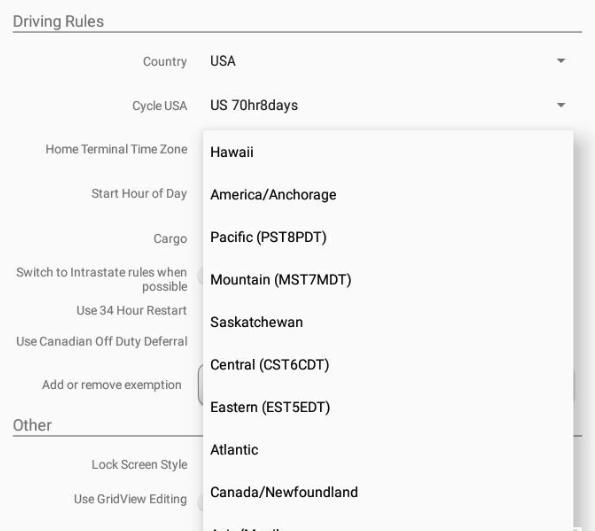
- Start Hour of Day - these option enables the motor carrier to set an hour to start their day. By default the time is set to 12AM. Whenever the time is changed the Start Hour Time in the daily logs grid chart also changes.
- Country - these option enables you to set the country in which you're located. The list displayed in the cycle is based on the country selected.
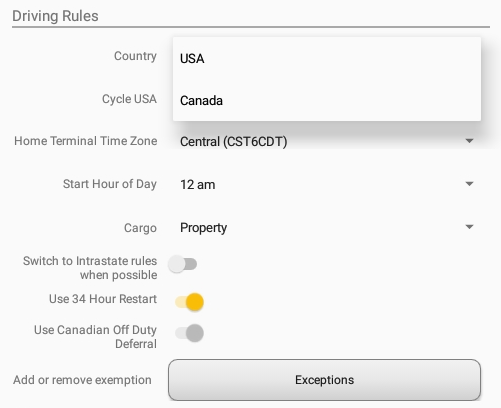
Note: When the Country is in US, you can enable/disable the 34 Hour Cycle Reset. The Cycle Reset status is shown on the Driver’s Daily Logs.
Lock Screen Style
When a vehicle is determined to be moving via VBUS data, the HOS app's screen locks and displays a lock screen. Tapping the screen doesn’t perform any action until the vehicle is stopped. The lock screen also allows the driver to create Off Road and Toll Road Remarks to indicate that the vehicle has begun driving in an off road or a toll road or has returned on a normal road.
- Lock Screen Style: Select a style of screen to be displayed when the lock screen is displayed.
- Remaining to Violation - displays a screen indicating the remaining time until the next violation.
- 4 Clocks - displays a screen with four clocks displaying the Drive time left, Shift time left, Cycle time left and Time Until Break. The clocks are similar to the clocks displayed upon tapping the Time Remaining button in the Main Dashboard.
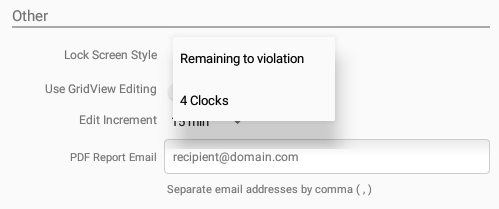
If there is a logged in Co-Driver, it is possible for him/her to view the logs and access the application, but with a very limited conditions. This can be done by tapping the Access Co-Driver Logs button at the bottom to display the co-driver login screen. This button acts the same way as accessing the logs from the Time Remaining button from the Main Dashboard. Below is a lock screen with Remaining to Violation style with a flag indicating the current ruleset in use.
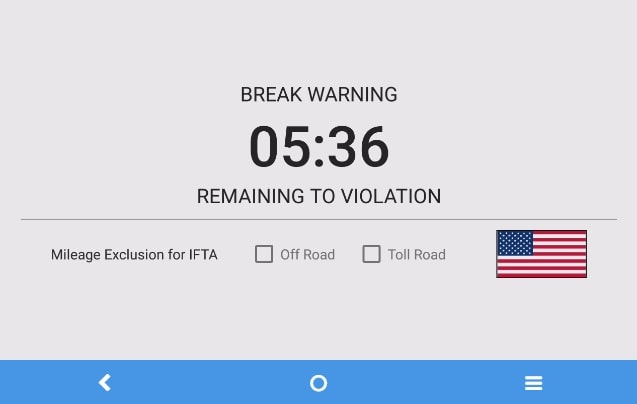
Notes:
- The vehicle movement is determined by the Movement Speed Threshold which is set to 5 Mi/hour. The Vehicle is considered moving when travelling over this speed according to the FMCSA regulations.
- For vehicle in AOBRD mode, speed threshold settings is dependent on what is set on the portal->account settings. The default value is 100 Mph/Kph. (For example: When the set AOBRD Speed Threshold is 100 Mph/Kph, lock screen will be shown and the app will be in driving state once the vehicle speed threshold reached to 100 mi/hour )
- Also, drivers have the ability to set speed threshold on the app->Vehicle Data Settings->AOBRD Speed Threshold only if the driver is allowed. To allow a specific driver, enable the option which can be seen in portal->Drivers Management Page->Set AOBRD Speed Threshold option.
Use Grid View Editing
he user has the ability to use grid view editing. Once enabled, user can also set the edit increment time. (See Section 5.2.12 Edit a Log)
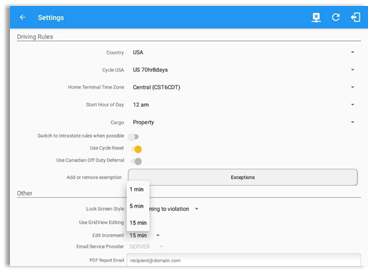
Display Street Address
Display Street address option will allow drivers to select where to get the location if it is the actual location or the nearest city with 5,000 population when in AOBRD mode. The option will only display for drivers that have permission which is set by the personnel in the portal->Account Settings under App Controls > ’Display Street Address for AOBRD mode’.
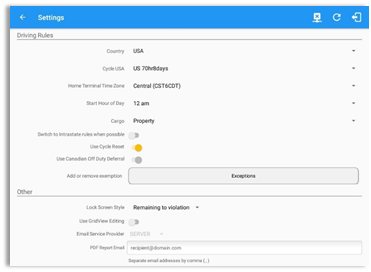
Email Sender
Email Sender option allows the driver to specify email sender when drivers’ need to send certified log PDF and DVIR report PDF. There are (2) two email sender options: App or Server. This setting can be changed on the portal -> account settings under App Controls -> Email Sender
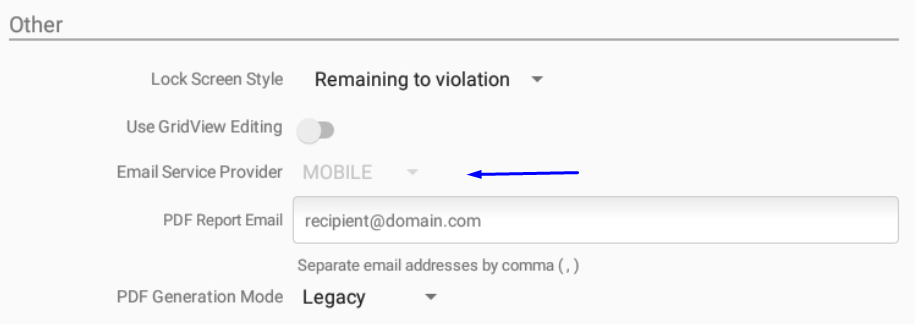
PDF Report Email Recipients
You can set the default recipients of your Driver’s Daily Log PDF report in this part of the Settings Menu.
AOBRD Speed Threshold
For vehicle in AOBRD mode, speed threshold setting is dependent on what is set on the portal->account settings under App Controls ->AOBRD Speed Threshold. The default value is 100 Mph/Kph. (For example: When the set AOBRD Speed Threshold is 100 Mph/Kph, lock screen will be shown and the app will be in driving state once the vehicle speed threshold reached to 100 mi/hour)
The AOBRD speed threshold can also be set from within the Vehicle Data Settings section (main navigation hamburger > Settings > Vehicle Data Settings > AOBRD Speed Threshold). 
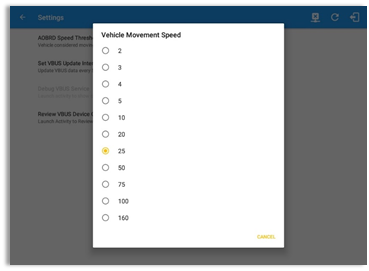

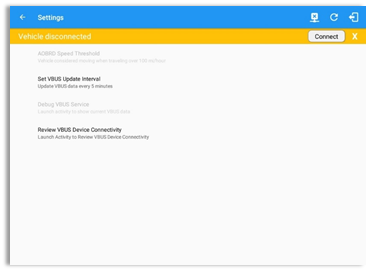
Unit of Distance
Setting the default unit of measures.
Disabling Notification Sound
The application has a Mute button to silence all sounds that could come from the application. Also, ELD rules state that all application sounds should be muted during Sleeper status. However, the mobile device should not be muted so that sound will be available for phone calls. Therefore, the application sound should be muted without muting the device sound by following the steps:
- Go to Settings
- Tap on Device
- Check on Disable Notification Sound

Note:
- When the current status is Sleeper Berth, it automatically mutes the application sound
- Application sounds include: Work Order Notifications, Alerts, VBUS connection and disconnection sounds
Color Theme
Displays option for selecting Color Theme.
![]()
![]()
![]()
![]()
![]()
![]()
![]()
![]()
Night Theme
By default, the application automatically changes to a night theme based on the sunset time calculated from the device's location. If location is not available, the local time of the device is used.
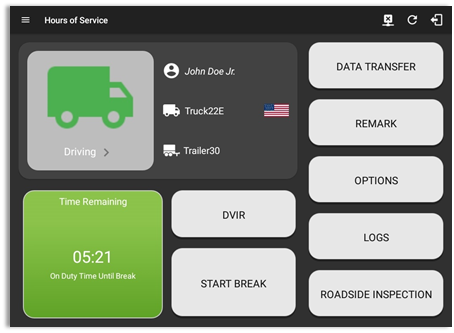
Language Support
The application supports language translation for English, French-Canadian (Francais (Canada)) and Spanish (Español (Estados Unidos)).
To enable the desired translation, select the supported language located below the Login button and the translation will take effect immediately.
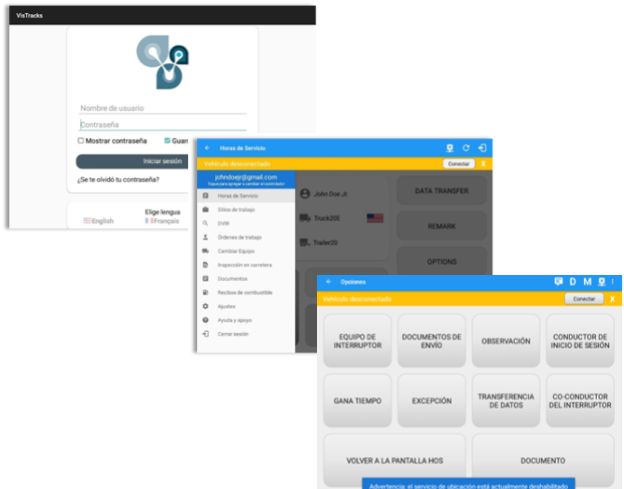
Vehicle Data Settings
- Go to Settings (swipe left to open the drawer)
- Tap on Vehicle Data Settings
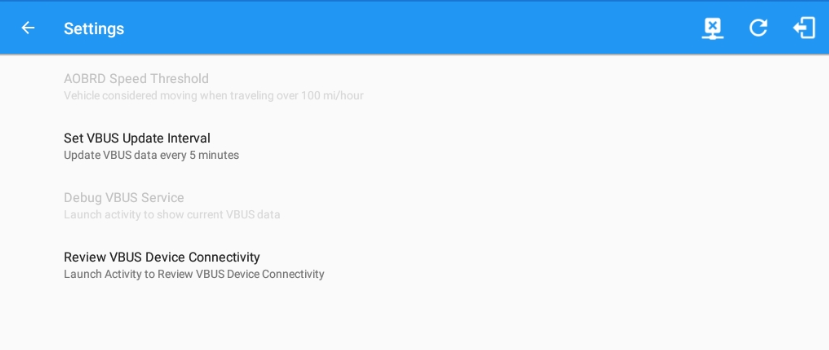
Privacy
- This screen displays the Privacy Screen
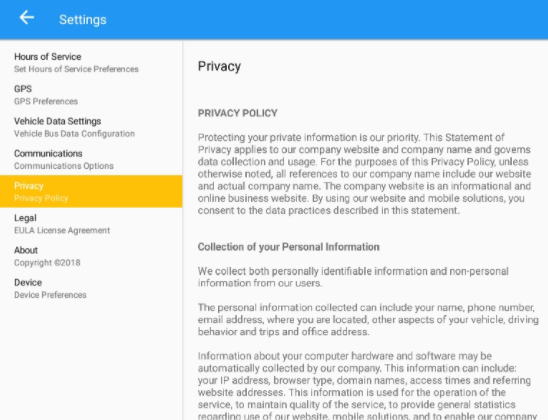
About
- This screen displays some of the necessary data about the application which includes the Brand, Build and Version numbers.
Android Device Settings
- The Application supports language translation for French-Canadian (Francais (Canada)) and Spanish (Español (Estados Unidos)). Setting up the language for the device will affect the app language. This is only applied to fixed labels and buttons.
- Go to Android Device Settings > Language and Inputs > Language.
- Select any of the three languages.
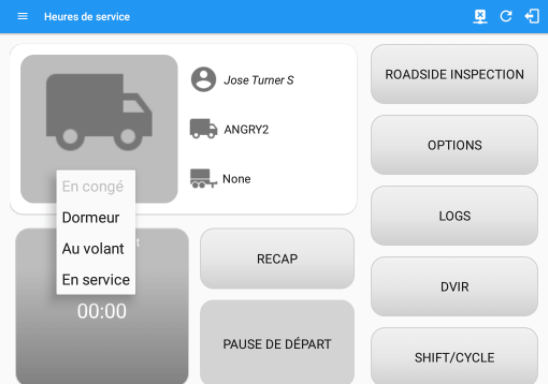
Malfunction and Data Diagnostic Events
| Malfunction Events | |||
| Requirement No. | Event Code | Event Name | Description |
| 4.6.1.1 | P / Power MF | Power Malfunction | An ELD must set a power compliance malfunction if the power data diagnostics event described in paragraph 4.6.1.1(a) of this appendix indicates an aggregated in-motion driving time understatement of 30 minutes or more on the ELD over a 24-hour period across all driver profiles, including the unidentified driver profile. |
| 4.6.1.2 | E / Sync MF | Engine Synchronization Malfunction | An ELD must set an engine synchronization compliance malfunction if connectivity to any of the required data sources specified in section 4.3.1 of this 87 appendix is lost for more than 30 minutesduring a 24-hour period aggregated across all driver profiles, including the unidentified driver profile. |
| 4.6.1.3 | T / Timing MF | Timing Malfunction | The ELD must periodically cross-check its compliance with the requirement specified in section 4.3.1.5 of this appendix with respect to an accurate external UTC source and must record a timing compliance malfunction when it can no longer meet the underlying compliance requirement. |
| 4.6.1.4 | L / Pos MF | Position Malfunction | ELD records requiring location information must use the last valid position measurement and include the latitude/longitudecoordinates and distance traveled, in miles, since the last valid position measurement.
An ELD must monitor elapsed time during periods when the ELD fails to acquire a valid position measurement within 5 miles of the CMV’s movement. When such elapsed time exceeds a cumulative 60 minutes over a 24 hour period, the ELD must set and record a positioning compliance malfunction. |
| 4.6.1.5 | R / DR MF | Data Recording Malfunction | An ELD must monitor its storage capacity and integrity and must detect a data recording compliance malfunction if it can no longer record or retain required events or retrieve recorded logs that are not otherwise catalogued remotely by the motor carrier. |
| 4.6.1.7 | S / Trans MF | Data Transfer Malfunction | (a) An ELD must implement in-service monitoring functions to verify that the data transfer mechanism(s) described in section 4.9.1 of this appendix are continuing to function properly. An ELD must verify this functionality at least once every 7 days. These monitoring functions may be automatic or may involve manual steps for a driver. (c) After an ELD records a data transfer data diagnostic event, the ELD must increase the frequency of the monitoring function to check at least once every 24-hour period. If the ELD stays in the unconfirmed data transfer mode following the next three 90 consecutive monitoring checks, the ELD must detect a data transfer compliance malfunction. |
| 4.1.6.8 | O / Other MF | Other Malfunction | In addition to the required monitoring schemes described in sections 4.6.1.1– 4.6.1.7 of this appendix, the ELD provider may implement additional, technology-specific malfunction and data diagnostic detection schemes and may use the ELD’s malfunction status indicator and data diagnostic status indicator (described in sections 4.6.2.1 and 4.6.3.1) to communicate the ELD’s malfunction or non-compliant state to the operator(s) of the ELD. |
| Data Diagnostic Events | |||
| Requirement No. | Event Code | Event Name | Description |
| 4.6.1.1 | 1 / Pwd Diag | Power Diagnostic | An ELD must monitor data it receives from the engine ECM or alternative sources as allowed in sections 4.3.1.1-4.3.1.4 of this appendix, its onboard sensors, and data record history to identify instances when it may not have complied with the power requirements specified in section 4.3.1.1, in which case, the ELD must record a power data diagnostics event for the corresponding driver(s), or under the unidentified driver profile if no drivers were authenticated at the time of detection. |
| 4.6.1.2 | 2 / Sync Diag | Engine Synchronization Diagnostic | An ELD required to establish a link to the engine ECM as described in section 4.2 must monitor its connectivity to the engine ECM and its ability to retrieve the vehicle parameters described under section 4.3.1 of this appendix and must record an engine-synchronization data diagnostics event when it no longer can acquire updated values for the ELD parameters required for records within 5 seconds of the need. |
| 4.1.6.4 (d) | 3 / Miss Diag | Missing Data Elements Diagnostic | If a new ELD event must be recorded at an instance when the ELD had failed to acquire a valid position measurement within the most recent elapsed 5 miles of driving, but the ELD has not yet set a positioning compliance malfunction, the ELD must record the character “X” in both the latitude and longitude fields, unless location is 88 entered manually by the driver, in which case it must log the character “M” instead. Under the circumstances listed in this paragraph, if the ELD event is due to a change in duty status for the driver, the ELD must prompt the driver to enter location manually in accordance with section 4.3.2.7 of this appendix. If the driver does notenter the location information and the vehicle is in motion, the ELD must record a missing required data element data diagnostic event for the driver. |
| 4.1.6.7 | 4 / Tran Diag | Data Transfer Diagnostic | (b) If the monitoring mechanism fails to confirm proper in-service operation of the data transfer mechanism(s), an ELD must record a data transfer data diagnostic event and enter an unconfirmed data transfer mode. |
| 4.6.1.6 | 5 / Unid Diag | Unidentified Driver DIagnostic | (b) If more than 30 minutes of driving in a 24-hour period show unidentified driver on the ELD, the ELD must detect and record an unidentified driving records data diagnostic event and the data diagnostic indicator must be turned on for all drivers logged in to that ELD for the current 24-hour period and the following 7 days.
(c) An unidentified driving records data diagnostic event can be cleared by the ELD when driving time logged under the unidentified driver profile for the current 24-hour period and the previous 7 consecutive days drops to 15 minutes or less. |
| 4.1.6.8 | 6 / Other Diag | Other Diagnostic | In addition to the required monitoring schemes described in sections 4.6.1.1– 4.6.1.7 of this appendix, the ELD provider may implement additional, technology-specific malfunction and data diagnostic detection schemes and may use the ELD’s malfunction status indicator and data diagnostic status indicator (described in sections 4.6.2.1 and 4.6.3.1) to communicate the ELD’s malfunction or non-compliant state to the operator(s) of the ELD. |
Actions for Malfunction & Data Diagnostic Events
Carrier responsibilities regarding malfunctions:
- Provide drivers with an instruction sheet describing the various ELD malfunction events and recordkeeping procedures (395.22)
- Provide drivers with a supply of 8 days’ worth of blank paper driver records (395.22)
- Repair, replacement, or service
- Motor carrier must correct the malfunction of the ELD within 8 days of discovery of the condition or a driver's notification to the motor carrier, whichever occurs first (395.34)
Record keeping responsibilities by the driver:
- Malfunction events
- Note the ELD malfunction and provide carrier with written notice within 24hrs (395.34)
- Reconstruct driving events for the current 24hr period and previous 7 consecutive days using paper logs (unless they can be retrieved from the ELD) (395.34)
- Continue to manually prepare driving logs until ELD is serviced and brought back into compliance (395.34)
- During inspections which take place when a malfunction has occurred: provide safety official with manually kept driver logs (395.34)
- Data diagnostic events
- Driver must follow the motor carrier's and ELD provider's recommendations in resolving the data inconsistency (395.34)
Clearing of malfunction and data diagnostic events:
- ELD needs to capture when a malfunction or data diagnostic event has been cleared by the driver (4.5.1.7)
- Unidentified driving records data diagnostic
- Events that drop to 15 minutes or less during the current 24hr period and previous 7 days can be cleared automatically and there is no requirement to record the automatic clear (4.6.1.6)